


Page 7
TimelapseCam Pro User Guide
Page 14
TimelapseCam Pro User Guide
Setting Options
When you slide the switch to Setup Mode, the LCD Display will
display the main General Setting screen. Using the navigation
process, set the features you desire. Press the
Right
or
Left
button
to begin setting the user options.
Pressing the
OK
button from this main screen will enter
Aim Mode.
SETTINGS
< OPTIONS
OPTIONS >
Setting Date and Time
Press the
OK
button. Use the
Left/Right
buttons to move
from one value to the next and the
Up/Down
buttons to
adjust each value. Press the
OK
button to lock in selections.
When all your selections have been made, and the date and
time has been set, press the
Right
button to move to the
next option.
DATE & TIME
11 / 11 / 2011
11 : 11 pm
PHOTO OR VIDEO?
VIDEO
X PHOTO
Setting Photo or Video
Press the
OK
button. Use the
Up/Down
buttons to choose
between Photo or Video.
Press the
OK
button to confirm the selection. Press the
Right
button to move to the next option.
To turn photo sequences into Time Lapse Video
Reasons you may want to create a video with your images:
• Makes it easier to e-mail your image sequences.
• Allows you to select the range of images you want included, to eliminate uninteresting images.
• Allows you to store the images as a video rather than a large number of images.
1. Download time lapse images to Time Lapse Software.
(see section on downloading images).
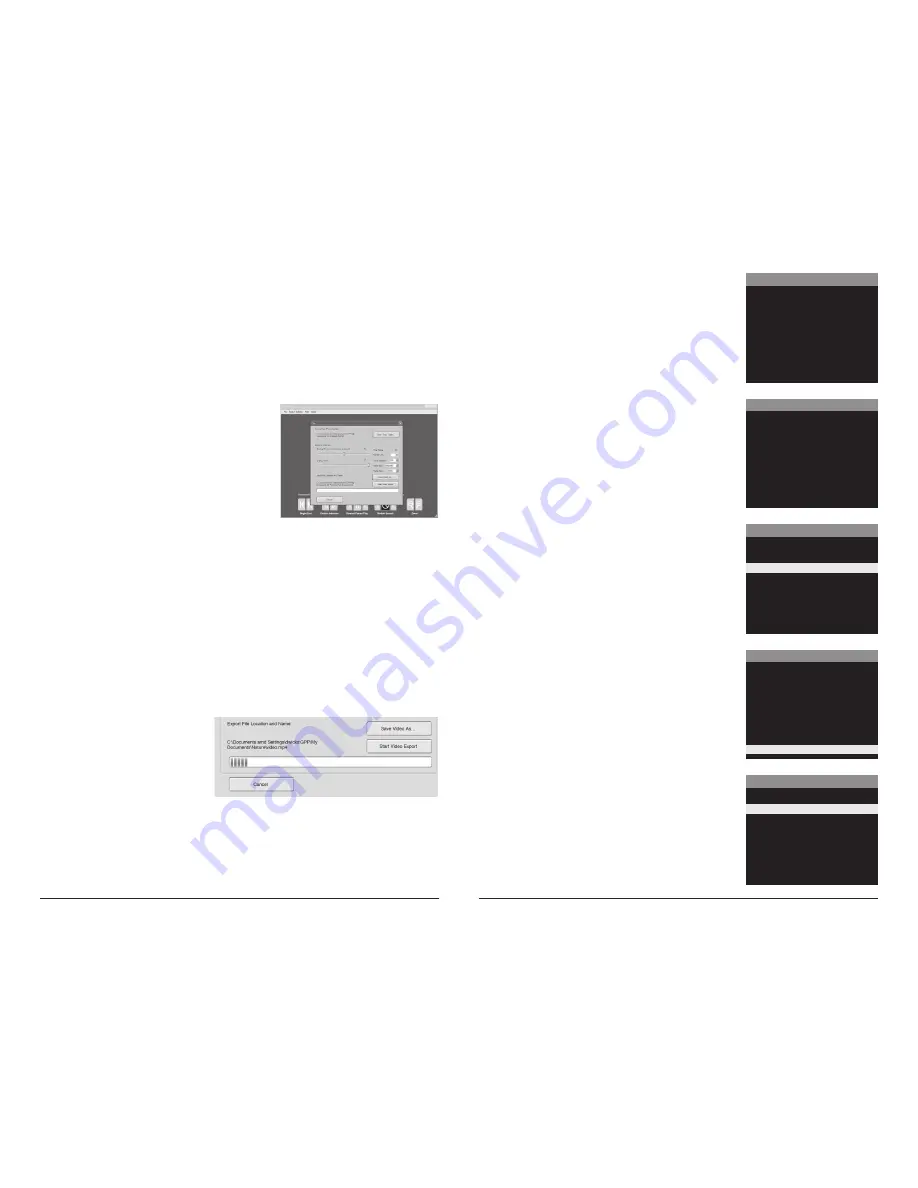
2. Click on File. You will see the screen image to the right.
3. Choose a starting image (frame) and an ending
image (frame).
Note: The frame limit is 300.
4. Choose the frame rate. Options include 1, 5, 10, 20,
and 30 frames per second (fps).
Note:
The frame rate says how many images of a video are displayed every second a video is
played. The higher frame rate a video has the smoother movement appears in the video. However,
a higher frame rate video will create a larger file and will require more memory.
5. Choose the video resolution:
Note:
The higher the resolution, the sharper the image. However, higher resolutions create
a larger file and will require more memory. VGA (640x480) / 720p / 1080p
6. Choose frame filter: None, Low, Medium, or High.
7. Click on Save the Video As. Name the video and choose the location file folder you wish
to save it in.
8. Click Start Video Export. The program will start to convert the images to video based on the
settings chosen above. The green bars will advance until the conversion is complete.
Note:
Click on Cancel to abort the transfer.
To View Time Lapse Video
1. Find the video in the folder
you saved it into.
2. Click on the video.
3. The video will be open up
automatically in QuickTime
player. To install a free version
of QuickTime, follow the on screen
instructions at
www.apple.com/quicktime/download
.
4. Press play to view your time lapse video.
TIME LAPSE INTERVAL
30 minutes
15 minutes
10 minutes
5 minutes
1 minute
30 seconds
X 10 seconds
Setting Time Lapse Interval
Press the
OK
button. Use the
Up/Down
buttons to choose
between 10, 30 seconds / 1, 5, 10, 15, or 30 minutes / 1, 2, 3, 6,
12 hours or 1 day. When your selection has been made, press
the
Right
button to go to the next option.
TIME LAPSE PROGRAMS PER DAY
X 2
1
Setting Multi-Program
Press the
OK
button. Use the
Up/Down
buttons to
choose between 2 available settings: 1 PROGRAM or
2 PROGRAM. This indicates the number of cycles the
camera will operate within a 24 hour period. Press the
OK
button. Press
Right
button to go to the next option.


