background image

The cassettes 

Device Overview and Operation 

3-14


Cash Media Dispenser Version 4 - Service Manual 

01750060162 A 

Setting the banknote width 

i


  The banknote width has to be set before the cassette is used for the 

first time or when a different currency or denomination is used in the 
cassette. 


• 

Remove and open the cassette (see section "Opening the cassette"). 


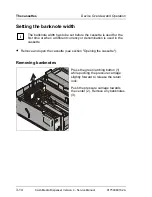
Removing banknotes 

  Press the green latching button (1) 

while pushing the pressure carriage 
slightly forward to release the return 
lock. 
 
Push the pressure carriage towards 
the center (2). Remove any banknotes 
(3). 


Содержание CMD-V4

Страница 1: ...Cash Media Dispenser Version 4 Service Manual Self Service Systems ...

Страница 2: ...ny questions or suggestions regarding this manual Please contact the following address giving the order number of this manual in your message Address Wincor Nixdorf International GmbH Handbuchredaktion BD P34 33094 Paderborn Germany Fax 49 0 52 51 693 62 09 E mail manuals hardware wincor nixdorf com ...

Страница 3: ...Cash Media Dispenser Version 4 Service Manual Edition April 2003 ...

Страница 4: ...arts are reserved Any violations give rise to a claim for damages All rights including rights created by patent grants or registration of a utility model or design are reserved Delivery subject to availability right of technical modifications reserved All names of hardware and software products mentioned in this manual are trade names and or trademarks of their respective manufactures This manual ...

Страница 5: ...0 1 C Contents 1 Introduction Safety precautions technical data 2 Function and Integration 3 Device Overview and Operation 4 Getting Started 5 Troubleshooting 6 Removal Installation of Components 7 Maintenance and Service 8 Pin Assignments 9 Spare Parts I Index ...

Страница 6: ...0 2 Cash Media Dispenser Version 4 Service Manual 01750060162 A ...

Страница 7: ...h DDU 1 15 Single dispensing unit without DDU 1 15 Single dispensing unit with DDU 1 15 Reject retract cassettes 1 16 Cash out cassettes 1 16 Environmental conditions 1 17 Climatic environmental conditions in accordance with EN 60721 1 17 Mechanical environmental conditions in accordance with EN 60721 1 17 Noise emission in accordance with EN 27779 1 17 Compliance with standards and certifications...

Страница 8: ...hotosensors 2 12 Checking the device locks 2 12 Checking mechanical and electronic components 2 13 Checking the transport paths 2 13 Checking the shutter 2 13 Dispensing 2 14 Checking the basic state 2 14 Double dispense note sizes out of tolerance 2 14 Undefined notes 2 15 Dispensing of notes not possible 2 15 Banknote jam 2 15 Transport 2 16 Transport to waiting position 2 16 Bundle reject 2 16 ...

Страница 9: ... units and 4 channel distributor board 2 39 Dispensing unit with dispensing shaft and magnetic clutch 2 40 Photosensors in the dispensing unit 2 41 Pressure sensor 2 41 Reject retract cassette 2 42 Cash out cassettes 2 44 Device Overview and Operation 3 1 Device overview 3 1 Horizontal cash out Frontload 3 2 Horizontal cash out Rearload 3 3 Vertical cash out Frontload 3 4 Vertical cash out Rearloa...

Страница 10: ...ement 4 2 Electronic adjustments for the CMD V4 4 3 Initializing the CMD V4 4 4 Jumper settings on the CMD controller 4 5 Position of the jumper panel on the CMD controller 4 5 Default settings 4 7 Adjusting cash cassettes to the note size 4 8 Filling cassettes with real cash and inserting them 4 8 Updating note parameters and cassette replenishment data 4 8 Calculating reference values for the va...

Страница 11: ...t 6 17 Clamp 6 19 Maintenance and Service 7 1 Maintenance 7 1 Maintenance intervals 7 1 Performing maintenance 7 1 Stacker 7 3 Output transport 7 3 Shutter 7 3 Cash out cassettes 7 3 Reject retract cassette 7 4 General 7 4 Approved maintenance materials 7 5 Pin Assignments 8 1 Power supply connector supply voltage 8 1 Safety switch 8 1 Basic module 8 1 Main motor M1 8 3 Stacker 8 3 Frontload modul...

Страница 12: ...ser Version 4 Service Manual 01750060162 A Connection of door switch 8 17 Battery connector 8 17 RS232C connection 8 18 CMD controller 8 19 4 channel distributor board 8 39 Spare Parts 9 1 Overview of individual parts 9 1 Index I 1 ...

Страница 13: ...ly described in those manuals Symbols used in this manual Text following a dash represents an item in a list Text in quotation marks refers to other chapters or sections in this document Text following this symbol describes actions to be performed in the specified order Text following this symbol should be given special attention in order to avoid damage and injury i Text following this symbol con...

Страница 14: ...f Install all cables in such a way that they will not be stepped on or tripped over or damaged and crushed in any other way Have damaged cables replaced immediately Make sure that there is always free access to the sockets used or to the electrical circuit breakers of the house installation In case of an emergency e g damaged cabinets controls or power cables liquids or foreign objects in the devi...

Страница 15: ...at there are only safety extra low voltage circuits SELV circuits if you want to feed voltage from an external source into prepared cables to install additional electronics e g connection for an intruder alarm system To clean the device only use cleaning agents approved by Wincor Nixdorf International GmbH see chapter Maintenance and Service Repair work Repair work may only be carried out by autho...

Страница 16: ...contact with water or fire Replace only with the same or an equivalent type recommended by Wincor Nixdorf International GmbH Dispose of used batteries in compliance with national regulations and the manufacturer s specifications General power interrupt i A general power interrupt has the following effects All currently running transactions are immediately aborted Dispensed banknotes remain in the ...

Страница 17: ...oyed in the ProCash BBA mini 3K up to February 2003 and the ProCash BBA UT with a CEN safe The ProCash BBA mini 3K requires a technical modification for CMD cassettes to be installed The old cassettes have to be used in the ProCash BBA UT with a CEN safe This manual describes the Cash Media Dispenser version 4 Here are some of the characteristics of the Cash Media Dispenser High functional reliabi...

Страница 18: ...nsist of the following components depending on the configuration Stacker transport facility with or without single reject Horizontal vertical output transport facility Rearload Frontload 1 cassette housing with single dispensing unit 4 cassette housing with one double dispensing unit or two double dispensing units CMD controller Cash out cassette and reject retract cassette i The single reject fun...

Страница 19: ...chapter describes among other things how to change the cash out and reject retract cassettes replenish the cash out cassette and set the banknote size The Start up chapter explains how the CMD V4 is initialized The Troubleshooting chapter lists the status messages that may be output together with explanations and action to be taken The next chapter Removal Installation of Components provides detai...

Страница 20: ...lation of the basic devices separate manuals are available in several languages which also include a short description of the CMD V4 These manuals can be ordered from our print partner They are also available in the intranet Usually the manufacturers original manuals for OEM components are included in the shipment They may contain more detailed information ...

Страница 21: ...n of the CMD V4 Height Four cassettes 758 mm Five cassettes 895 5 mm Six cassettes 1033 mm Width 340 mm Depth with cassettes in place 537 mm Device weight without cassettes and without single reject max 30 kg Banknote dimensions in mm 54 x 85 x 0 08 to 92 x 182 x 0 12 Maximum number of notes per transaction 60 Dispensing and transport rate 6 8 banknotes sec Number of dispensing units 2 to 6 Securi...

Страница 22: ...ight with single reject 8 820 kg without single reject 8 500 kg Output transport Vertical output transport Frontload in ProCash 2000xe and ProCash 2100xe Dimensions Depth 400 mm Width 200 mm Height 230 mm Weight 1 5 kg Vertical output transport Rearload in ProCash 2000xe and ProCash 2100xe Dimensions Depth 400 mm Width 200 mm Height 230 mm Weight 1 5 kg ...

Страница 23: ...rizontal output transport Frontload 241 mm in ProCash 2350xe and ProCash BBA UT Dimensions Depth 250 mm Width 200 mm Height 50 mm Weight 1 kg Horizontal output transport Rearload 124 mm in ProCash 1500xe and ProCash BBA UT Dimensions Depth 130 mm Width 200 mm Height 50 mm Weight 1 kg Horizontal output transport Rearload 232 mm in ProCash 2050xe ProCash 2150xe and ProCash 2250xe Dimensions Depth 34...

Страница 24: ...r Dimensions Shutter vertical Rearload and vertical Frontload Depth 310 mm Width 150 mm Height 100 mm Weight 0 5 kg Dimensions Shutter horizontal Rearload Depth 305 mm Width 126 mm Height 67 mm Weight 0 9 kg Dimensions Shutter horizontal Frontload Depth 310 mm Width 150 mm Height 100 mm Weight 0 9 kg ...

Страница 25: ...20 MHz Memory 512 Kbyte static RAM 512 Kbyte Flash PROM PUT bootloader Interface V 24 RS232 USB interface in preparation Transmission parameters Line speed 19 2 56 KBaud automatic baud rate recognition Data format NRZ Parity ODD Code width 8 Bit Parity Stop bits 2 Dimensions Depth 430 mm Width 160 mm Height 25 mm Weight 0 42 kg ...

Страница 26: ...sette housing without contents Dimensions Depth 450 mm Width 305 mm Height 600 mm Weight 10 9 kg 1 cassette housing without contents Dimensions Depth 450 mm Width 305 mm Height 162 mm Weight 3 34 kg Double dispensing unit without DDU Dimensions Depth 282 mm Width 305 mm Height 200 mm Weight 3 30 kg ...

Страница 27: ...g unit with DDU Dimensions Depth 282 mm Width 305 mm Height 200 mm Weight 3 34 kg Single dispensing unit without DDU Dimensions Depth Still open Width Still open Height Still open Weight Still open Single dispensing unit with DDU Dimensions Depth Still open Width Still open Height Still open Weight Still open ...

Страница 28: ...partment max 400 notes Retract compartment max 100 notes Dimensions Depth 250 mm Width 100 mm Height 100 mm Weight 1 5 kg Cash out cassettes Banknote dimensions Size 54 x 85 mm to 92 x 182 mm Thickness 0 08 mm to 0 12 mm Filling capacity Banknote bundles up to 310 mm thick Dimensions Depth 441 mm Width 264 mm Height 125 mm Weight 3 5 kg ...

Страница 29: ...s from the value of the standard 32 C Mechanical environmental conditions in accordance with EN 60721 Class Comment Operation 3M2 Building with minimum external vibration Transport in original packing 2M2 All types of commercial vehicles and trailers as well as rail and air transport Storage in original packing 1M3 Noticeable vibration and shocks e g by machines or passing vehicles Noise emission ...

Страница 30: ...equirements of the following EC directives EMC Directive 89 336 EEC including the amending directive 93 68 EEC Low Voltage Directive 73 23 EEC including the amending directive 93 68 EEC The corresponding statement of compliance has been issued by Wincor Nixdorf International GmbH Heinz Nixdorf Ring 1 33106 Paderborn Germany Notes concerning radio interference suppression and electrical safety All ...

Страница 31: ...imits are designed to provide reasonable protection against harmful interference when the equipment is operating in a commercial environment The equipment generates uses and can radiate high frequency energy and if not installed and used in accordance with the instruction manual may cause harmful interference to radio communications Operation of this equipment in a residential area is likely to ca...

Страница 32: ...y have been taken into account This saves resources and relieves the strain on the environment Saving energy Please switch on devices that need not be constantly running only when they are actually needed They should also be turned off when they are not needed for longer periods of time Disposing of used consumables Please dispose of printer consumables batteries fluorescent tubes as well as clean...

Страница 33: ...e return and recycling of used units and consumables can be obtained from your local branch office or from our Recycling Center in Paderborn Tel 49 0 5251 8 1 80 10 Fax 49 0 5251 8 1 80 15 Further information can be obtained from our Environmental Protection section Referat Umweltschutz Tel 49 0 5251 693 67 07 Fax 49 0 5251 693 67 09 Email mailto referat umweltschutz wincor nixdorf com ...

Страница 34: ... unit DES Data Encryption Standard DIN German Institute for Standardization DMA Direct Memory Access DPS Digital photosensor DSP Diagnostic and service package EEPROM Electrical erasable programmable read only memory EC European Community EMC Electromagnetic compatibility EN European standard EPROM Erasable Programmable Read Only Memory EEC European Community FCC Federal Communications Commission ...

Страница 35: ...e read only memory PS Photosensor PSD Photosensor Dispense dispensing sensor PSE Photosensor Empty cassette empty RAM Random access memory RL Rearload S Switch SAT Stacker and output transport SCOP Security cash out procedure SM Stepper motor SMC Connector Motor Cassette ST Connector SW Software T Timing disk UL Underwriters Laboratories ...

Страница 36: ...Abbreviations Introduction 1 24 Cash Media Dispenser Version 4 Service Manual 01750060162 A ...

Страница 37: ...ction and Integration Sensors and electromechanical components Horizontal output transport DCM1 DPS14 DPS15 DPS4 SM1 PS2 PS1 DDU PSE1 PSD1 PS18 DPS2 SM2 3 DCM2 3 MAC1 SMC1 CL1 HS1 HS3 MA6 HS2 DPS7 DPS5 6 DPS5 6 DPS8 9 HS4 PS27 PS28 DPS11 DCM7 DPS10 SM9 MA2 2 SW1 MA2 1 ...

Страница 38: ... 2 2 Cash Media Dispenser Version 4 Service Manual 01750060162 A Vertical output transport DCM1 DPS14 DPS15 DPS4 SM1 PS2 PS1 DDU PSE1 PSD1 PS18 SM9 DPS2 SM2 3 DCM2 3 MAC1 MA2 2 SMC1 CL1 HS1 HS3 MA6 SW1 HS2 PS27 PS28 HS4 DPS11 SM7 DPS10 DPS7 DPS5 6 DPS5 6 DPS8 9 MA2 1 ...

Страница 39: ...4 Home position of switch Single reject DPS 15 Switch position single reject Single reject HS 1 Home position Hall sensor Clamp positioning HS 2 RR home position behind the routing disk Hall sensor Clamp positioning HS 3 Reversal in FL direction if required Hall sensor Clamp positioning HS 4 Stop over position and final position of clamp Hall sensor Clamp positioning PS 1 Stacker wheel input Stack...

Страница 40: ...g disk drive right SM 7 Stepper motor indoor Shutter SM 9 Stacker wheel stepper motor Stacker wheel input T 1 Timing disk Stacker wheel input Components of dispensing unit and cassette Component Designation Location MACx Retaining magnet Dispensing unit cassette x x 1 6 CLx Extractor gear Dispensing unit cassette x x 1 6 PSDx Dispensing sensor Dispensing unit cassette x x 1 6 PSEx Empty sensor Dis...

Страница 41: ... on the basis of this schematic drawing of the CMD V4 with a vertical output transport frontload i a b c d e f g j k h l m 1 Shutter g Reject compartment of b Clamp in home position reject retract cassette c Vertical output transport FL h Main drive motor d Routing disk i Thickness measuring station e Clamp in stacking position j Stacker wheel f Retract compartment of reject k Cassette 1 retract c...

Страница 42: ...l notes are moved to the thickness measuring station i 3 All good notes are placed in the stacking position of the clamp e 4 The clamp is closed with the aid of the routing disk 5 The routing disk moves to the output position d 6 The bundle of notes is transported to the output position b 7 The shutter opens 8 The bundle of notes is transported to the removal position 9 The customer removes the bu...

Страница 43: ...on 4 Service Manual 2 7 Bundle reject i a b c d e f g j k h 1 4 The procedure is the same as for dispensing in customer direction vertical frontload 5 The routing disk moves to the reject retract position d 6 The bundle of notes is transported to the reject compartment of the reject retract cassette g ...

Страница 44: ...ame as for dispensing in customer direction vertical frontload 3 1 If a bad note is detected it is rejected via the single reject switch l and placed in the single reject compartment m Up to two bad notes can be placed in the single reject compartment They do not have to originate from one transaction 4 11 The procedure is the same as for dispensing in customer direction vertical frontload ...

Страница 45: ...nual 2 9 i a b c d e f g j k h l m 12 Bad notes are taken from the single reject compartment m via the stacker wheel j and placed in the stacking position of the clamp e 13 The routing disk moves to the reject retract position d 14 The notes are transported to the reject compartment of the reject retract cassette g ...

Страница 46: ... in customer direction vertical frontload 9 The notes are not removed within the defined time 10 The notes are retracted to the output position b 11 The shutter closes 12 The clamp moves toward the stacker unit c 13 There is a reject retract compartment switchover 14 The bundle of notes is transported to the retract compartment of the reject retract cassette f 15 The clamp moves back to the stacki...

Страница 47: ...er s status display see the Troubleshooting chapter Controller test A reset uses the same routine as power up in principle but the controller test is not performed The controller test takes about six seconds and is finished when appears on the status display In the event of an error processing is aborted with status code 10 controller defective Firmware tt The validity of the loaded firmware is ch...

Страница 48: ...al data If they do not match the cassettes in question are flagged as new To operate correctly at least one operable cash out cassette and also the reject retract cassette are necessary If this minimum requirement is not satisfied this is indicated on the status display with error code 14 The device is not ready for operation Checking the photosensors All photosensors are checked The result is pro...

Страница 49: ...re or were accessible to the customer the first operation is a retract If there is a bundle of notes in the clamp at the time of a reset a bundle reject takes place When the output transport is free the transport motor is activated for approximately five seconds All detected banknotes are transported into the reject cassette In the event of an error the status display may show the following 18 Ban...

Страница 50: ...there is a bundle reject The dispensing command is repeated Dispensing finishes when The number of notes requested is available A cassette becomes empty during a dispensing procedure The required number of notes cannot be made available within one minute It is impossible to dispense notes from one cassette Double dispense note sizes out of tolerance If the measuring station detects double or overl...

Страница 51: ...ot possible cassette empty or notes stuck together Banknote jam A banknote jam may occur during dispensing allowing transportable notes to be moved to the clamp s stacking position A banknote is dispensed from the lowest cassette and transported to the clamp s stacking position The transport path is clear again when the banknote reaches the clamp s stacking position A bundle reject takes place In ...

Страница 52: ...rior to actual banknote output It is used to transport the bundle of notes from the clamp s stacking position to the waiting position This position is just in front of the shutter Bundle reject This function is used to transport banknote bundles that had not been accessible to the customer to the reject cassette Single reject This function is only available for shipments to countries outside the E...

Страница 53: ...anced until the bundle is accessible to the customer The device then waits for the cash to be removed When the notes have been removed the shutter is closed and the clamp moves back to the stacking position The function finishes when the shutter has closed completely again and the clamp has reached the stacking position If individual notes were parked in the single reject switch they are transport...

Страница 54: ...s The bundle of notes remains in the clamp so that it is possible to associate it with the customer A device lock is triggered i If the device lock is set status display 13 all dispensing and transport commands are rejected In addition the function button cannot be activated in this case The flag remains set even in the event of a power failure it is not reset if the device is reset When the bundl...

Страница 55: ...e by the system Currency code This is the 3 character currency code according to ISO 4217 codes for representation of currencies and funds for example EUR Issue date The banknote issue date contains an additional 4 character indicator YYMM of the issue This means that the CMD V4 can process notes which have the same face value but different note characteristics Denomination This value defines the ...

Страница 56: ...ically The sequencer receives control commands from the higher level system unit via the RS232C interface acknowledges them and executes them If the command is correct the program controls the mechanical device functions Then the command acknowledgement is passed to the higher level system unit The controller consists of the following components Function group Components 80C188 CPU with 20 MHz Exe...

Страница 57: ...functions have been integrated in the CMD controller Note measurement Photosensor control Motor and module control for up to two double dispensing units and two single dispensing units Cassette control The loadable firmware CMD_V4_0 bin is stored in a flash PROM Externally it behaves compatibly with the AZM NG i The number of dispensing units is detected automatically via the connected distributor...

Страница 58: ... block I O block with motor control Photosensor electronics Thickness sensor electronics Component control Serial interface The SCOP can optionally be connected to the CMD controller It is used to authenticate the dispensing job To work the SCOP has to be connected and must contain a smartcard Position of function groups 1 Two 7 segment displays 3 Jumper panel 2 Function button ...

Страница 59: ...tors on the CMD controller Connec tor Description X1 Mechanical thickness sensor X2 Shutter X3 Transport module X4 V 24 interface from PC X6 Door switch and safety switch in safe X7 V 24 interface SCOP card AVT2800 X8 Special electronics X9 24 V power supply X10 24 V connection to SCOP card AVT2800 X11 Motor M1 ...

Страница 60: ...ybrid photosensors on stacker left side panel X30 Dispensing unit X31 Dispensing unit X32 Hybrid photosensors and photosensors on stacker right side panel X40 Jumpers The pin assignments are described in the Pin Assignment chapter Logical interface All commands from the host system to the CMD V4 and responses from the CMD V4 to the host system follow the master slave principle This means that the ...

Страница 61: ... 1 D Device identifier dispenser ASCII 1 a Command specification ASCII 1 a Additional specification for command ASCII 1 a Status code ASCII n XX XX Any data ASCII HEXA Overview of commands Command Description Dablank RESET DAB Clearing DBA Pre Dispense DBC Added dispense DBS Dispensing Standard DCA Transport Waiting for cash removal DCB Transport Bundle reject DCC Transport Close shutter DCE Trans...

Страница 62: ... error DFC Confirm existing cassettes DFD Note parameters II DFG Write firmware configuration DFI Cassette ID standard DFL Set minimum quantity DFN DFO Number of banknotes without check DFP Note parameters I DFQ Reset lock flag without error DFR Reset lock flag DFT Delete retract counter DFX Write value in cassette DFY Write value from cassette DFZ Power on reset without PUT DGblank Reference valu...

Страница 63: ... clock DQB Read the real time clock DQC Read error statistics DQD Delete error statistics DQE Internal commands Read error information DQF Internal commands Read EEPROM DQG Internal commands Read out error stack DQH Internal commands Clear error stack DQI Internal commands Write EEPROM DQR Internal commands Read recovery information DXa Self test commands DYa Internal commands DYL Internal command...

Страница 64: ...ation about the control procedure and data structure in the software manual for the CMD V4 Status display A 2 character 7 segment display indicates the status of the CMD V4 Refer to the Troubleshooting chapter for the meaning of the status codes Function button In some cases it is advisable to check whether the CMD V4 is ready for operation without using additional tools For this purpose there is ...

Страница 65: ... with pulsed current The receive logic only evaluates the pulse This reduces the influence of light from external sources on the receive signal The photosensors are polled one after another Each photosensor operates with its own specific parameters current and amplification These parameters are constantly readjusted during operation The photosensor parameters are stored in a table in CMOS and are ...

Страница 66: ...lues are calculated The DDU can detect good individual and good double notes Notes with measured values that are too different to the anticipated values are detected as bad and are not allowed to be presented to the customer A bad note is stored temporarily in a compartment of the single reject switch if available Notes that slant excessively more than 22 degrees or long fanned out multiple notes ...

Страница 67: ...cated on the 4 channel distributor board Two connectors are available to connect two other 1 channel distributor boards with drivers for one further dispensing unit each A distributor board is connected to the distributor board above it via its two connectors This chaining tells the controller how many distributor boards there are and the controller automatically derives the cassette positions Cas...

Страница 68: ...750060162 A Shutter module control A shutter module can be attached to the controller as an option Control of the shutter has been integrated in the CMD controller It consists of the following parts Shutter motor driver Receiver for the two shutter sensors Control of photosensors in the shutter ...

Страница 69: ...e reject function is available bad notes are rejected individually max two bad notes per transaction When there is no single reject function a bad note is transported to the reject retract cassette as part of a bundle reject Bundle output from the clamp s stacking position is controlled via the routing disk The clamp is closed with the aid of the routing disk The clamp transports the bundle of not...

Страница 70: ...ored unordered The number of notes stored there is counted providing there is a corresponding output transport As an option a retracted bundle can be placed in the clamp s stacking position If this option is used however no further device operations are possible until the bundle is removed by an operator and the software cancels the lock The transport belts in the SAT not the clamp are driven by t...

Страница 71: ...evice variant for example single reject is stored in EEPROM if it cannot be recorded electronically The information is stored in EEPROM at the production plant The following information is stored in EEPROM Version of the EEPROM build Checksum Firmware name Serial number Type Hardware configuration of the CMD V4 Single reject configuration Routing disk positions Offset routing disk i The EEPROM mus...

Страница 72: ...l 01750060162 A Output transport The output transport facility varies depending on the device variant The following illustration shows an output transport for a rearload device with horizontal cash out The output transport is attached to the stacker transport and driven via the CMD controller ...

Страница 73: ...Function and Integration Shutter 01750060162 A Cash Media Dispenser Version 4 Service Manual 2 37 Shutter The shutter is a flap to keep cash under cover It is controlled via the CMD controller ...

Страница 74: ...Dispensing unit Function and Integration 2 38 Cash Media Dispenser Version 4 Service Manual 01750060162 A Dispensing unit 4 cassette housing without dispensing units ...

Страница 75: ...ette housing contains four cassette mounts and at least one dispensing unit featuring a thickness measuring station The second dispensing unit is used when more than two cassettes are configured The thickness measuring station must always be in the upper dispensing unit i If there is only one double dispensing unit in a 4 cassette housing the requisite jumper has to be connected on the CMD control...

Страница 76: ...taining shaft that is actuated by a magnet Dispensing unit with dispensing shaft and magnetic clutch A pendulum dispensing shaft is used in dispensing the notes Each dispensing shaft is driven by the main motor and its own magnetic clutch At one end of the dispensing shaft there is a pressure sensor that is used to poll the note pressure and the Cassette inserted message Forward movement is achiev...

Страница 77: ...pensing gear Retaining magnet Cash dispensing photosensor Cassette empty message photosensor Pressure sensor for Cassette inserted and Note pressure Photosensors in the dispensing unit The PSE message photosensor empty is output when there are no more notes in the cassette The photosensor beam is sent to the receiver in the dispensing unit via a prism in the cassette s pressure carriage Pressure s...

Страница 78: ...assette contains two separate compartments in which notes can be placed under software control The compartment is selected by a lifting magnet in the SAT The reject retract cassettes are equipped with a tamper indicator The status of the tamper indicator can be checked in a window in the back panel A reject retract cassette that has been tampered with cannot be used in the SAT any more The cassett...

Страница 79: ...rives two intake rollers which transport the individual notes or bundles into the cassette The feed area of the reject retract cassette is opened on insertion into the SAT by means of side tappets that are moved in side panels in the SAT The cassette shutter is designed as a visor In its final position the cassette is locked a switch reports that this position has been reached The two cassettes ar...

Страница 80: ... in a window on the cassette handle side Any subsequent attempt to insert the cassette with an open visor is stopped If the indicator is blue and the visor is closed the cassette can be inserted in the CMD V4 Cash can be dispensed The tamper indicator can be reset by opening the lid A display window on the cassette handle side indicates the locking status Green Cassette ready to be inserted Blue C...

Страница 81: ...d can be changed via a software command The cassette has a connector on its side panel to connect the EEPROM and the stepper motor The EEPROM itself is located in the connector housing An adhesive label can be affixed to a recess on the handle side of the cassette in order to identify the cassette denomination cassette number etc The denomination is lasered into the cassette if it is configured at...

Страница 82: ...Cash out cassettes Function and Integration 2 46 Cash Media Dispenser Version 4 Service Manual 01750060162 A ...

Страница 83: ...01750060162 A Cash Media Dispenser Version 4 Service Manual 3 1 Device Overview and Operation Device overview ...

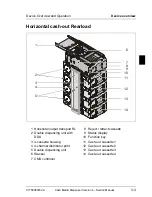
Страница 84: ...8 9 10 11 12 13 1 2 3 4 14 1 Double dispensing unit with DDU 8 Reject retract cassette 2 4 cassette housing 9 Status display 3 4 channel distributor print 10 Function key 4 Double dispensing unit 11 Cash out cassette 1 5 Stacker 12 Cash out cassette 2 6 CMD controller 13 Cash out cassette 3 7 Horizontal output transport FL 14 Cash out cassette 4 ...

Страница 85: ...1 12 14 7 8 9 1 2 3 5 4 13 1 Horizontal output transport RL 8 Reject retract cassette 2 Double dispensing unit with 9 Status display DDU 10 Function key 3 4 cassette housing 11 Cash out cassette 1 4 4 channel distributor print 12 Cash out cassette 2 5 Double dispensing unit 13 Cash out cassette 3 6 Stacker 14 Cash out cassette 4 7 CMD controller ...

Страница 86: ...11 12 13 14 9 10 5 2 3 4 1 1 Stacker 8 Reject retract cassette 2 Double dispensing unit with 9 Status display DDU 10 Function key 3 4 cassette housing 11 Cash out cassette 1 4 4 channel distributor print 12 Cash out cassette 2 5 Double dispensing unit 13 Cash out cassette 3 6 Vertical output transport FL 14 Cash out cassette 4 7 CMD controller ...

Страница 87: ...11 12 13 7 9 3 4 2 5 1 14 1 Vertical output transport RL 8 Reject retract cassette 2 Double dispensing unit with DDU 9 Status display 3 4 cassette housing 10 Function key 4 4 channel distributor print 11 Cash out cassette 1 5 Double dispensing unit 12 Cash out cassette 2 6 Stacker 13 Cash out cassette 3 7 CMD controller 14 Cash out cassette 4 ...

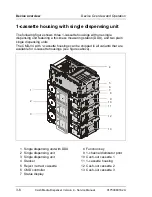
Страница 88: ... and two plain single dispensing units The CMD V4 with 1 cassette housings can be shipped in all variants that are available for 4 cassette housings see figures above 4 6 5 7 8 10 11 9 1 2 3 12 13 1 Single dispensing unit with DDU 8 Function key 2 Single dispensing unit 9 1 channel distributor print 3 Single dispensing unit 10 Cash out cassette 1 4 Stacker 11 1 cassette housing 5 Reject retract ca...

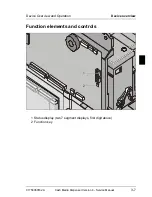
Страница 89: ...verview and Operation Device overview 01750060162 A Cash Media Dispenser Version 4 Service Manual 3 7 Function elements and controls 1 2 1 Status display two 7 segment displays first digit above 2 Function key ...

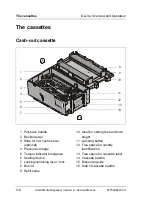
Страница 90: ...back handle 10 Inset for setting the banknote 2 Banknote rail height 3 Slide for low cash sensor 11 Latching button optional 12 Free space for validity 4 Pressure carriage identification 5 Tamper indicator blue green 13 Free space for cassette label 6 Sealing device 14 Cassette handle 7 Locking unlocking lever lock 15 Dispensing side 8 Box lid 16 Side of cassette handle 9 Refill notes ...

Страница 91: ...0162 A Cash Media Dispenser Version 4 Service Manual 3 9 Reject retract cassette 2 3 4 5 6 7 1 1 Box lid 5 Tamper indicator blue green 2 Retract compartment lever 6 Cassette handle 3 Retract compartment 7 Locking lever optional lock 4 Reject compartment ...

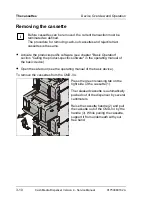
Страница 92: ...tware see chapter Basic Operation section Calling the product specific software in the operating manual of the basic device Open the safe door see the operating manual of the basic device To remove the cassettes from the CMD V4 Press the green releasing tab on the right side of the cassette 1 The released cassette is automatically pushed out of the dispenser by several centimeters Raise the casset...

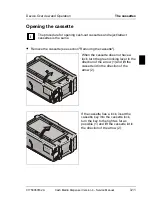
Страница 93: ...s is the same Remove the cassette see section Removing the cassette 1 When the cassette does not have a lock turn the green locking lever in the direction of the arrow 1 and lift the cassette lid in the direction of the arrow 2 If the cassette has a lock insert the cassette key into the cassette lock turn the key to the right as far as possible 1 and lift the cassette lid in the direction of the a...

Страница 94: ...spensing procedure are returned to the retract compartment Cash which has been incorrectly dispensed or which was dispensed for test purposes is stored in the reject compartment Remove and open the cassette see section Opening the cassette Remove the banknotes from the cassette s reject compartment To empty the retract compartment push the green lever in the direction indicated as far as possible ...

Страница 95: ...ette only contains a certain number of banknotes To set to the desired minimum banknote quantity proceed as follows Remove and open the cassette see section Opening the cassette Remove any notes you may find Set the slide 1 manually see arrow to the desired minimum banknote quantity i The minimum banknote quantity can be set between 50 and 550 in steps of 50 via the green mechanical slide 1 Settin...

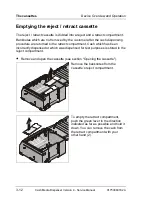
Страница 96: ...re the cassette is used for the first time or when a different currency or denomination is used in the cassette Remove and open the cassette see section Opening the cassette Removing banknotes Press the green latching button 1 while pushing the pressure carriage slightly forward to release the return lock Push the pressure carriage towards the center 2 Remove any banknotes 3 ...

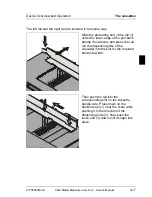
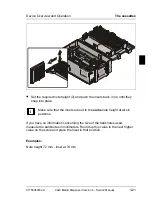
Страница 97: ...neath the tab At the same time push against the nose of the rail 3 with the thumb of your other hand in the direction of the cassette handle i The left rail and the right rail are inserted in the same way Should the rail be difficult to remove proceed as follows Pull up the horizontal tab 1 at the end of the banknote rail to lift the catch 2 above the crosspiece underneath the tab see illustration...

Страница 98: ... catch 2 above the crosspiece underneath the tab At the same time push against the nose of the rail 3 with the thumb of your other hand in the direction of the cassette handle see section Removing the banknote rails Push the pressure carriage all the way to the other end of the cassette i e the one from which the banknotes are dispensed Lift the end of the rail a little and push it outwards toward...

Страница 99: ...ail 1 under the lower edge of the pull back handle if necessary and press the rail on the dispensing side of the cassette into the slot for the required banknote width Then push the rail into the corresponding slot on the cassette handle side Press down on the banknote rail 1 near the scale while pushing it in the direction of the dispensing side 2 Now push the loose end 3 down until it snaps into...

Страница 100: ...e tab of the rail 1 must lie flat on the crosspiece i Make sure that both rails are set to the same note width at all four positions If you have no information concerning the size of the banknotes used measure the banknotes in millimeters Round up this value to the next higher value on the scale and insert the rail at that position Examples Banknote width 133 mm rail is set to 135 mm on the scale ...

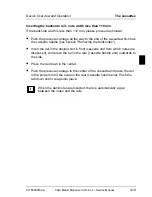
Страница 101: ...tte handle see section Removing the banknotes Insert the rail in the desired slot in front cassette end from which notes are dispensed and press the rail in the rear cassette handle end outwards to the side Press the rail down in the center Push the pressure carriage to the center of the cassette and press the rail in the proper slot of the scale in the rear cassette handle end Push the tab down u...

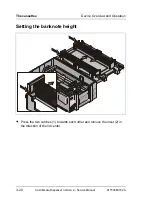
Страница 102: ...ce Overview and Operation 3 20 Cash Media Dispenser Version 4 Service Manual 01750060162 A Setting the banknote height Press the two catches 1 towards each other and remove the inset 2 in the direction of the lid center ...

Страница 103: ... back in 4 until they snap into place i Make sure that the insets are set to the same note height at all six positions If you have no information concerning the size of the banknotes used measure the banknotes in millimeters Round up this value to the next higher value on the scale and place the inset in that position Examples Note height 72 mm inset at 74 mm ...

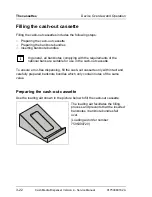
Страница 104: ...complying with the requirements of the national bank are suitable for use in the cash out cassette To ensure error free dispensing fill the cash out cassette only with intact and carefully prepared banknote bundles which only contain notes of the same value Preparing the cash out cassette Use the loading aid shown in the picture below to fill the cash out cassette The loading aid facilitates the f...

Страница 105: ... picture and open the cassette lid see the section Opening the cassette Press the green latching button 1 and push the pressure carriage slightly forward to release the return lock Then pull the pressure carriage back up to the top cassette edge 2 Set the low cash sensor if available to the desired minimum banknote quantity see section Setting the low cash sensor Fill the cash out cassette followi...

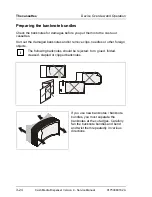
Страница 106: ...into the cash out cassettes Sort out the damaged banknotes and or remove clips needles or other foreign objects i The following banknotes should be rejected torn glued folded creased stapled or clipped banknotes If you use new banknotes banknote bundles you must separate the banknotes at the cut edges Carefully fan the banknote bundles and bend and twist them repeatedly in various directions ...

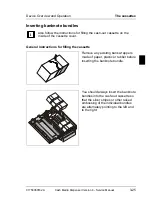
Страница 107: ...sette on the inside of the cassette cover General instructions for filling the cassette Remove any existing bank wrappers made of paper plastic or rubber before inserting the banknote bundle You should always insert the banknote bundles into the cash out cassette so that the silver stripes or other raised embossing of the individual bundles are alternately pointing to the left and to the right ...

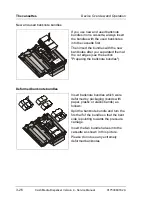
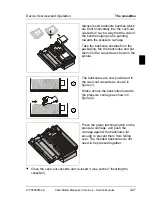
Страница 108: ...ith the new banknotes after you separated them at the cut edges see the section Preparing the banknote bundles Deformed banknote bundles Insert banknote bundles which were deformed by packaging bands with paper plastic or elastic bands as follows Split the banknote bundle and turn the first half of the bundle so that the bent side is pointing towards the pressure carriage Insert the two bundle hal...

Страница 109: ...packaging fan the banknotes and put them into the cassette as shown in the picture 1 2 The banknotes are now positioned in the cash out cassette as shown in figure 1 Stroke across the banknotes towards the pressure carriage as shown in figure 2 Press the green latching button on the pressure carriage and push the carriage against the banknotes far enough to prevent them from falling over The inser...

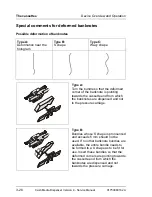
Страница 110: ...rmed corner of the banknote is pointing towards the cassette end from which the banknotes are dispensed and not to the pressure carriage Type B Bundles whose S shape is pronounced and exceeds 5 mm should not be used If no other banknote bundles are available the entire bundle needs to be formed to a U shape as to be fit for use Insert these bundles so that the deformed corners are pointing towards...

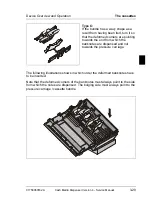
Страница 111: ...deformed corners are pointing towards the end from which the banknotes are dispensed and not towards the pressure carriage The following illustrations shows in which order the deformed banknotes have to be inserted Note that the deformed corners of the banknotes must always point to the side from which the notes are dispensed The bulging side must always point to the pressure carriage cassette han...

Страница 112: ...ssettes is the same Closing the cassette If the cassette does not have a lock you must close the cassette lid 1 and turn the green locking lever 2 to the left The cassette lid then engages in the lock and the lever 2 automatically returns to its original position 2 If the cassette has a lock close the cassette lid 1 and turn the key 2 to the left as far as possible Pull the key from the cassette l...

Страница 113: ...te lid and turn the locking unlocking lever to the left as far as possible Lock the cassette using the key see section Closing the cassette 1 Push the cassette back into the CMD V4 in one uninterrupted motion until it engages Wait for the single signal tone confirming the correct pressure build up in the cassette If a triple signal tone sounds instead of a single tone remove the cassette and check...

Страница 114: ...ew banknote types Activate the product specific software see chapter Basic Operation section Calling the product specific software in the operating manual of the basic device From the specified cassette the currency characteristics the value of the banknotes and the emission date will be read out These values are transmitted to the cassette when it is initialized There will be as many banknotes di...

Страница 115: ...position and count them The number of dispensed banknotes must be the same as the one indicated by the system If this is not the case you will have to repeat the whole procedure for determining the reference values Place the counted banknotes back in the clamp stacking position Push the CMD V4 as far as possible into the safe Wait until the CMD V4 is ready After the CMD V4 has powered up the cash ...

Страница 116: ...ions described in the following sections can be performed only when the safety switch is closed i e the CMD V4 is in cash out position Functions 2 and 3 may be started only from normal operation display 00 or 14 or when all transport paths are guaranteed to be clear Display Function Function description Normal operation Return to normal mode no function RESET After resetting the result is shown on...

Страница 117: ...yed in alternating mode Example As far as the firmware build is concerned to be read with DEF Build 1 137 the version number 1 137 is shown as follows 11 for 2 seconds 37 for 1 second After nine attempts the device returns to normal mode Reset statistics counter Resettable counters are set to 0 and the current time of the realtime clock is saved ...

Страница 118: ...Function test Device Overview and Operation 3 36 Cash Media Dispenser Version 4 Service Manual 01750060162 A ...

Страница 119: ...ted up for the first time 1 Adjust the cash cassettes to the note size if this was not done at the production plant 2 Fill the cassettes with real cash and insert them 3 Update the note parameters and cassette replenishment data 4 Calculate reference values for the various note types 5 Authenticate the cash i The Device Overview and Operation chapter describes how to carry out the steps mentioned ...

Страница 120: ... the note size if this was not done at the production plant if replacement makes this necessary 3 Fill the cassettes with real cash and insert them if replacement makes this necessary 4 Update the note parameters and cassette replenishment data if replacement makes this necessary 5 Calculate reference values for the various note types if replacement makes this necessary 6 Authenticate the cash i T...

Страница 121: ...ess measurement station replaced X X X Dispensing unit without thickness measurement station replaced X X Cash out cassette replaced X New note type used X X New firmware loaded Shutter X Remove cassettes before initializing photosensors photosensors must not be covered KDIAG DXM Remove cassette with the CMD V4 turned on normal mode but not in the process of dispensing and reinsert it Calculate re...

Страница 122: ...s all photosensors must be free Check the jumper settings on the CMD controller in accordance with the system configuration All connectors on the CMD controller must have been plugged in Connect jumper 7 on the CMD controller Clear CMOS before turning on the device Turn on the CMD V4 Leave jumper 7 connected until the status display shows the value io Remove jumper 7 Clear CMOS and run through the...

Страница 123: ...ing the CMD V4 01750060162 A Cash Media Dispenser Version 4 Service Manual 4 5 Jumper settings on the CMD controller Position of the jumper panel on the CMD controller 1 Position of the jumper panel on the CMD controller ...

Страница 124: ... housing 5 Jump C Not allocated reserved 6 Jump D Not allocated reserved 7 Clear CMOS Clear CMOS and trigger reset afterwards remove the jumper again 8 NEN SE controls energy saving mode NEN signal is generated by the CMD V4 9 Battery CMOS backup battery inactive CMOS backup battery active 10 Jump PLD Reserved input for the programmable logic device Jumper 1 is located at the top of the controller...

Страница 125: ... Initializing the CMD V4 01750060162 A Cash Media Dispenser Version 4 Service Manual 4 7 Default settings Jumper connected NEN Battery Jumper connected to just one pin DOOR possibility of enabling DOOR or SCOP ...

Страница 126: ...h out cassettes have to be filled with real cash Refer to the Filling the cash out cassette section in the Device Overview and Operating chapter Updating note parameters and cassette replenishment data You can find information on this in the Cassette initialization section in the Device Overview and Operating chapter Calculating reference values for the various note types This is described in the ...

Страница 127: ... transport or dispensing operation If a special state occurs during one of these operations this is shown on the status display and is retained until the next device operation Additional messages may be displayed during initialization after powering up and after a reset It is also possible to run an internal test to see if the CMD V4 is ready for operation You can find more on this in the Function...

Страница 128: ...oller Controller faulty Replace the controller Startup of firmware reset Validation of firmware Check of CMOS parameters Test of mechanical compo nents Clearing run None Error 11 Initialization of photosensors CMOS error PS xx 22 Error 23 28 Error 18 19 71 9A X X Error during photosensor initialization after change of configuration or replacement of controller the display alternates between PS and...

Страница 129: ... test Wait until power up is completed Burn program controller Compare check controller Controller OK No error Faulty software Switch the device off and on again Communication problem with ChipCard controller Check the lines to the ChipCard controller Communication problem with ChipCard or wrong ChipCard inserted ChipCard number not 226 0PR Check the ChipCard at the controller Stacker EEPROM missi...

Страница 130: ...etract has been executed The cash that was not removed by the customer has been placed in the SAT After this all transport functions of the CMD V4 are disabled by the software Remove the customer money from the SAT and then reset the device lock using the product specific software CMD V4 minimum configuration is missing In order to be able to operate the CMD V4 requires at least one cash out casse...

Страница 131: ...nectors on the CMD controller or at the photosensor elements are plugged in properly Then return the CMD V4 to cash out position in the safe thereby closing the safety switch and starting the CMD V4 again Reset If the status display continues to show 18 after this start the jam was not completely eliminated or another jam occurred Using a test program check the self test job Status of the Photosen...

Страница 132: ...r in lifting magnet MA2 Select test function 2 mechanical test by pressing the function button and observe actuation of the single reject switch If lifting magnet MA2 does not move at all or all the way the stacker and output transport SAT or the controller has to be replaced If the magnet moves all the way the CMD V4 can go back into operation If the fault recurs within a short time and checking ...

Страница 133: ...otes and scraps and remove them Then return the CMD V4 to cash out position in the safe thereby closing the safety switch and starting the CMD V4 again Reset If the status display continues to show 22 after restart the controller must be replaced Routing disk DCM 2 SM 3 faulty blocked Eliminate the blockage Set the CMD V4 in the safe to cash out position safety switch closed and select test functi...

Страница 134: ...ther the connector on the CMD controller and lifting magnet MA6 has been plugged in correctly Check whether the digital photosensor is firmly attached to the switchover lever Place the CMD V4 in the safe in its dispensing position safety switch closed Reinsert the RR cassette select test function 2 mechanical test by pressing the function button and check the movement of the RR drive MA6 If the li...

Страница 135: ...here is a loud running noise check the cash paths of the CMD V4 for a massive note jam Check the inlet to the reject retract cassette for jammed notes Set the CMD V4 in the safe to cash out position safety switch closed and select test function 2 mechanical test on the function button after starting up the CMD V4 check the running noise and transport function of the main motor If the main motor do...

Страница 136: ...s with status display 26 the SAT or the controller must be replaced Shutter error Check the output area of the CMD V4 and of the shutter for any foreign matter that may be preventing the shutter shield from moving Place CMD V4 in safe in cash out position safety switch closed Select test function 2 mechanical test by pressing the function button and observe the movement of the shutter The shutter ...

Страница 137: ...note output and shutter for any foreign bodies that may be disturbing the functioning of the output photosensor Verify that the connectors at the CMD V4 are properly plugged in Set the CMD V4 in the safe to cash out position safety switch closed and select test function 1 Reset on the function button If status code 29 reappears after the CMD V4 is started the shutter the SAT or the controller must...

Страница 138: ...e first time it occurs warning but do the following if it recurs often 1 Remove the cassette from dispensing unit x and check the inserted banknotes are the front notes deformed on one side Is pressure applied evenly to the front banknotes left and right 2 When the cassette is removed check the dispensing area in the dispensing unit for jammed scraps 3 Check the cash path from the cassette x to th...

Страница 139: ...it or the controller have to be replaced X Cash could not be dispensed or faulty amount of pressure against the banknotes when a cassette is inserted x 1 6 A No cash could be dispensed from cassette x or B The required pressure could not be established when the cassette was inserted Procedure in case A 1 Remove the cassette x and check the inserted banknotes the notes must be standing upright in t...

Страница 140: ...ch closed If this test ends with error code 4x again repeat the test dispensing procedure checking the function of the clutch and retaining shaft in the process If the clutch or retaining magnet is not activated the dispensing unit or controller must be replaced Procedure in case B 1 Remove the cassette x and check the inserted banknotes the notes must be standing upright in the cassette Are the f...

Страница 141: ...e motor is still not activated the controller is faulty If you can hear the motor running but error message 4x still appears after a few seconds together with three acoustic signals remove the cassette and check manually if the dispensing shaft can be lifted easily Remove the cassette open it and place it in dispensing position manually Check the smooth movement of the return bar 3 If you cannot f...

Страница 142: ...ts Reinsert the cassette and restart the application If many good notes are subject to a single reject during dispensing or if error 4x recurs after a short time the reference values should be recalculated for this note type If the error cannot be removed the dispensing unit or controller must be replaced X Cassette defective x 1 6 The banknote data stored in cassette x cannot be read or re writte...

Страница 143: ... x 1 6 A If a cassette can be inserted without error single acoustic signal the error message indicates a very dirty dispenser sensor PSDx photosensor in dispenser module x which must be cleaned Then execute a Reset set CMD V4 to dispensing position Note When this error has occurred for the first time the CMD V4 will continue to function until operation shuts down automatically when the level of d...

Страница 144: ...carriage of the cassette Then execute a Reset set CMD V4 to dispensing position Use the DYK self test program check status of photosensors photosensor amplifiers to check the level of dirt on all photosensors in KDIAG Photosensors with status 3 or higher must be cleaned The improvement in status can be checked after reset Note When this error has occurred for the first time the CMD V4 will continu...

Страница 145: ...om below clean the surfaces of the prism between the stacker wheels Put the CMD V4 back in its dispensing position If the status display continues to show error code 90 after powering up reset the stacker has to be replaced Use the DYK self test program check status of photosensors photosensor amplifiers to check the level of dirt on all photosensors in KDIAG Photosensors with status 3 or higher m...

Страница 146: ...ively and if necessary from the associated prism P two glass clear surfaces opposite the transmitter receiver with a brush or compressed air After cleaning set the CMD V4 to home position and wait for start up or select 1 Reset on the function button Use the DYK self test program check status of photosensors photosensor amplifiers to check the level of dirt on all photosensors in KDIAG Photosensor...

Страница 147: ...c software in the operating manual of the basic device Open the safe door see the operating manual of the basic device Holding the green locking handle pull out the CMD V4 as far as possible see chapter Removal Installation of Components section Pulling out pushing in the CMD V4 i If the locking handle jams you must check the current position of the clamp If possible push the clamp carefully back ...

Страница 148: ...o be in the stacker position Otherwise the clamp can fall when it is pulled out and the pull cable can be damaged Remove the reject retract cassette see the Removing the cassette section of the Device Overview and Operating chapter and see which position the banknote clamp is in If the banknote clamp is not in the stacking position try carefully to move it down into the stacking position When the ...

Страница 149: ...propriate locking handle 1 or 2 of the dispensing unit and move the cover forward Check the upper or lower area of the vertical transport facility and remove any notes that are there 1 Swing the cover back until you hear it click into place i Make sure that the cover lies flush with the surface and that the two sides of the locking handle are locked in position ...

Страница 150: ...ed when the cassettes have been removed from the dispensing units see chapter Device Overview and Operation section Removing the cassette Check the dispensing area of each dispensing unit for banknotes and if necessary remove the notes see arrow Re insert all cassettes which were removed see chapter Device Overview and Operation section Inserting the cassette Log the cassettes on using the product...

Страница 151: ...60162 A Cash Media Dispenser Version 4 Service Manual 5 25 Checking the stacker and output transport i Do not try to open the clamp by force you could damage it Stacker wheel area Check the area round the vertical transport and if necessary remove any notes ...

Страница 152: ...penser Version 4 Service Manual 01750060162 A Single reject area i The function of the single reject depends on the individual configuration Push the green unlocking levers 1 out and pull the flap 2 forward Check the dispensing area and if necessary remove the banknotes ...

Страница 153: ...put transport Horizontal output If the clamp has come to a standstill at a position outside the stacking position you may need to check and clean the gear tracks 1 Gear tracks of the output transport Vertical output 1 If the clamp has come to a standstill at a position outside the stacking position you may need to check and clean the gear tracks 1 ...

Страница 154: ...eck the photosensors 1 and 2 in the shutter area After checking the cash paths proceed as follows After checking the cash paths push the CMD V4 by the green locking lever back into the safe as far as possible see the operating manual of the basic device Close the safe door see the operating manual of the basic device ...

Страница 155: ...eplacing any components i After components have been replaced the CMD V4 must be initialized see chapter Start up section Initializing the CMD V4 Pulling out pushing in the CMD V4 Open the safe door please refer to the operating manual of the basic device Pulling it out Pull the CMD V4 out of the safe by the green locking unlocking handle 1 i If the locking handle jams and you cannot pull out the ...

Страница 156: ...nectors from the controller Push the fastening bolts 1 to 5 together and carefully remove the CMD controller i The EEPROM 6 must always stay on the stacker Installation For installation the controller is placed onto the bolts The controller must noticeably click into place i After the CMD controller has been replaced the photosensors and the pressure sensor must be reinitialized and the reference ...

Страница 157: ...into place Push the stacker back arrow 2 and lift it up and out i If the stacker was delivered without the clamp the clamp must be rebuilt i The bordering screws from the old stacker must used on the new stacker The bordering screws depend on the device configuration In the event of a clamp malfunction they are to prevent the clamp from falling out Only use screws of the same type length diameter ...

Страница 158: ...on the right The following table provides an overview of the bordering screws which are required for the individual systems Bordering screws on the left Bordering screws on the right ProCash 1500xe Rearload ProCash 1500xe Frontload ProCash 2000xe Frontload Rearload ProCash 2000xe Frontload Rearload ProCash 2050xe ProCash 2100xe Frontload Rearload ProCash 2100xe Frontload Rearload ProCash 2150xe Pr...

Страница 159: ...ransport Remove connector 1 on the left hand side of the CMD V4 and remove the two screws 2 and 3 Remove screws 1 and 2 on the right hand side Pull the output transport apart slightly on the left and on the right and remove it Reinstall it by following the same steps in reverse order i On installation make sure that the same type of screw is used ...

Страница 160: ...arrow Pull the output transport a little in the direction of the arrow and remove it upwards Reinstall it by following the same steps in reverse order i When replacing the output transport make sure that it fits properly in the guides of the stacker Pull the cash media dispenser out of the device if necessary and then push it back in Adjustment Push the plate 1 up against the output transport 2 wi...

Страница 161: ...e operating and service manuals of the ProCash 2050xe Detach connector 1 from the CMD controller Remove screws 2 and 3 Remove screws 1 and 2 on the other side Push the two plates outwards a little see arrows and remove the output transport 3 upwards Reinstall it by following the same steps in reverse order i For installing the new output transport you may only use the screws previously removed or ...

Страница 162: ...of the device see arrow Pull the output transport a little in the direction of the arrow and remove it upwards Reinstall it by following the same steps in reverse order i When replacing the output transport make sure that it fits properly in the guides of the stacker Pull the cash media dispenser out of the device if necessary an then push it back in Adjustment Push the plate 1 up against the outp...

Страница 163: ...osen screw 2 and unhook the ground strap Loosen screw 3 Push the shutter in the direction of the arrow 4 and remove it from the mount Carefully push the cable out 5 and remove the shutter Reinstall it by following the same steps in reverse order When inserting it make sure that the catches of the shutter 1 to 3 sit in the holes 4 to 6 of the shutter mount Adjust the shutter so that the shutter slo...

Страница 164: ... Pull the customer panel out of the device refer to the operating or service manual of the ProCash 2050xe Detach connector 1 Loosen screw 2 and unhook the ground strap 3 Loosen the screws 1 and 2 Push the shutter a little in the direction of the arrow and remove it Carefully remove the cable 3 Reinstall it by following the same steps in reverse order ...

Страница 165: ...nual 6 11 Shutter ProCash 2100xe RL Open the door of the operating unit and pull the customer panel out of the device see the operating or service manual of the ProCash 2100xe Loosen screw 1 and detach connector 2 Loosen screw 1 and remove the shutter upwards Reinstall it by following the same steps in reverse order ...

Страница 166: ...ull out the customer panel refer to the operating or service manual of the ProCash 2150xe Loosen screw 1 on the bottom of the shutter Push the cable 2 a little to the right unhook it on the left side and remove it to the left Detach connector 3 Remove screws 1 and 2 and remove the shutter upwards Reinstall it by following the same steps in reverse order ...

Страница 167: ...s from the CMD V4 see chapter Device Overview and Operation section Removing the cassette Detach tab connectors 1 and 2 from the controller and connectors 3 and 4 from the distributor board How to remove the connectors 5 is described below Press catches 1 and 2 in the direction of the arrow and open the cover 3 Repeat this step for the other three covers ...

Страница 168: ...Dispenser Version 4 Service Manual 01750060162 A While pushing catches 1 and 2 in the direction of the arrow detach connector 3 forwards Proceed in the same way for the other three connectors Push the white pins 1 to 6 down and remove the distributor board with its cover ...

Страница 169: ...commodate two double dispensing units The upper dispensing unit always includes the thickness measuring station i The two dispensing units must not be confused Remove the cover 1 by pulling it off Upper dispensing unit with thickness measuring station Removal Release the upper dispensing unit by turning the locking unlocking levers 1 and 2 by 90 counterclockwise ...

Страница 170: ...is cable must be unplugged 1 Detach connector 2 from the distributor board Remove the dispensing unit in the direction of the arrow Installation Carefully push the connecting cable 1 between the toothed wheels and the device panel Insert the dispensing unit and close the latches If you cannot close them check the proper fit of the dispensing unit Carefully turn the toothed wheels if necessary to c...

Страница 171: ...nnect the cables to the CMD controller 1 and the distributor board 2 Mount the cover Lower dispensing unit Turn the locking unlocking levers 1 and 2 on the left side of the dispensing unit by 90 counterclock wise Detach connector 1 from the distributor board Remove the lower dispensing unit in the direction of the arrow ...

Страница 172: ... the connecting cable 1 between the toothed wheels and the device panel Insert the dispensing unit and close the latches If you cannot close them check the proper fit of the dispensing unit Carefully turn the toothed wheels if necessary to cause the dispensing unit to click into place Attach the cable to the distributor board 1 Mount the cover ...

Страница 173: ...Clamp Removal Turn the two routing disks 1 and 2 in the direction of the arrow as far as possible The clamp closes at the same time and has to engage Turn the routing disks back by approx 90 as shown in the picture so that the clamp can be removed upwards i Make sure that the clamp is not opened improperly ...

Страница 174: ...arings are loosely attached and can fall out Remove the clamp upwards Remove the ball bearings with the black hooks 1 and the toothed wheels 2 on both sides of the clamp The illustration shows the latch 1 on the left hand side used to open the clamp Open the clamp by pushing the latches 1 and 2 on the left and on the right side in the direction of the arrow ...

Страница 175: ...ecuring pin 1 and hold onto the cable Loosen the cable fixing 1 and pull out the cable i Careful Make sure that the cable is not pulled back again and secure it if necessary Installation Feed the cable in 1 as shown in the picture by moving it slightly back and forth Plug in the cable 1 and press the cable fixing 2 shut ...

Страница 176: ...ust be engaged manually Put the two black hooks and the ball bearings 1 on the left and right side of the clamp back in place Slip on the two toothed wheels and the ball bearings 2 The toothed wheel is pushed on with the bulging side pointing inside Set the clamp down on the stacker as shown in the illustration Push the clamp into the routing disk The toothed wheel must be inserted evenly 1 and 2 ...

Страница 177: ...utor In addition the safety plug must be disconnected from the power distributor Maintenance Maintenance intervals Preventive maintenance is required for the CMD V4 every two years or at the latest after 200 000 transactions Performing maintenance i All photosensors are only allowed to be cleaned in a dry state Preventive maintenance consists of the following If any error statistics exist evaluate...

Страница 178: ...l photosensors prisms and transport rollers in the dispensing units and the stacker with compressed air Function testing is carried out by the system software You will find further information in the software documentation After maintenance clear the parameters in the CMD controller s CMOS Then the CMD has to be initialized and reference values have to be calculated for all note types See the Init...

Страница 179: ...e the output transport refer to chapter Removal Installation of Components Visually inspect the output transport for damage and dirt Clean the output transport using a vacuum cleaner brush cloth or compressed air Reinstall the output transport refer to chapter Removal Installation of Components Shutter Visually inspect the shutter for damage and dirt Clean all photosensors using a brush cloth or c...

Страница 180: ...inspect the reject retract cassette for damage and dirt Clean the reject retract cassette using a vacuum cleaner brush cloth or compressed air Clean the rollers with isopropyl alcohol if necessary Check that the toothed drive wheel is sitting properly Check for even pressure of the transport rollers at the intake of the cassette General Check that the components have been installed correctly Check...

Страница 181: ...10ml GFI BARRIERTA 10ML 2056293 Multi purpose grease BP LS2 50ml 01750049230 2085328 Screw lacquer red 20 ml NCA 39692 00 0 52 6410170 SNI special grease NCA 32555 00 2 52 6387748 Heat insulating packing for gas soldering iron SON QC1 2032858 Portasol gas soldering iron filled NCA 30071 00 8 40 6377157 Exxon gas WVC 079517 2030869 Maintenance fluid 100ml pump spray TPI VC891 2030745 Compressed air...

Страница 182: ...u will find the address in the internet http www wincor nixdorf com internet index html You will find a list of all the cleaning and maintenance materials released by Wincor Nixdorf in the intranet or extranet i Please note the manufacturer s specifications on the packaging and on the enclosed information sheet The product may be damaged or soiled if materials are used that are not approved or if ...

Страница 183: ...witch Connector 3 pin DUBOX 1 row 90 Pin Signal name Meaning 1 Relay Safety cut off relay 2 GND Ground 3 NC not connected Basic module Elements HS2 Lifting magnet of single reject switch SM6 Stepper motor for tray selection in reject retract cassette DPS4 Digital photosensor for tray selection S1 Micro switch Reject retract cassette available PS1 Cash path photosensor reflective photosensor PS21 C...

Страница 184: ... photosensor DPS4 power supply 8 GND Digital photosensor DPS4 Ground 9 GL4 Digital photosensor DPS4 output signal 10 IGSAMOUT Digital photosensor DPS4 Transmit current Plus 11 S1 Micro switch Reject retract cassette available signal 12 GND Micro switch Reject retract cassette available ground 13 VCCL PS21 receiver collector 14 LAGT212235 PS21 receiver emitter 15 VCCL PS1 receiver collector 16 LAGT...

Страница 185: ...g 1 M1P Main motor Plus connection 2 M1M Main motor Minus connection Stacker Elements DCM3 Swiveling motor for collecting tray DPS1 DPS3 Digital photosensors for collecting tray position DCM5 Stepper motor for bundle reject switch DPS8 DPS9 Digital photosensors for bundle reject switch PS29 PS22 Cash path photosensors controlled PS18 PS19 PS29 TOPLED attention constant light T1 Timing disk DCM1 ...

Страница 186: ...9 9 GL1N Output signal Digital photosensor DPS1 Dispensing position 10 GL3N Output signal Digital photosensor DPS3 Cash out position 11 GL8N Output signal Digital photosensor DPS8 Transport position 12 GL9N Output signal Digital photosensor DPS9 Reject position 13 IGSAMIN Transmit current Plus DPS1 3 and DPS8 9 14 IGSAMOUT Transmit current Minus DPS1 3 and DPS8 9 15 P12V PS29 receiver collector 16...

Страница 187: ...3 Free 34 Free Frontload module Elements PS33 PS35 Cash path photosensors controlled PS26 PS26 TOPLED attention constant light Connector 10 pin DUBOX 2 rows 90 Pin Signal name Meaning 1 P12V PS26 receiver collector 2 LAGT2629 PS26 receiver emitter attention constant light 3 VCCL PS35 receiver collector 4 LAGT212235 PS35 receiver emitter 5 VCCL PS33 receiver collector 6 LAGT33 PS33 receiver emitter...

Страница 188: ...name Meaning 1 P24V Electromagnetic clutch Plus connection dispensing unit position 1 2 EK1 Electromagnetic clutch Minus connection dispensing unit position 1 3 P24V Lifting magnet retaining spring Plus connection dispensing unit position 1 4 HR1 Lifting magnet retaining spring Minus connection dispensing unit position 1 5 P24V Electromagnetic clutch Plus connection dispensing unit position 2 6 EK...

Страница 189: ...nit position 1 14 UANDR2 Signal of pressure measurement dispensing unit position 2 15 IAN12IN Transmit current for pressure measurement reflective photosensor 16 IAN12OUT Transmit current for pressure measurement reflective photosensor 17 VCCL all receivers collector 18 LAM135 PSD1 receiver emitter 19 LKL135 PSE1 receiver emitter 20 LAM246 PSD2 receiver emitter 21 LKL246 PSE2 receiver emitter 22 n...

Страница 190: ...M cassette 1 Select 6 EECSK2 serial EEPROM cassette 2 Select 7 GND Ground EEPROM measuring electronics for cassette 1 8 GND Ground EEPROM measuring electronics for cassette 2 9 VCCSWK1 Switched power supply cassette 1 10 VCCSWK2 Switched power supply cassette 2 11 nc not connected 12 nc not connected 13 SMK1P1P Stepper motor cassette 1 Phase 1 Plus 14 SMK2P1P Stepper motor cassette 2 Phase 1 Plus ...

Страница 191: ...e Meaning 1 P24V Electromagnetic clutch Plus connection dispensing unit position 3 2 EK3 Electromagnetic clutch Minus connection dispensing unit position 3 3 P24V Lifting magnet retaining spring Plus connection dispensing unit position 3 4 HR3 Electromagnetic clutch Minus connection dispensing unit position 3 5 P24V Electromagnetic clutch Plus connection dispensing unit position 4 6 EK4 Electromag...

Страница 192: ... 3 14 UANDR4 Signal of pressure measurement dispensing unit position 4 15 IAN34IN Transmit current for pressure measurement reflective photosensor 16 IAN34OUT Transmit current for pressure measurement reflective photosensor 17 VCCL PSD3 receiver collector 18 LAM135 PSD3 receiver emitter 19 LKL135 PSE3 receiver emitter 20 LAM246 PSD4 receiver emitter 21 LKL246 PSE4 receiver emitter 22 nc not connec...

Страница 193: ...OM cassette 3 Select 6 EECSK4 serial EEPROM cassette 4 Select 7 GND Ground EEPROM measuring electronics for cassette 3 8 GND Ground EEPROM measuring electronics for cassette 4 9 VCCSWK3 Switched power supply cassette 3 10 VCCSWK4 Switched power supply cassette 4 11 nc not connected 12 nc not connected 13 SMK3P1P Stepper motor cassette 3 Phase 1 Plus 14 SMK4P1P Stepper motor cassette 4 Phase 1 Plus...

Страница 194: ...taining spring dispensing unit position 5 6 PSD5 6 Photosensor dispensing sensor controlled dispensing unit position 5 6 PSE5 6 Photosensor cassette empty sensor dispensing unit position 5 6 EEPR5 6 serial EEPROM cassette 5 6 SMK5 6 Stepper motor cassette 5 6 LANDR5 6 Note pressure measurement dispensing unit position 5 6 Connector 40 pin Berg pins LOW profile 2 rows 90 Pin Signal name Meaning 1 G...

Страница 195: ...1 LAM135 PSD5 receiver emitter 22 LKL135 PSE5 receiver emitter 23 LAM246 PSD6 receiver emitter 24 LKL246 PSE6 receiver emitter 25 GND Ground 26 EEDAT serial EEPROMs data line 27 EETAKT serial EEPROMs clock line 28 EECSK5 serial EEPROM cassette 5 Select 29 EECSK6 serial EEPROM cassette 6 Select 30 GND Ground 31 SMDAT0 Stepper motor control signal Bit 0 32 SMDAT1 Stepper motor control signal Bit 1 3...

Страница 196: ...f Z module 2 ZRICHTG Direction for stepper motor of Z module 3 RMSH1N Indicator for shutter position bit 0 4 GND Ground 5 SHMOTEN Shutter motor M7 or M8 ON 6 ZEIN Stepper motor of Z module ON 7 LSH27 PS27 signal 8 nc not connected 9 IQLSSH Photosensor transmit current 10 P24V Power supply 24 V 11 RMSH2N Indicator for shutter position bit 1 12 SHMOTRN Shutter motor M7 or M8 Direction 13 P12V Power ...

Страница 197: ...s been transported to the output slot the shutter is moved back to the CLOSED position until the transition from L L to H H has been completed L 0 V H 12 V RMSH2N RMSH1N Meaning H L Shutter flap is CLOSED L L Shutter flap between CLOSED and cash presentation H H Shutter flap between cash presentation and OPEN L H Shutter flap is OPEN ...

Страница 198: ...Meaning 1 DMLED1IN Transmit current for IR LED of reflective photosensor 1 2 DMLED1OUT Transmit current for IR LED of reflective photosensor 1 3 DMLED2IN Transmit current for IR LED of reflective photosensor 2 4 DMLED2OUT Transmit current for IR LED of reflective photosensor 2 5 P12V Power supply 12 V 6 DMPHT1 Intensified signal for phototransistor 1 of reflective photosensor 1 7 N12V Power supply...

Страница 199: ...4 pin DUBOX 1 row 90 Pin Signal name Meaning 1 TUERM Solenoid operated switch Door switch of safe door 2 GND Ground for solenoid operated switch 3 TUERB Jumper that reports wiring of the door switch 4 GND Ground for bridge Battery connector Elements Lithium battery TL5242 W no 92675 07 1 39 3 6V 1 9Ah Connector 4 pin Berg pin contact strip one row 90 Pin Signal name Meaning 1 VBATT Plus pole batte...

Страница 200: ... Signal name Meaning 1 DCD1 Carrier Detect 2 RXD1 Receive Data IN 3 TXD1 Transmit Data OUT 4 DTR1 Data Terminal Ready 5 GND Ground 6 DSR1 Data Set Ready 7 RTS Request to Send OUT 8 CTS Ready for Sending IN 9 RI Ring Indicator The 9 pin Sub D connector is pinned in accordance with the standard The CTS input pin 8 is connected at 12 V on a high resistance basis in order to receive a defined signal w...

Страница 201: ...alog Hall sensor 4 GND 5 5 V 6 GND 7 Measuring input for the second analog Hall sensor 8 GND X2 shutter JST pin connector model PHD 2 x 10 pin S20B PHDSS 90 Reihe A3C40014865 Sohn A3C40014864 Pin Designation 1 24 V 2 Last GND 3 12 V 4 GND 5 Release of energization of SM7 24 V level phase open of M7 6 Direction of SM7 24 V level phase closed of M7 7 Gate input of DPS10 8 Gate input of DPS11 9 Gate ...

Страница 202: ...S28 or PS29 rear edge control PSR7 12 current for transmit diodes from PS27 PS28 or PS26 PS29 LSISH 13 Gate input of shutter1 14 GND 15 Gate input of shutter2 16 GND 17 Gate input of shutter3 18 GND 19 Gate input of shutter4 20 GND Jumper coding Pin 19 Pin 17 Pin 15 Pin 13 Shutter4 Shutter3 Shutter2 Shutter1 B Shutter in safe B Shutter in counter section ...

Страница 203: ... of HS4 sensor for clamp end position 3 GND 4 N C 5 Gate input of transport1 6 GND 7 Gate input of transport2 8 GND 9 Gate input of transport3 10 GND 11 Gate input of transport4 12 GND Jumper coding Pin 11 Pin 9 Pin 7 Pin 5 Transport4 Transport3 Transport2 Transport1 B Rearload transport module in safe B Frontload transport module in safe B B Rearload transport module in counter section B B Frontl...

Страница 204: ... 2 Gate input of HS4 sensor for clamp end position 3 GND 4 N C 5 Gate input of transport1 6 GND 7 Gate input of transport2 8 GND 9 Gate input of transport3 10 GND 11 Gate input of transport4 12 GND 8 pin Western Reihe 5603107937 00 or A3C40016907 Sohn 5603111937 Pin Designation 1 N C 2 DSR not connected 3 RXD 4 DTR RTS 5 TxD 6 GND 7 CTS 8 N C ...

Страница 205: ...7337 00 Pin Designation 1 N C 2 USB Data 3 USB Data 4 GND 5 Shielding 6 Shielding X6 Door switch and disconnector in safe JST pin connector model PHD 2 x 5 pin S10B PHDSS 90 Reihe A3C40016307 00 Sohn A3C40016306 Pin Designation 1 N C 2 N C 3 Polling the safety switch 4 GND 5 Polling the door switch 6 GND 7 Polling the jumper 8 GND 9 Reserve input 10 GND ...

Страница 206: ... upright Reihe 9405007037 Sohn 9405010037 Pin Designation 1 n c DSR not connected 2 RXD 3 DTR RTS 4 TxD 5 GND 6 CTS X8 NEN from special electronics module JST pin connector model PH 2 pin S2B PH K S 90 Reihe A3C40014712 11 Sohn A3C40014711 Pin Designation 1 NEN 2 GND X9 24 V voltage supply 2 pin Mini Fit 39 30 1020 Reihe A3C40029754 Sohn A3C40029755 Pin Designation 1 24 V 2 GND ...

Страница 207: ...52 Pin Designation 1 Motor 2 N C 3 Clock signal from main motor M1 4 Motor 5 5 V 6 GND X12 additional motor on main drive assembly for single reject optional JST pin connector model PH 1 x 4 pin S4B PH K S 90 Reihe 7206807137 Sohn 7206810137 Pin Designation 1 Phase A of SM1 pressure of sliding surface to empty the single reject 2 Phase A of SM1 pressure of sliding surface to empty the single rejec...

Страница 208: ...97 Sohn A3C40032098 Pin Designation 1 Phase A from SM9 stacker wheel 2 Phase A from SM9 stacker wheel 3 Phase B from SM9 stacker wheel 4 Phase B from SM9 stacker wheel 5 Phase A from SM2 left routing disk 6 Phase A from SM2 left routing disk 7 Phase B from SM2 left routing disk 8 Phase B from SM2 left routing disk 9 Phase A from SM3 right routing disk 10 Phase A from SM3 right routing disk 11 Phas...

Страница 209: ... to EEPROM 5 Data output to EEPROM 6 Data input from EEPROM 7 N C 8 N C X16 Hall sensors at stacker JST pin connector model PHD 2 x 6 pin S12B PHDSS 90 Reihe A3C40015986 Sohn A3C40015984 Pin Designation 1 Vcc 2 Vcc 3 Gate input of HS1 sensor for clamp basic position 4 Gate input of HS2 sensor for reject retract initial position 5 GND 6 GND 7 Vcc 8 Vcc 9 Gate input of HS3 sensor for reject retract ...

Страница 210: ...t 4 Gate input of DPS15 sensor for switch position of single reject 5 GND 6 GND 7 Vcc 8 Vcc 9 Gate input of DPS7 sensor for basic position of the sliding surface in single reject 10 Gate input of DPS3 reserve used several times 11 GND 12 GND 13 Power supply for photo transistor from PS2 check for empty compartment during single reject LSVCC 14 assuring input for phototransistor of PS2 checking for...

Страница 211: ...sk 4 Gate input of DPS8 polling the position of the left routing disk 5 GND 6 GND 7 Vcc 8 Vcc 9 Gate input of DPS2 sensor for stacker wheel position 10 Gate input of DPS4 sensor for retract compartment 11 GND 12 GND 13 Vcc 14 Vcc 15 Gate input of DPS1 reserve 16 Gate input of DPS3 reserve used several times 17 GND 18 GND 19 Power supply for photo transistor from PS1 stacker wheel intake LSVCC 20 M...

Страница 212: ... 8 5 V 9 5 V switched 10 5 V switched 11 5 V switched 12 Last GND 13 Last GND 14 Last GND 15 Last GND 16 Last GND 17 Last GND 18 24 V switched 19 24 V switched 20 24 V switched 21 24 V switched 22 24 V switched 23 24 V switched 24 Dispensing gear of dispensing unit 1 25 Retaining magnet of dispensing unit 1 26 Dispensing gear of dispensing unit 2 27 Retaining magnet of dispensing unit 2 28 Dispens...

Страница 213: ...g magnet of dispensing unit 4 32 Dispensing gear of dispensing unit 5 33 Retaining magnet of dispensing unit 5 34 Dispensing gear of dispensing unit 6 35 Retaining magnet of dispensing unit 6 36 Dispensing gear of dispensing unit 7 37 Retaining magnet of dispensing unit 7 38 Dispensing gear of dispensing unit 8 39 Retaining magnet of dispensing unit 8 40 Last GND ...

Страница 214: ...PROM data 4 D0 5 D1 6 D2 7 D3 8 D4 9 D5 10 D6 11 D7 12 CS ICN 13 CS ReserveN 14 CS Dispensing unit1 15 CS Dispensing unit2 16 CS Dispensing unit3 17 CS Dispensing unit4 18 CS Dispensing unit5 19 CS Dispensing unit6 20 CS Dispensing unit7 21 CS Dispensing unit8 22 WRN 23 RDN 24 ResetN 25 GND 26 Free 27 Power source for LEDs LSIPLUS 28 Current sink dispensing unit 1 LSIV1 29 Current sink dispensing ...

Страница 215: ... 32 Current sink dispensing unit 5 LSIV5 33 Current sink dispensing unit 6 LSIV6 34 Current sink dispensing unit 7 LSIV7 35 Current sink dispensing unit 8 LSIV8 36 Power supply photo transistors LSVCC 37 Polling the first phototransistor for pressure sensor LSANDR 38 Polling the second phototransistor for empty sensor LSR1 39 Polling the third phototransistor for pressure sensor LSR2 40 GND ...

Страница 216: ...input of DPS6 polling the position of the right routing disk 4 Gate input of DPS9 polling the position of the right routing disk 5 GND 6 GND 7 Vcc 8 Vcc 9 Gate input of S1 switch reports reject retract cassette inserted 10 Gate input of DPS3 reserve used several times 11 GND 12 GND 13 Power supply for photo transistors from PS18 Intake monitoring in front of the reject cassette LSVCC 14 Measuring ...

Страница 217: ... left 14 Segment B of 7 segment display up left 15 Segment C of 7 segment display up left 16 Segment D of 7 segment display up left 17 Segment E of 7 segment display up left 18 Segment F of 7 segment display up left 19 Segment G of 7 segment display up left 20 Segment DP of 7 segment display up left 21 Special output for 7 segment display up left 22 Segment A of 7 segment display bottom right 23 S...

Страница 218: ...CMD controller Pin Assignments 8 36 Cash Media Dispenser Version 4 Service Manual 01750060162 A Pin Designation 30 Special output for 7 segment display bottom right 31 Free 32 Free 33 Free 34 Free ...

Страница 219: ... to be polled by firmware 4 GND 5 Jump A reserve input A to be polled by firmware 6 GND 7 Jump B reserve input B to be polled by firmware 8 GND 9 Jump C reserve input C to be polled by firmware 10 GND 11 Jump D reserve input D to be polled by firmware 12 GND 13 Clear CMOS RAM to be polled by firmware 14 GND 15 NEN to be polled by firmware also 16 GND 17 Battery jumper 18 GND 19 Jump PLD jumper jum...

Страница 220: ...r Pin Assignments 8 38 Cash Media Dispenser Version 4 Service Manual 01750060162 A Connectors in the center of the controller X50 JTAG PLD programming connector X51 Kontron test connector X52 Turbodebugger connector ...

Страница 221: ...d 10 5 V switched 11 5 V switched 12 Last GND 13 Last GND 14 Last GND 15 Last GND 16 Last GND 17 Last GND 18 24 V switched 19 24 V switched 20 24 V switched 21 24 V switched 22 24 V switched 23 24 V switched 24 Dispensing gear of dispensing unit 1 25 Retaining magnet of dispensing unit 1 26 Dispensing gear of dispensing unit 2 27 Retaining magnet of dispensing unit 2 28 Dispensing gear of dispensi...

Страница 222: ...nit 5 34 Dispensing gear of dispensing unit 6 35 Retaining magnet of dispensing unit 6 36 Dispensing gear of dispensing unit 7 37 Retaining magnet of dispensing unit 7 38 Dispensing gear of dispensing unit 8 39 Retaining magnet of dispensing unit 8 40 Last GND Second connection to CMD controller Pin Designation 1 GND 2 EEPROM clock 3 EEPROM data 4 D0 5 D1 6 D2 7 D3 8 D4 9 D5 10 D6 11 D7 12 CS ICN ...

Страница 223: ...pensing unit 1 LSIV1 29 Current sink dispensing unit 2 LSIV2 30 Current sink dispensing unit 3 LSIV3 31 Current sink dispensing unit 4 LSIV4 32 Current sink dispensing unit 5 LSIV5 33 Current sink dispensing unit 6 LSIV6 34 Current sink dispensing unit 7 LSIV7 35 Current sink dispensing unit 8 LSIV8 36 Power supply photo transistors LSVCC 37 Polling the first phototransistor for pressure sensor LS...

Страница 224: ...mit diodes LSIPLUS 2 Dispensing unit x current sink LSIVx activates the three transmit diodes of the only dispensing unit 3 Power supply for the pressure photo transistor LSVCC 4 Input from pressure photo transistor LSANDR PS at the side 5 Power supply for the cassette empty photo transistor LSVCC 6 Input from cassette empty photo transistor LSR1 PS at top 7 Power supply for the dispensing photo t...

Страница 225: ...g photo transistor LSR2 PS at bottom 9 Power source for the transmit diodes LSIPLUS 10 Dispensing unit x 1 current sink LSIVx 1 activates the three transmit diodes of the only dispensing unit x 1 11 Power supply for the pressure photo transistor LSVCC 12 Input from pressure photo transistor LSANDR PS at the side 13 Power supply for the cassette empty photo transistor LSVCC 14 Input from cassette e...

Страница 226: ...4 channel distributor board Pin Assignments 8 44 Cash Media Dispenser Version 4 Service Manual 01750060162 A ...

Страница 227: ... Cash out cassette CMD V4 1750053503 Cash out cassette CMD V4 lead sealed 1750053504 Cash out cassette CMD V4 FSM 1750053506 Cash out cassette CMD V4 FSM lead sealed 1750053511 Cash out cassette BBA UT CMD V4 1750053512 Cash out cassette BBA UT CMD V4 lockable 1750053513 Cash out cassette BBA UT CMD V4 lead sealed 1750053540 Cash out cassette CMD V4 no cash 1750053550 Cash out cassette CMD V4 ink ...

Страница 228: ...V4 4 cassette housing mounted 1750054048 1 cassette housing complete with latching mechanism 1750054366 1 cassette housing complete without latching mechanism Dispensing units 1750051760 Double dispensing unit CMD V4 without thickness measuring station 1750051761 Double dispensing unit CMD V4 with thickness measuring station 1750051758 Single dispensing unit CMD V4 without thickness measuring stat...

Страница 229: ...m for ProCash 1500 FL 1750059116 AGT CMD V4 horizontal RL 232 mm for ProCash 2150 RL 1750059284 AGT CMD V4 horizontal RL 124 mm for ProCash 1500 RL 1750059283 AGT CMD V4 horizontal FL 241 mm for ProCash 2350 Shutter 1750045330 Shutter CMD V4 Rearload mounted 1750054768 Shutter CMD V4 vertical Frontload 1750053690 Shutter CMD V4 horizontal Rearload 1750056960 Shutter CMD V4 horizontal Frontload i W...

Страница 230: ...Overview of individual parts Spare Parts 9 4 Cash Media Dispenser Version 4 Service Manual 01750060162 A ...

Страница 231: ... 23 Controller 2 20 CPU 2 28 D DDU 2 30 Device description 1 5 Device overview 3 1 Dispensing 2 14 Dispensing unit 2 38 E EEPROM 2 35 Environmental conditions 1 17 F Function button 2 28 Function test 3 34 I Initial start up 4 1 Initialization 3 32 4 4 J Jumper settings 4 5 L Lithium batteries 1 4 Locking unlocking handle Blockage 5 22 Low cash sensor 3 13 M Maintenance and service 7 1 Maintenance...

Страница 232: ... Components CMD controller 6 2 6 15 Ouput transport ProCash 2000xe RL 6 6 Ouput transport ProCash 2100xe RL 6 8 Output transport ProCash 2050xe 6 7 Shutter ProCash 2000xe RL 6 9 Shutter ProCash 2050xe RL 6 10 Shutter ProCash 2100xe RL 6 11 Shutter ProCash 2150xe RL 6 12 Retract cassette 2 42 3 9 S Safety precautions 1 2 SAT 2 33 Sensors 2 1 Serial interface 2 28 Shutter 2 37 Single reject 2 8 Spar...

Страница 233: ...01750060162 A Cash Media Dispenser Version 4 Service Manual Notes ...

Страница 234: ...Published by Wincor Nixdorf International GmbH 33094 Paderborn Germany Printed in Germany Order No 01750060162 A 1 GB ...

Отзывы: