Manual WDC-300
17
Description
1. Initializing system setup include setting up measure unit, selecting coordinate and
annotation mode, the points' number of forward annotation mode needs.
2. Work-piece skewing include coordinate circle and coordinate move.
3. Introduce the circle's measure and the line's measure.
4.1
I
NTERIOR SYSTEM SETUP
If you are going to measure, please make sure that the followings have been setup.
1. Measure unit
You can use unit of MM or INCH to measure with WDC-300. Select a kind of unit
before you begin to measure. Please refer to 3.5. The default length unit is MM.
2. ABS and INC coordinate
Please refer to 3.4.
3. POL and CART coordinate
POL and CART coordinate display graphics using different modes. The default
coordinate system is CART. Refer to 3.6 if you want to change the coordinate mode.
And you can change it anytime also. In CART system, the offset length of X and Y
map on axis is displayed. In the POL system, a point will be explained with a length
from datum point and an angle.
4. Probing method
Feature points can be probed with crosshairs or an optical edge detector.
You can use auto-find-edge mode also. The default mode is crosshairs.
(Refer to 3.7 and 3.8)
5. Forward or backward annotation
Selecting annotation by steps as forward:
(1). Press
setup
, enter setup mode.
(2) Press and to browse menu until "Annotation" is displayed.
(3). Press
ENTER
, then "Back Annotation" is displayed.
(4). Press or until "Forw Annotation" is displayed.
(5). Press
ENTER
, there is a " " before annotation mode, which means this mode is
selected.
(6). Press
FINISH
to exit. And press
FINISH
again to quit setup.
6. Angle unit setting up
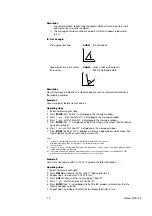
Angle's unit has two mode: DD and DMS. The forward steps display selecting:
Note:
DMS expresses a angle with ***°**' **" . 1°= 60' , 1' = 60"
DD expresses an angle with ***.*****°
(1). Press
SETUP
, enter setup.
(2). Press or to browse menu until "Angle Type…" is displayed.
(3). Press
ENTER
, "DMS Angle" is displayed.
(4). Press or until "DD Angle" is displayed.
(5). Press
ENTER
then a "v"is displayed before the mode on the screen,
which means this mode is selected.
(6). Press
FINISH
or
QUIT
twice to exit setup state, then return normal
monitor state.
7. Setting up the number of points to be probed.
If the forward annotation has been selected, you should set up the number of points
to be sampled:
(1). Press
SETUP
to enter setup, then "Clear…" is displayed
(2). Press
or to browse menu until "Annotation…" is displayed.
(3). Press
ENTER
then "Back Annotation" is displayed.
(4). Press
or to browse menu until "Point Pts 01?" is displayed.
(5). Press
ENTER
and then "Value:01" is displayed.
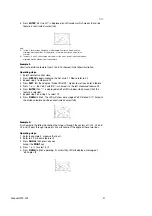
(6). Input the number you want to probe. For example, input 3 means that
measuring a point feature needs to probe three points.
4. E
XAMPLES FOR MEASUREMENT
Содержание WDC-300
Страница 1: ...Manual WDC 300 COUNTER FOR WPP 300 ...
Страница 54: ...W03 134 ...


