background image

7

ALLEGRO  III DIGITAL PIANO

WILLIAMSPIANOS.COM

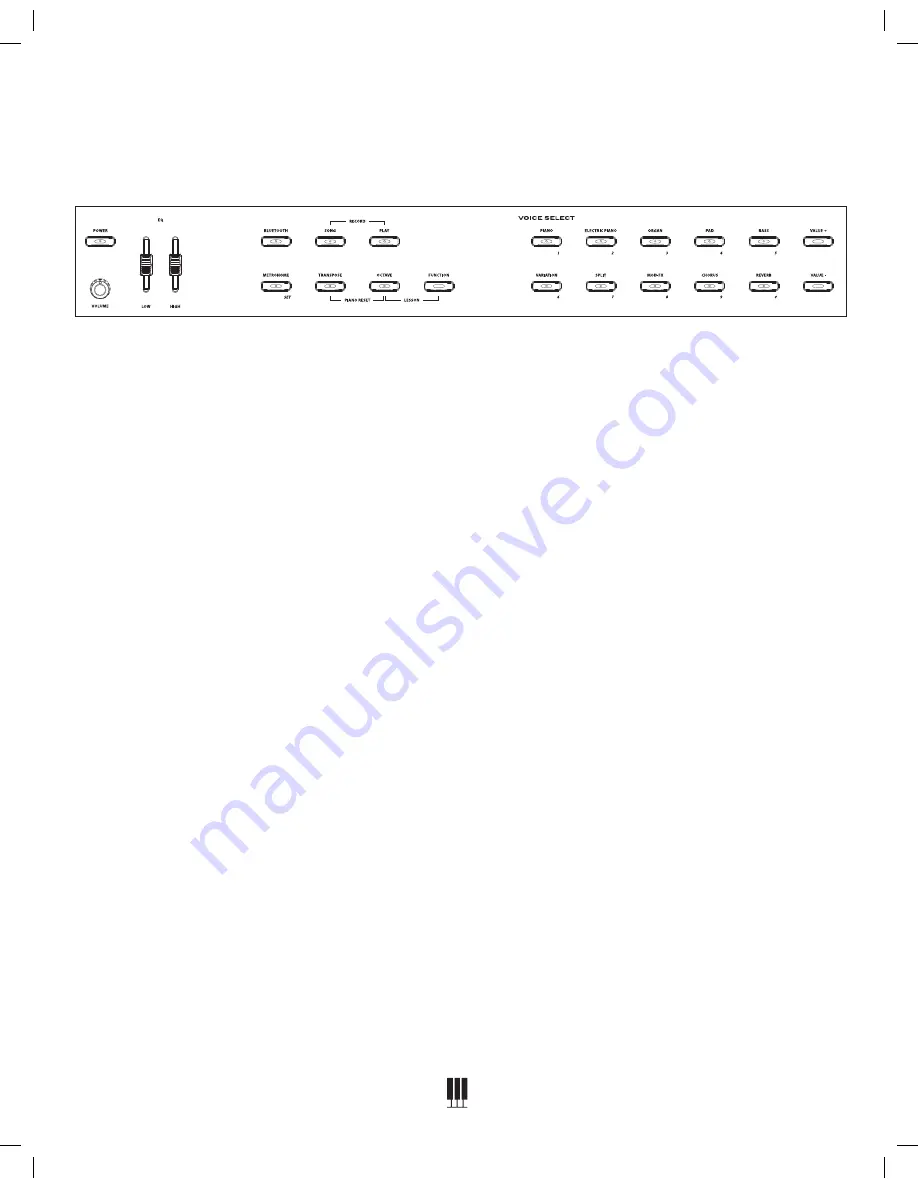
Power On/Off

Volume Knob 

Controls the overall output volume of the piano.

EQ Low / High 

Adjusts the EQ to add or subtract bass and treble

Bluetooth 

Enables Bluetooth Wireless MIDI

Metronome 

Turns the Metronome on and off.

Transpose 

Transposes the key of the piano.

Octave 

Transposes the range of the piano keys 1 octave 

higher or lower.

Piano Reset 

Pressing the Transpose and Octave buttons 

simultaneously will reset the transpose and octave 

functions to factory settings.

Function Button 

Selects various functions in the Piano.

10-key function 

Note that the buttons on the right side of the piano 

form a 10-key pad. Piano is 1, Electric Piano is 2, 

etc. These buttons can be used to enter values on 

the piano.

Song  

Pressing the Song button and then the Voice 

buttons selects which song will play.

TOP PANEL

Record 

Pressing the Song and Play buttons simultaneously 

will start the recording function.

Play 

Pressing Play will play back the song you recorded.

Voice Select Buttons 

(PIANO, ELECTRIC PIANO, ORGAN, PAD, BASS) 

Pressing these buttons will switch on the sound that 

is associated with the names printed above them.

Variation Button 

This will allow you to switch between the original 

and variation sounds. When the blue LED is lighted 

the sound will be the variation sound.

Split Button 

Splits the keyboard with different sounds on the 

right and left side.

Reverb Button 

Transposes the key of the piano.

Chorus Button 

Turns on and off the Chorus effect assigned to  

the voice.

Mod FX Button 

Turns on and off the Modulation effect assigned  

to the voice.

Value +/- 

Changes the selected setting 

Содержание Allegro III

Страница 1: ...owner s manual...

Страница 2: ......

Страница 3: ...t 2 NOTE This equipment has been tested and found to comply with the for a Class B digital device pursuant to Part 15 of the FCC Rules These limits are designed to provide reasonable protection agains...

Страница 4: ...heless we recommend that you carefully examine the packaging and its contents for any signs of physical damage that may have occurred during transit If the unit is damaged notify us immediately at Wil...

Страница 5: ...ARE OF YOUR DIGITAL PIANO 6 TOP PANEL 7 BACK PANEL 8 BOTTOM PANEL 8 OPERATIONS 9 SELECTING VOICES 9 LAYER MODE 9 SPLIT MODE 9 DEMO SONGS 10 METRONOME 10 RECORDING 11 TUNING 11 EFFECTS 11 MOD FX 12 EQ...

Страница 6: ...the keys and buttons wipe with a clean lightly dampened cloth and then polish with a soft dry cloth Location To avoid deformation discoloration or more serious damage do not expose the instrument to...

Страница 7: ...an be used to enter values on the piano Song Pressing the Song button and then the Voice buttons selects which song will play TOP PANEL Record Pressing the Song and Play buttons simultaneously will st...

Страница 8: ...I It will auto sense the correct polarity as it starts up Headphone The headphone socket disconnects the speakers when headphones are connected Stereo Mono Line Out Jacks The output jacks supply a lin...

Страница 9: ...n press the Variation button Original Voice Variation Voice 1 Grand Piano Bright Piano 2 Tine Electric Piano Reed Electric Piano 3 Perc Organ Full Drawbar Organ 4 String Pad Synth Pad 5 Acoustic Bass...

Страница 10: ...ll be retained until you either record a new song or tif you reset the Allegro III back to factory settings To Play A Demo Song Press the Song button and then the corresponding Voice select button See...

Страница 11: ...ng Your Own Song 1 Press the Song and Play buttons simultaneously 2 Once you start playing the button LEDs will flash to indicate that the recording has started 3 When you finish playing press the SON...

Страница 12: ...for an instrument press the ModFX button The effect will become active and the ModFX LED will light To turn off the ModFX press the button again The LED on the button will turn off Rotary There is a...

Страница 13: ...attery backed memory and restore all functions to factory defaults 1 Turn the Power Off 2 Press and hold the transpose and octave buttons 3 Turn the Power on All of the LEDs will light up to show that...

Страница 14: ...Allegro voices each played back individually on different MIDI channels To ensure your recorded part is played back with the correct voice make sure to press the voice button first and play your part...

Страница 15: ...olyphony 64 Voice Control Layer Touch Split Metronome Pedals Sustain Demo Songs 10 MIDI Transmit Settings Local Control Connectors USB Sustain Pedal Aux In Line Out L R Phones Dimensions 51 9 x 13 3 x...

Страница 16: ...UTS FUNCTION MODE Press and hold Function then Press one of the keys below A 0 MIDI Channel C 1 MIDI Panic D 1 Local On Off F 1 Soft Velocity G 1 Normal Velocity A 1 Hard Velocity C 2 Fixed Velocity F...

Страница 17: ...ssion Sustain Sostenuto Soft Pedal DSP Type Portamento DSP Depth NRPN LSB MSB RPN LSB MSB Reset All Controllers Program Change True O 0 9 0 9 O 0 9 0 9 System Exclusive X O System Song Position Song S...

Страница 18: ...he manufacturer s instruction or to products from which the serial number has been removed or altered If covered defects are found contact your authorized Williams dealer with regard to the alleged de...

Страница 19: ......

Страница 20: ...1812 18272893 10506474 V1 0...

Отзывы: