Page
4
of
5
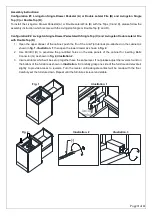
7. Attach the Back Panel (D) to the cabinet, insert Screws (R) into the pre-drilled holes on the back panel. Tighten
with a Screwdriver (not included) as shown in
fig. 5, illustration. 5
.
8. Attaching Adjustable Shelves as shown in
fig. 6, illustration. 6 & 7
:
Determine desired height for Shelf (F), insert the Shelf Pins (Q) in the pre-drilled holes located on the side
panels of the cabinet until they are fully secure.
Put the Shelf (F) into the cabinet by inserting the shelf
“diagonally”. Place adjustable Shelf (F) onto the
Shelf pins (Q). Make sure the shelves are stable.
Fig. 5 Fig. 6
IIllustration. 6
IIllustration. 5 IIllustration. 7
Assembly Instructions:
Livingston Single Hutch with Livingston Single Drawer Pedestal and Single Top (G) or Livingston Single
Glass Door and Single Top (H)
:
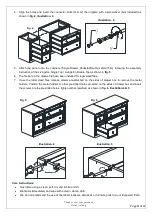
1. Lay Single Hutch on the Single Drawer Pedestal (G) or Single Glass Door (H) as shown in
fig. 7
.
2. Align the holes on the back of the Single Hutch with the holes on the back of the Single Drawer Pedestal (G) or
Single Glass Door (H). Attach Mending Plates (O) by Inserting the flat head Bolts (P) through the holes on the
Mending Plate (O) as shown in
fig. 7, illustration. 8
. Tighten with a screwdriver (not included).
Fig. 7 Fig. 8
IIllustration. 8
D
F


