background image


12-Oct-2020 


3/5


A-Lvt-24 


Williams-Sonoma Inc. 


Assembly Instructions 

Instructions d’assemblage 

Instrucciones de Ensamblaje 

Pottery Barn – Pottery Barn Teen – Pottery Barn Kids – Williams Sonoma Home – West Elm – Rejuvenation – Mark and Graham 


X2 

NOT INCLUDED / NON INCLUS / NO INCLUIDAS 

NOT INCLUDED / NON INCLUS / NO INCLUIDAS 

Содержание LIVINGSTON

Страница 1: ...vt 24 Williams Sonoma Inc Assembly Instructions Instructions d assemblage Instrucciones de Ensamblaje Pottery Barn Pottery Barn Teen Pottery Barn Kids Williams Sonoma Home West Elm Rejuvenation Mark and Graham LIVINGSTON ...

Страница 2: ... recommend the use of chemical cleansers abrasives or furniture polish on our lacquered finish Hardware may loosen over time Periodically check to make sure all connections are tight Re tighten if necessary Instructions d entretien Épousseter régulièrement avec un chiffon propre doux et non pelucheux Éponger immédiatement les liquides renversés et essuyer à l aide d un chiffon propre et humide L u...

Страница 3: ...y Instructions Instructions d assemblage Instrucciones de Ensamblaje Pottery Barn Pottery Barn Teen Pottery Barn Kids Williams Sonoma Home West Elm Rejuvenation Mark and Graham X2 NOT INCLUDED NON INCLUS NO INCLUIDAS NOT INCLUDED NON INCLUS NO INCLUIDAS ...

Страница 4: ...tions d assemblage Instrucciones de Ensamblaje Pottery Barn Pottery Barn Teen Pottery Barn Kids Williams Sonoma Home West Elm Rejuvenation Mark and Graham A B C 100 A B C C 8X 1 D Allen Bolts 1 4 x 1 1 2 8x E Allen Key M4 1x F G H Board 1x 2 Drill Bit 1x Bolt Connector 4sets ...

Страница 5: ... A Lvt 24 Williams Sonoma Inc Assembly Instructions Instructions d assemblage Instrucciones de Ensamblaje Pottery Barn Pottery Barn Teen Pottery Barn Kids Williams Sonoma Home West Elm Rejuvenation Mark and Graham 4X F F 100 H 4X G 100 3 4 5 ...

Страница 6: ...Page 1 of 5 LIVINGSTON SINGLE BOOKCASE HUTCH Date 30 March 16 Rev www potterybarn com ...

Страница 7: ...n until assembly is completed to avoid accidentally discarding small parts or hardware Use the parts and hardware lists below to identify and separate each of the pieces included The illustrations provided allow for easier assembly when used in conjunction with the assembly instructions The use of power tools to aid in assembly is not recommended Power tools can damage hardware and split wood Part...

Страница 8: ...l C into the inserts on the Side Panel B as shown in fig 2 illustration 2 Fig 1 Fig 2 Illustration 1 IIllustration 2 4 Attach the other Side Panel B and repeat step 2 3 as shown in fig 3 5 Attach the Top Panel A by inserting dowels on the Side Panels B into the holes on the Top Panel A Insert the Allen Bolts I through the holes on the cleat of the Side Panels B into the inserts on the Top Panel A ...

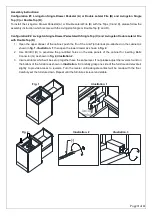
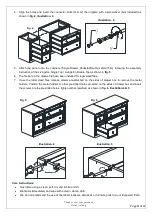
Страница 9: ...f F onto the Shelf pins Q Make sure the shelves are stable Fig 5 Fig 6 IIllustration 6 IIllustration 5 IIllustration 7 Assembly Instructions Livingston Single Hutch with Livingston Single Drawer Pedestal and Single Top G or Livingston Single Glass Door and Single Top H 1 Lay Single Hutch on the Single Drawer Pedestal G or Single Glass Door H as shown in fig 7 2 Align the holes on the back of the S...

Страница 10: ...hown in fig 9 illustration 9 3 Align the holes of each item with other and insert the connector bolts M M then tighten with a screwdriver Not Included as shown in fig 10 illustration 10 Fig 9 Fig 10 Illustration 9 Illustration 10 Care Instructions Dust often using a clean soft dry and lint free cloth Blot spills immediately and wipe with a clean damp cloth We do not recommend the use of chemical c...

Страница 11: ...Page 1 of 4 LIVINGSTON SINGLE TOP Date 25 March 16 Rev www potterybarn com ...

Страница 12: ...this will avoid damaging parts during assembly The shipping box provides an ideal work surface Do not dispose of any packaging or contents of the shipping carton until assembly is completed to avoid accidentally discarding small parts or hardware Use the parts and hardware lists below to identify and separate each of the pieces included The illustrations provided allow for easier assembly when use...

Страница 13: ...al File B back to the previous position as shown in fig 2 Fig 2 3 If the floor is uneven adjust the recessed levelers found on the bottom of the furniture as shown in illustration 3 Carefully grasp one side of the furniture and elevate it slightly to provide access to levelers Turn the leveler until adequate contact will be made with the floor Carefully set the furniture down Repeat until the furn...

Страница 14: ...in fig 3 illustration 3 Avoid pushing the drawer forcefully into the cabinet as this may damage the drawer rails The ball bearing drawer rail should slide easily into the cabinet Illustration 2 Illustration 3 4 If the floor is uneven adjust the recessed levelers found on the bottom of the furniture as shown in illustration 4 Carefully grasp one side of the furniture and elevate it slightly to prov...

Страница 15: ...Page 1 of 4 LIVINGSTON SINGLE DRAWER PEDESTAL LIVINGSTON DOUBLE LATERAL FILE Date 30 March 16 Rev www potterybarn com ...

Страница 16: ... assembly The shipping box provides an ideal work surface Do not dispose of any packaging or contents of the shipping carton until assembly is completed to avoid accidentally discarding small parts or hardware Use the parts and hardware lists below to identify and separate each of the pieces included The illustrations provided allow for easier assembly when used in conjunction with the assembly in...

Страница 17: ... Interlock pre attached on the cabinet as shown in fig 1 illustration 1 then open the lower drawer as shown in fig 2 2 Use Drill Bit H to penetrate the pre drilled holes on the side panels of the cabinet for inserting Bolts Connector G as shown in fig 2 illustration 2 3 Insure all items which will be set up together have the same level If not please adjust the levelers found on the bottom of the f...

Страница 18: ...If use the letter sized files release screws pre attached on the sides of drawer box to remove the metal holders Position the metal holders to other pre drilled holes provided on the sides of drawer box and insert the screws into the pre drilled holes tighten with screwdriver as shown in fig 6 illustration 4 5 Fig 5 Fig 6 Illustration 4 Illustration 5 Care Instructions Dust often using a clean sof...

Отзывы: