Wickes 217-005 Скачать руководство пользователя страница 6

Customer helpline number: 01604 633607

6

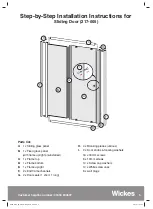
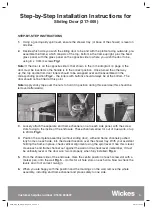
Step-by-Step Installation Instructions for

Sliding Door (217-005)

14.

   Loosely screw the panel assembly to the corresponding end frame channel using 6 x 10mm 

screws (3 each side), complete with 6 screw-cap washers. Check horizontal and vertical 
levels of the completed assembly using the spirit level, and then tighten the upper and 
lowermost screws. Re-check levels and if OK, tighten all screws fully 

Fig.10.


15.

   Fit the fl at glass panel edge seals with the free, long, end pointing inwards (this is the 

shorter seal).

16.

   Fit the door edge seal to the door, with the free, long, end pointing outwards (the side 

away from the handle) 

Fig.11.

17.

   Fit the door onto the upper track (arrow pointing up) by positioning the upper rollers 

(without buttons) onto the top track 

Fig 12.

 Then, with the lower roller buttons depressed, 

gently push the bottom of the door onto the lower track. 
When in place, release the buttons 

Fig.13.


18.

   Ensure the smooth operation of the door and that the door closes without a gap at the top 

or bottom. Should there be a gap, then the door level may need to be adjusted by using 
the adjustment screws in the upper rollers on the sliding door – clockwise will raise and 
anticlockwise will lower the corresponding door side 

Fig.14.


19.

   Fit the handle to the sliding door using the pre-drilled hole. Assemble using the handle bolt 

(fi t from the outside) and a washer on both sides of the glass surface – please don’t over 
tighten or you could break the glass 

Fig.15.

14

13

15

10

11

12

8892_Step_By_Step_Sliding Door_V3.indd   6

8892_Step_By_Step_Sliding Door_V3.indd   6

1/9/10   17:54:02

1/9/10   17:54:02

Содержание 217-005

Страница 1: ...Step Installation Instructions for Sliding Door 217 005 Customer helpline number 01604 633607 8892_Step_By_Step_Sliding Door_V3 indd 1 8892_Step_By_Step_Sliding Door_V3 indd 1 1 9 10 17 54 01 1 9 10 1...

Страница 2: ...uded in this pack are for solid walls only If the product is to be mounted on a partition or stud wall specialised xings should be purchased separately CAUTION Before drilling into any walls check tha...

Страница 3: ...x Frame top D 1 x Frame bottom E 1 x Frame upright F 2 x End frame channels G 2 x Door seals 1 short 1 long H 4 x Blanking pieces various I 2 x Door knobs Sealing washers 16 x 30mm screws 6 x 10mm sc...

Страница 4: ...on during this exercise this should be removed afterwards 3 Loosely attach the separate end frame channels one to each side panel with the screw slots facing to the inside of the enclosure These chann...

Страница 5: ...nnel using a spirit level When correct gently tighten the two top and bottom screws and re check alignment if OK tighten all screws fully if not re align and tighten repeat for the other side Next The...

Страница 6: ...ng up by positioning the upper rollers without buttons onto the top track Fig 12 Then with the lower roller buttons depressed gently push the bottom of the door onto the lower track When in place rele...

Страница 7: ...ickes clear silicone 22 Making sure the room is well ventilated nish off by applying silicone sealant as shown in Fig 19 Note Sealant should not be applied to the inside of the enclosure when tted ove...

Страница 8: ...the glass and frame with clean water after use regular cleaning is required to prevent the build up of soap scum or limescale in hard water areas Maintenance Ensure that this product is regularly che...

Отзывы: