


Customer helpline number: 01604 633607
2
Before Starting:
Please read and understand these
instructions. Not following these instructions
will invalidate your warranty (although this
does not affect your statutory rights) and
could cause injury during or after installation.
This is a two-person job. All glass must be
handled with great care. This product is
made from toughened glass and must not be
replaced by standard, non-certifi ed material.
If you are in any doubt, call the helpline or
consult a suitably qualifi ed person.
Check that all parts listed on page 3 are
included in the box and that you have the
necessary tools to hand. Note that some
parts, such as screws, may have more than
the number stated.
DISCLAIMER:
Should any parts be missing
or damaged, do not continue with the
installation and call the Customer Helpline
number on 01604 633607. We cannot accept
liability for any costs arising from installation
of damaged or faulty parts.
Ensure you have suffi cient space and a
clean, dry area for assembly. This product
should ideally be fi tted to a fl at wall, although
it will allow for walls that are up to 20mm out
of true. However, if the surface is uneven,
additional silicone sealing will be required.
Note:
This product should only be fi tted over
a sound tiled surface.
Important:
The
wall plugs
included in this
pack are for
solid walls only.
If the product is to be mounted on a
partition
or stud wall, specialised fi xings
should be
purchased separately.
CAUTION!
Before drilling into any walls,
check that there are no hidden cables or
pipes. Exercise great care when using power
tools near water. The use of a residual
current device (RCD) or cordless drill is
recommended. Always double-check the
position and your measurements before
drilling holes. Protective eyewear should be
used when drilling and handling glass.
Keep children away from the work area and
remember that
all small parts, plastic bags
and tools should also be kept out of reach
of children.
Fixing tips: A piece of insulating tape or a couple
of layers of masking tape applied to the wall
before marking out the fi xing holes will help stop
the drill from wandering on tiled surfaces. Also, to
avoid the loss of small parts down the drain, put
the plug in the plughole. Additionally, take care
not to drop accessories or tools onto the shower
tray; use a towel or bathmat to protect delicate
surfaces.
Tools required
1.
Preferably a Cordless Drill
If not cordless, use a RCD
2.
6mm Masonry Drill Bit or tile bit for fi xing
onto a tiled surface
3.
3mm Metal Drill Bit
4.
Pencil / Pen
5.
Rubber Mallet
6.
Tape Measure
7.
Sealant and Sealant Gun
8.
Screw Driver
9.
Spirit Level
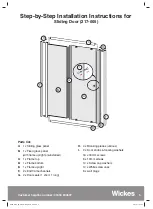
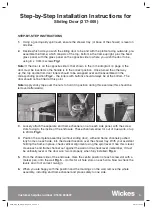
Step-by-Step Installation Instructions for
Sliding Door (217-005)
8892_Step_By_Step_Sliding Door_V3.indd 2
8892_Step_By_Step_Sliding Door_V3.indd 2
1/9/10 17:54:01
1/9/10 17:54:01


