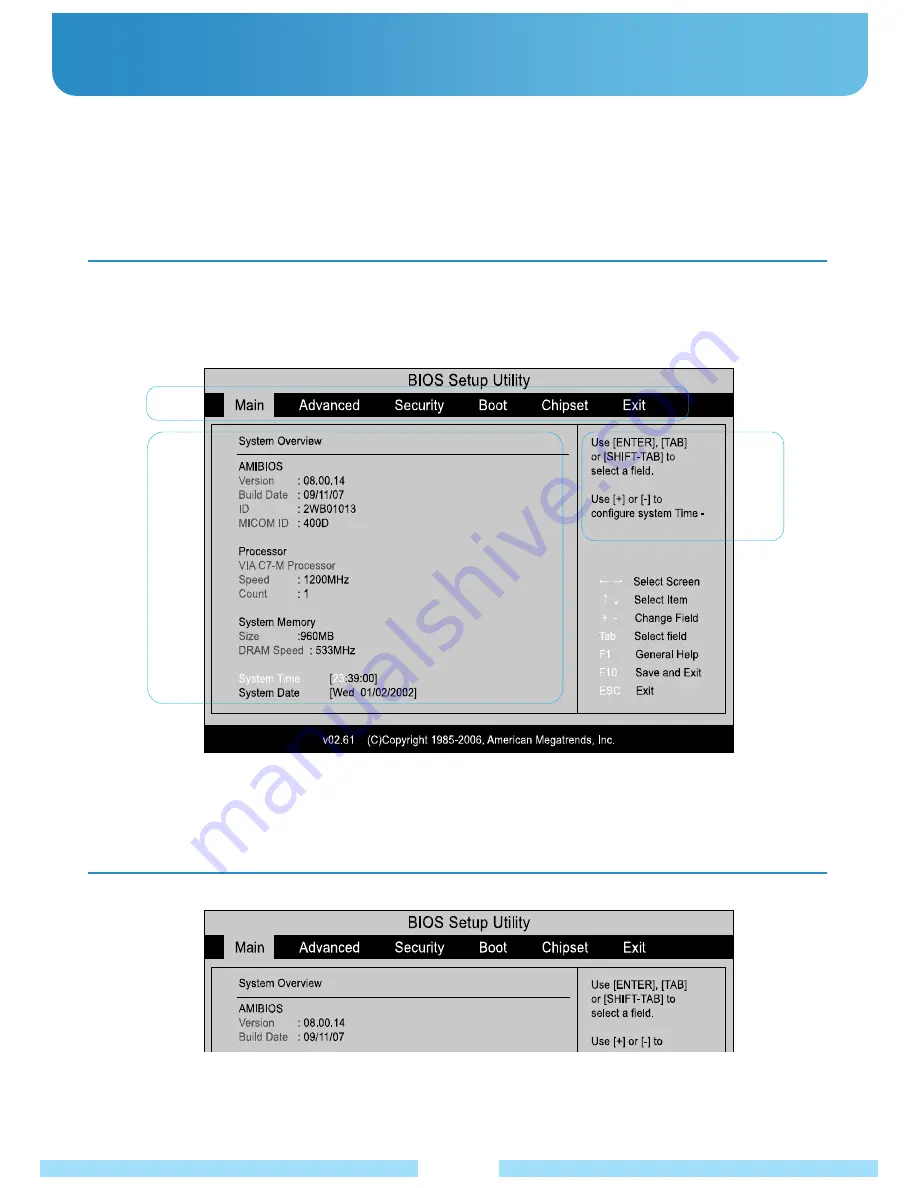
Wibrain B1UMPC Скачать руководство пользователя страница 38

A :

 Setup Menu       

B :

 Setup Items(B)      

C :

 Help: Help for the selected item appears automatically. 

Ɣ

BIOS Setup 

The BIOS Setup menus and items may differ depending on your model. Entering the BIOS Setup 

1. Slide the Power Switch down. The product is turned on. 
2. The booting screen appears. Press the 

Fn+2[F2]

.

3. After a moment, the BIOS setup screen appears. 

The items in the BIOS setup may differ depending on the product. 

͑

The BIOS Setup enables you to configure your product hardware according to your needs. 

Ŷ

 Use the BIOS setup to define a boot password, change the booting priority, or add a new device. 

Since incorrect settings may cause your system to malfunction or crash, take care when configuring the BIOS. 

Ŷ

 The functions of the BIOS setup are subject to change for product function enhancement purposes.

͑

A

B

C

The BIOS Setup Screen   

35

Содержание B1UMPC

Страница 1: ......

Страница 2: ...Before You Get Started Safety Precautions Proper Posture During Product Use Important Safety Information Replacement Parts and Accessories Regulatory Compliance Statements Approval of Windows XP Overv...

Страница 3: ...f the User Guide 1 Be sure to read the Safety Precautions before using the product 2 For basic usage of the product refer to the additionally supplied Quick Start 3 Refer to the User Guide for the pro...

Страница 4: ...ue to this problem a service charge will be applied In addition installing a program that does not support Windows XP may cause the program not to work properly In this case ask the corresponding soft...

Страница 5: ...power cord or power outlet makes a noise disconnect the power cord from the wall outlet and contact a service center There is a danger of electric shock or fire hazard Do not use a damaged or loose ma...

Страница 6: ...semble the power supply or AC adapter There is a danger of electric shock Use only authorized parts multi plug battery and memory and never disassemble parts There is a danger of damaging the product...

Страница 7: ...t for safety might cause electric shock or fire In case of lightening immediately turn the system off disconnect the power cord from the wall outlet and line There is a danger of electric shock or fir...

Страница 8: ...g periods of not using the product discharge the battery and preserve as it is detached The battery will be preserved at its best condition Keep the Stylus Pen out of reach of children Children may in...

Страница 9: ...oss of any data caused by customer such as the carelessness usage or bad environmental condition Causes that may damage the data of a hard disk drive and the hard disk drive itself The data may be los...

Страница 10: ...D screen so that its top height is equal to or lower than your eyes Avoid setting the LCD excessively bright Keep the LCD screen clean When wearing glasses clean them before using the product Hand Pos...

Страница 11: ...ease the separation between the equipment and receiver Connect the equipment into an outlet on a circuit different from that to which the receiver is connected Consult the dealer or an experienced rad...

Страница 12: ...ects of any kind into the product ventilation openings Ensure that the fan vents on the backside of the casing are clear at all times Do not place the product on a soft surface doing so will block the...

Страница 13: ...UCTIONS ALSO IF THE BATTERY IS PLACED IN THE CAR FOR A CERTAIN TIME ESPECIALLY IN SUMMER OR WINTER THERE WOULD BE A POSSIBILITY OF EXPLOSION OR OUT OF ORDER Power Cord Requirements The power cord set...

Страница 14: ...s devices ask the applicable authority for authorization prior to use or turning on the wireless device Every country has different restrictions on the use of wireless devices Since your system is equ...

Страница 15: ...I want to telephone a customer service representative to activate Windows b Select your country and make a phone call to the customer service representative that shows on the Step 2 c Fill in the boxe...

Страница 16: ...Cradle for navigation 15 Device Battery Windows CD Quick Start Soft Pouch Styles Pen Hand Strap USB Gender Adapter Power Cable VGA Cable NOTE You can purchase optional accessories the shop where you b...

Страница 17: ...on the keypad C LCD Displays the screen D Buttons You can configure this button to launch a frequently used program E Touch Pad Synaptic 16 A WEBCAM Using the front side camera You can use it for the...

Страница 18: ...at this hole for holding the device in safe D Battery A lithium Ion rechargeable battery supplies power for the product E Stylus Pen Slot You can keep the stylus pen in this slot The Stylus pen helps...

Страница 19: ...ion WiFi HDD Power Hold Blue Hold On Hold Off Caps Blue Hold On Hold Off Fn Blue Fn On Fn Off WiFi Blue WiFi On WiFi Off HDD Green HDD Read Power Blue Power On Power Off Windows Standby Power Red Full...

Страница 20: ...Using the Product Chapter 2 Turning the Product On and Off Entering Text 20 21...

Страница 21: ...erly due to a system error push and hold the power switch for more than 4 seconds to turn it off by force When turning the product on again after it was turned off forcefully the system examination pr...

Страница 22: ...This key also performs the role of inputting keys Function Fn Key To input such as F1 F2 F3 F4 etc or symbols like etc press and hold Fn Key and input those symbols simultaneously Caps Lock Setting Ca...

Страница 23: ...ouse Left Key Mouse Right Key Volume Down Volume Up Resolution Setting 1024x600 800x600 800x480 LCD Back Light Setting Brighter LCD Back Light Setting Darker Mouse Left Key Mouse Right Key Volume Down...

Страница 24: ...heel you can drag your finger up down or left right on this area Move the cursor Place your finger on the touch pad and move your finger where you d like to make a move of the cursor Single Click Sing...

Страница 25: ...1 Setting the touch screen 1 Go to Program TDTOUCH TDTOUCH Using Touch Screen Before You Get Started It is recommended to use a stylus pen Sharp objects may scratch or damage the LCD surface 24...

Страница 26: ...en whenever it appears on the screen 4 If you have pressed all the crosshairs the calibration finishing window pops up Tap the OK button to apply the calibration result for the pointing position corre...

Страница 27: ...r enjoying the video chatting The resolution of default setting is 320x240 pixels and it supports upto 640x480 pixels Additional Usage 1 You can take a Snapshot upto 640x480 2 You can record a video f...

Страница 28: ...f the messenger and enjoy a video chatting 26 Preview You can check a screen what the camera is showing Capture You can take a photo under the resolution you have set up Record You can record a video...

Страница 29: ...product cooler because of the long time use you can select this mode The sound of Fan would be louder than other modes 2 Setting the Keyboard Backlight 2 1 On It makes the keyboard backlight always on...

Страница 30: ...Using the Network Chapter 3 28 30 34 35 38 39 40 Wireless Network Using Bluetooth Using Wired Network BIOS Setup Introducing Programs Battery Product Specifications...

Страница 31: ...c In that case you need to subscribe for the wireless service Right click on the Network Connections icon on the taskbar and click Connect to the Network You can check the status when you are on mouse...

Страница 32: ...Connect button When Connected to the AP is displayed click the Close button You can access the network If it s Security enabled Wireless Network you need to input Network Key If you have no idea what...

Страница 33: ...such as a cell phone PDA another notebook computer etc Electronic Business Card Vcard Exchange You can exchange business cards with Bluetooth devices such as a cell phone PDA another notebook computer...

Страница 34: ...hing the Bluetooth devices nearby the product Bluetooth devices would be detected in orbit Choose a device that you d like to connect Choose Pair Device with right clicking for pairing on the device i...

Страница 35: ...nputting the same passkey on both sides On BlueSoleil side the following window will pop up you can enter the passkey here After the pairing procedure succeeds you can find the available service icons...

Страница 36: ...is the directory for Object Push and Synchronization Received cards and other objects will be put here 2 2 Installed devices 11 Bluetooth Serial ports e g COM3 COM13 Bluetooth PAN Network Adapter 4 Bl...

Страница 37: ...u can set both automatic and fixed IP address or select to use either of them to connect to the Internet Go to Start Control Panel Network and Internet Network Connection Local Area Connection Right c...

Страница 38: ...he BIOS setup screen appears The items in the BIOS setup may differ depending on the product The BIOS Setup enables you to configure your product hardware according to your needs Use the BIOS setup to...

Страница 39: ...e setup settings press the F9 Fn 9 key on the external keyboard Press the Esc Fn key to return to a higher level menu or to move to the Exit menu If you push the 4way key Left or Right you can move to...

Страница 40: ...configured Deactivating the supervisor password also deactivates the user password In the Set User Password item press Enter and complete the procedures of Step 3 of Setting a Supervisor Password Act...

Страница 41: ...asic use of the software For detailed information refer to the help section of the corresponding software Every software program may not be provided or the version may differ depending on your product...

Страница 42: ...eft side Charging the Battery 1 Attach the battery and connect the AC adapter to the power supply jack of the product The battery will start charging 2 When charging is completed the Charge LED light...

Страница 43: ......

Страница 44: ...FAQ Troubleshooting Support Chapter 4 FAQ and Troubleshooting 42 Warranty 43...

Страница 45: ...that case you may hear the noise Q I m using 512MB RAM but I d like to use high capacity RAM Is it possible to upgrade to 1GB A Our product has got only memory slot it would not be able to make an add...

Страница 46: ...device s manual for more information A_3 In general a Bluetooth headset has 2 operating modes On Off mode and Pairing mode To connect the device to the product it must be in Pairing mode Switch the de...

Страница 47: ...ve been applied Art 3 1 a EN 60950 1 2001 A11 2004 Art 3 1 a EN 50383 EN 50385 Art 3 1 b ETSI EN 301 489 1 V1 7 1 2007 04 ETSI EN 301 489 17 V1 3 2 2007 06 Art 3 2 ETSI EN 300 328 V1 7 1 2006 10 Test...

Отзывы: