
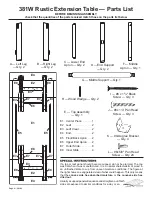


9.
Take the other leg assembly and apply a thin layer of glue to the elongated mortise holes. Slide
the leg assembly onto the table top assembly so that the tenons in the Front/Back Aprons (E5)
seat into the mortise holes in the two legs. Also, make sure the Middle Support (G) is inserted
into the hole in the End Support (D). Carefully tap the legs until they are tightly in place against
the Front/Back Apron (E5) and the table top. See FIGURE 9. Remove any excess glue with a
damp cloth.
10.
Repeat step 6 and install the 90-Degree Bracket between the legs and aprons.
11.
Repeat step 8 to install Wood Wedge (H). Make sure both wedges are tight.
K
x 2
L
x 12
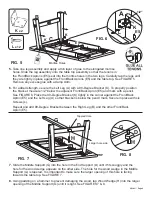
12.
Unlock the Ends (E4) and pull them out. Insert Leaves (E2) and lock in place.
Note:
the underside of the Leaves (E2) and Ends (E4) are marked with either the letter “A” or “B.”
Match these letters to correctly place each leaf.
The slides may stick or be hard to open when inserting the leaves. If so, apply a thin layer of
paraffin (candle wax) to the surfaces of the inner slides that come in contact with the outer slides.
FIG. 9
FIG. 12
G
Mortise Holes
K
K
D
H
E5
E5
A
E1
E2
E4
E1
E4
A
E2
Page 6 — 381W


