Whittier Wood 1317AFGAC Скачать руководство пользователя страница 7

Attach Headboard (A) to Pedestal Assembly as in previous step.

NOTE: NOW TIGHTEN ALL BOLTS ON TRESTLES.

10.

Fig. 10

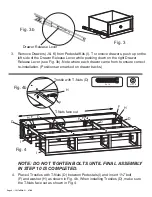
Attach the Footboard (B) to the Pedestal Assembly as in Fig. 9. Align

brackets as shown in Fig. 9b, and slide the Pedestal Assembly down on to 

the Footboard (B).    

9.

Fig. 9b

Fig. 9

B

Page 7 — 1317AFGAC — 0

7

/08

Adjust Glides (W) on the Foot Assemblies (U) so the Glides just touch the floor. 

11.

Fig. 11

Adjustable Glide (W)

Leveler Bracket (V)

A

Содержание 1317AFGAC

Страница 1: ... Provide the complete furniture model number part letter production code quantity needed reason for replacement and your full name and address along with a telephone number in case we need to contact you Parts ship from our Eugene Oregon factory within 1 or 2 business days from the time we receive the request Please allow 5 10 business days for delivery This fine piece of furniture will make a han...

Страница 2: ...Black Screw Qty 24 H Washer Qty 32 N 8 x 1 Machine Screw Qty 3 O Knob Qty 3 I Pedestal Kit Qty 1 B Footboard Qty 1 C Trestle Without T Nuts Qty 4 D Trestle With T Nuts Qty 8 P Deckboard Qty 1 J Small Drawer Box Qty 2 pre assembled K Large Drawer Box Qty 1 pre assembled L Small Drawer Face Qty 2 pre attached M Large Drawer Face Qty 1 pre attached Q Drawer Slides Qty 3 pre installed sets T 8 x 2 Bla...

Страница 3: ...IRED This Assembly Requires Two People Phillips screwdriver 7 16 wrench and tape measure Remove the Trestles C D from the back of the Headboard A as seen in Fig 1 and place them off to the side 1 Place both Pedestals I approximately 63 apart as shown in Fig 2 2 Fig 1 Fig 2 Shipping Straps I I 63 C D A ...

Страница 4: ... correct re installation Positions are marked on drawer backs 3 Fig 3 Fig 3b Drawer Release Lever Place 4 NOTE DO NOT TIGHTEN BOLTS UNTIL FINAL ASSEMBLY IN STEP 10 IS COMPLETED Trestles with T Nuts D between Pedestals I and insert 1 bolt F and washer H as shown in Fig 4b When installing Trestles D make sure the T Nuts face out as shown in Fig 4 4 Fig 4b Trestle with T Nuts D F x 16 H x 16 H F Fig ...

Страница 5: ...les C and D on the Pedestal Assembly Face the Trestles with T Nuts D toward the ends of the Assembly from the center as shown in Fig 6 Insert 2 Hex Bolt G and Washer H See Fig 6b DO NOT TIGHTEN BOLTS UNTIL FINAL ASSEMBLY IN STEP 10 R o t a t e P e d e s t a l Assembly upside down so that the plywood Deckboard s a r e o n t h e f l o o r Page 5 1317AFGAC 07 08 G H ...

Страница 6: ...AC 07 08 Fig 8 Rotate Pedestal Assembly to its original position Fig 7 Fig 7b D D C C T x 6 7 8 On each inner Pair of Trestles C D place a Foot Assembly U between the two middle trestles as shown in Fig 7 Insert three 8 X 2 Black screws T as shown in Fig 7b U V W T ...

Страница 7: ...ach the Footboard B to the Pedestal Assembly as in Fig 9 Align brackets as shown in Fig 9b and slide the Pedestal Assembly down on to the Footboard B 9 Fig 9b Fig 9 B Page 7 1317AFGAC 07 08 Adjust Glides W on the Foot Assemblies U so the Glides just touch the floor 11 Fig 11 Adjustable Glide W Leveler Bracket V A ...

Страница 8: ...as shown in Fig 12 There should be a small gap between each deckboard Secure with 8x1 Screw E 12 Fig E x 24 P Carefully align drawer slides into the cabinet and gently push the drawers back to their original positions Sleep well and enjoy 13 12 ...

Отзывы: