Whittier Wood 1317AFGAC Скачать руководство пользователя страница 3

1317AFGAC McKenzie Queen 

Platform Storage Bed

Assembly Instructions

Page 3 — 1317AGAC — 0

7

/08

TOOLS REQUIRED:

This Assembly Requires Two People 

Phillips screwdriver, 7/16" wrench and tape measure.

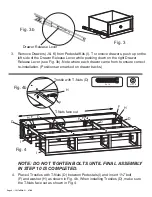
Remove the Trestles (C/D) from the back of the Headboard (A) as seen

in Fig. 1 and place them off to the side.

1.

Place both Pedestals (I) approximately 63" apart as shown in Fig. 2.

2.

Fig. 1

Fig. 2

Shipping Straps

I

I

63"

C/D

A

Содержание 1317AFGAC

Страница 1: ... Provide the complete furniture model number part letter production code quantity needed reason for replacement and your full name and address along with a telephone number in case we need to contact you Parts ship from our Eugene Oregon factory within 1 or 2 business days from the time we receive the request Please allow 5 10 business days for delivery This fine piece of furniture will make a han...

Страница 2: ...Black Screw Qty 24 H Washer Qty 32 N 8 x 1 Machine Screw Qty 3 O Knob Qty 3 I Pedestal Kit Qty 1 B Footboard Qty 1 C Trestle Without T Nuts Qty 4 D Trestle With T Nuts Qty 8 P Deckboard Qty 1 J Small Drawer Box Qty 2 pre assembled K Large Drawer Box Qty 1 pre assembled L Small Drawer Face Qty 2 pre attached M Large Drawer Face Qty 1 pre attached Q Drawer Slides Qty 3 pre installed sets T 8 x 2 Bla...

Страница 3: ...IRED This Assembly Requires Two People Phillips screwdriver 7 16 wrench and tape measure Remove the Trestles C D from the back of the Headboard A as seen in Fig 1 and place them off to the side 1 Place both Pedestals I approximately 63 apart as shown in Fig 2 2 Fig 1 Fig 2 Shipping Straps I I 63 C D A ...

Страница 4: ... correct re installation Positions are marked on drawer backs 3 Fig 3 Fig 3b Drawer Release Lever Place 4 NOTE DO NOT TIGHTEN BOLTS UNTIL FINAL ASSEMBLY IN STEP 10 IS COMPLETED Trestles with T Nuts D between Pedestals I and insert 1 bolt F and washer H as shown in Fig 4b When installing Trestles D make sure the T Nuts face out as shown in Fig 4 4 Fig 4b Trestle with T Nuts D F x 16 H x 16 H F Fig ...

Страница 5: ...les C and D on the Pedestal Assembly Face the Trestles with T Nuts D toward the ends of the Assembly from the center as shown in Fig 6 Insert 2 Hex Bolt G and Washer H See Fig 6b DO NOT TIGHTEN BOLTS UNTIL FINAL ASSEMBLY IN STEP 10 R o t a t e P e d e s t a l Assembly upside down so that the plywood Deckboard s a r e o n t h e f l o o r Page 5 1317AFGAC 07 08 G H ...

Страница 6: ...AC 07 08 Fig 8 Rotate Pedestal Assembly to its original position Fig 7 Fig 7b D D C C T x 6 7 8 On each inner Pair of Trestles C D place a Foot Assembly U between the two middle trestles as shown in Fig 7 Insert three 8 X 2 Black screws T as shown in Fig 7b U V W T ...

Страница 7: ...ach the Footboard B to the Pedestal Assembly as in Fig 9 Align brackets as shown in Fig 9b and slide the Pedestal Assembly down on to the Footboard B 9 Fig 9b Fig 9 B Page 7 1317AFGAC 07 08 Adjust Glides W on the Foot Assemblies U so the Glides just touch the floor 11 Fig 11 Adjustable Glide W Leveler Bracket V A ...

Страница 8: ...as shown in Fig 12 There should be a small gap between each deckboard Secure with 8x1 Screw E 12 Fig E x 24 P Carefully align drawer slides into the cabinet and gently push the drawers back to their original positions Sleep well and enjoy 13 12 ...

Отзывы: