


EN -16-
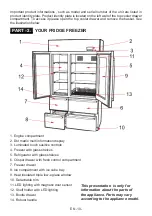
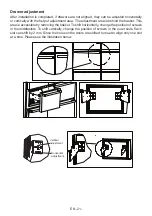
Unpack the unit
Check whether there is any damage on the product packaging. Open the packaging carton
using a utility knife from the cutting section which is indicated on the carton. Pay attention that
there is a kickplate taped at the back and the handle group is located right side of the unit.
Remove and discard “L” type brackets from pallet and then the unit
take down the refrigerator to floor with applying force only sides of it.
Important note:
Please do not use the middle bottom part of the refrigerator for carrying.
Important note:
It is strongly suggested that the refrigerator should be laid to its left side
(freezer side) while carrying.
If for any reason the unit has been laid on other than the left side, the unit must stand upright
for a minimum of 24 hours before connecting to power.
Due to the refrigerator being hefty a caution should be taken to sure that the unit is moved
and placed with adequate human power.
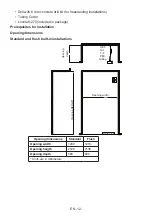
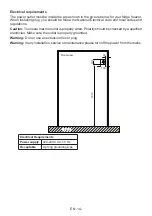
Position the unit
Please make sure all electrical and plumbing requirements are done, before placing the unit.
Caution: Do not tilt the refrigerator in any direction. This action can cause malfunction.
Your fridge freezer has own rollers, so it can be moved easier than moving on pallet.
Important note:
Make sure the rear levellers are in their lowest position while settling the
refrigerator to its place. Levelling should not be completed until the unit is in desired position.
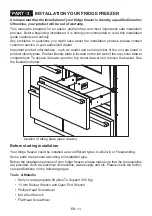
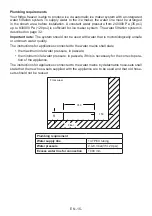
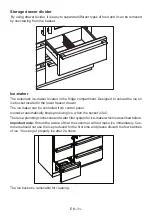
Levelling the unit
After positioning has been done, levelling should be done for proper placing. When the unit
is properly levelled, door and drawer adjustments are less likely to be changed from the fac-
tory default settings.
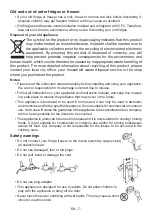
Firstly rear adjustment should be done with using a 13 mm socket wrench. Turn the bolt
clockwise to raise the unit or counter clockwise to lower it. Refer to the picture below for the
position of the rear roller base adjustment.
Important note:
The floor can be reference for levelling, and not surrounding cabinetry. This
could have influence the operation of the unit, such as door closing or drawer closing.
The front levelling legs could be adjusted by turning them counter clockwise
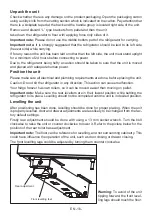
Rear adjustment
Front levelling feet
Warning:
To avoid of the unit
tipping forward, the front level-
ling legs should touch the floor.
Содержание WR 747 SS
Страница 1: ...Fridge Freezer User manual WR 747 SS...
Страница 42: ...45 6 1 GT 850 EN15502 IEC60335 1 IEC60335 2 24 2004 108 EC ISO15502 25 C 18 C 5 C 12 C 7 7 1 7 2 LED LED 28 46...
Страница 43: ...5 4 10 1 1 2 2 3 3 4 4 5 5 6 6 7 7 45...
Страница 44: ...E41 ZONE 4 E42 E43 1 2 E44 170 E50 No Frost 44...
Страница 45: ...E01 E02 E11 E12 E13 1 2 3 E14 E15 E16 E17 E31 ZONE 3 E32 E33 1 2 E34 43...
Страница 47: ...3 2 3 13 10 12 8 6 12 10 8 9 6 12 10 2 12 10 12 10 8 6 4 12 8 10 12 12 8 3 2 8 6 6 41...
Страница 48: ...39 42 41 40 8 6 8 6 8 6 8 6 8 4 3 1 3 1 6 4 6 4 2 5 8 6 2 4 4 2 6 4 40...
Страница 49: ...38 5 5 1 4 6 C 5 2 2 39...
Страница 50: ...37 4 4 4 4 1 38...
Страница 51: ...36 4 3 6 16 24 37...
Страница 52: ...35 4 3 5 36...
Страница 53: ...34 4 3 3 4 3 4 35...
Страница 54: ...33 4 3 2 34...
Страница 55: ...32 4 3 4 3 1 33...
Страница 57: ...30 4 2 7 Vegetable Zone ON 12 C Vegetable Zone ON OFF 15 4 2 8 Keypad Sound Keypad Sound ON OFF 15 31...
Страница 58: ...29 4 2 5 Sabbath Sabbath ON OFF 15 4 2 6 Fridge Zone OFF Fridge Zone ON OFF 15 30...
Страница 60: ...27 4 2 4 2 1 15 24 C 16 C 2 C 8 C 12 28...
Страница 61: ...26 4 4 1 1 2 LCD 3 4 5 6 7 8 9 10 11 LED 12 LED 13 14 27...
Страница 62: ...25 50 5 3 3 26...
Страница 63: ...24 il gov sviva www 3 2 3 3 220 240V 50Hz 25...
Страница 64: ...23 3 3 1 R600a R600a 16 24...
Страница 65: ...22 2 13 6 2 14 23...
Страница 66: ...21 2 12 22...
Страница 67: ...20 2 11 21...
Страница 68: ...19 2 10 2 20...
Страница 69: ...18 2 9 Loctite 270 120 19...
Страница 70: ...17 2 8 18...
Страница 71: ...16 2 7 1 4 1 4 PEX 37 17...
Страница 72: ...15 2 6 2 L 8 D4X20 16...
Страница 73: ...14 2 6 4 2 8 D4X20 4 L 2 M5X16 2 4 D4X35 4 2 6 1 L L M5 L 6 D4X35 15...
Страница 74: ...13 2 5 13 14...
Страница 75: ...12 2 3 L 24 2 4 13...
Страница 76: ...11 2 2 2 240 000 Pa 35 psi 830 000 Pa 120 psi 37 PEX 1 4 2 4 8 3 35 120 psi 1 12...
Страница 77: ...10 2 2 1 220 240V AC 50Hz 11...
Страница 78: ...9 GT 850 350 10...
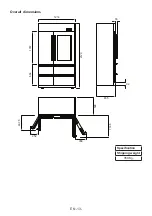
Страница 79: ...8 2 2 1200 1216 2120 2136 580 600 9...
Страница 80: ...7 2 1 400 13 M4 6 Loctite 270 8...
Страница 81: ...6 2 7...
Страница 82: ...5 1 304 LCD LED LED 6...
Страница 83: ...50 220 240 16 5 50 2 15 90 75 3 5...
Страница 84: ...CFC HFC WEEE 4...
Страница 85: ...8 8 3 3 0 8 3 14 8 2000 3...
Страница 86: ...R600a R600a 16 2...
Страница 87: ...mA 30 OFF 1...
Страница 88: ...52309147...


