background image

8

Language

The default display language is English, but may be set to 
French. Two display messages are affected: “End” (English) or 
“Fin” (French), and “door” (English) or “PrtE” (“porte” - French).

To Set Language to French: Within 5 minutes of power-up, 
touch and hold POWER LEVEL for about 5 seconds, until a tone 
sounds. To set back to English, disconnect power, then 
reconnect power to microwave oven.

Weight Entry Mode

The default weight entry mode for Weight Defrost is imperial 
(pounds), but may be set to metric (grams). This setting does not 
affect any other program besides Weight Defrost. See “Defrost” 
section.

To Set Weight Entry to Metric: Within 5 minutes of power-up, 
touch and hold number pad “0” for about 5 seconds, until a tone 
sounds. To set back to imperial, disconnect power, then 
reconnect power to microwave oven.

MICROWAVE OVEN USE

A magnetron in the microwave oven produces microwaves which 
reflect off the metal floor, walls and ceiling and pass through the 
turntable and appropriate cookware to the food. Microwaves are 
attracted to and absorbed by fat, sugar and water molecules in 
the food, causing them to move, producing friction and heat 
which cooks the food.

To avoid damage to the microwave oven, do not lean on or 
allow children to swing on the microwave oven door.

To avoid damage to the microwave oven, do not operate 
microwave oven when it is empty.

Baby bottles and baby food jars should not be heated in 
microwave oven.

Clothes, flowers, fruit, herbs, wood, gourds, paper, including 
brown paper bags and newspaper, should not be dried in 
microwave oven.

Paraffin wax will not melt in the microwave oven because it 
does not absorb microwaves.

Use oven mitts or pot holders when removing containers from 
microwave oven.

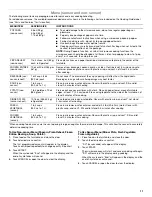
Do not overcook potatoes. At the end of the recommended 
cook time, potatoes should be slightly firm. Let potatoes 
stand for 5 minutes. They will finish cooking while standing.

Do not cook or reheat whole eggs inside the shell. Steam 
buildup in whole eggs may cause them to burst, requiring 
significant cleanup of microwave oven cavity. Cover poached 
eggs and allow a standing time.

Food Characteristics

When microwave cooking, the amount, size and shape, starting 
temperature, composition and density of the food affect cooking 
results.

Amount of Food

The more food heated at once, the longer the cook time needed. 
Check for doneness and add small increments of time if 
necessary.

Size and Shape

Smaller pieces of food will cook more quickly than larger pieces, 
and uniformly shaped foods cook more evenly than irregularly 
shaped food. 

Starting Temperature

Room temperature foods will heat faster than refrigerated foods, 
and refrigerated foods will heat faster than frozen foods.

Composition and Density

Foods high in fat and sugar will reach a higher temperature, and 
will heat faster than other foods. Heavy, dense foods, such as 
meat and potatoes, require a longer cook time than the same size 
of a light, porous food, such as cake.

Cooking Guidelines

Covering

Covering food helps retain moisture, shorten cook time and 
reduce spattering. Use the lid supplied with cookware. If a lid is 
not available, wax paper, paper towels or plastic wrap approved 
for microwave ovens may be used. Plastic wrap should be turned 
back at one corner to provide an opening to vent steam. 
Condensation on the door and cavity surfaces is normal during 
heavy cooking.

Stirring and Turning

Stirring and turning redistribute heat evenly to avoid overcooking 
the outer edges of food. Stir from outside to center. If possible, 
turn food over from bottom to top.

Arranging

If heating irregularly shaped or different sized foods, arrange the 
thinner parts and smaller sized items toward the center. If 
cooking several items of the same size and shape, place them in 
a ring pattern, leaving the center of the ring empty.

Piercing

Before heating, use a fork or small knife to pierce or prick foods 
that have a skin or membrane, such as potatoes, egg yolks, 
chicken livers, hot dogs, and sausage. Prick in several places to 
allow steam to vent.

Shielding

Use small, flat pieces of aluminum foil to shield the thin pieces of 
irregularly shaped foods, bones and foods such as chicken 
wings, leg tips and fish tail. See “Aluminum Foil and Metal” first.

Standing Time

Food will continue to cook by the natural conduction of heat even 
after the microwave cooking cycle ends. The length of standing 
time depends on the volume and density of the food.

Содержание YWMC30516

Страница 1: ...cessories or service call 1 800 807 6777 or visit our website at www whirlpool ca FOUR À MICRO ONDES Guide d utilisation et d entretien Au Canada composez le 1 800 807 6777 ou visitez notre site web à www whirlpool ca Table of Contents Table des matières 2 W10677585A Model Modèle YWMC30516 ...

Страница 2: ...ABLE DES MATIÈRES SÉCURITÉ DU FOUR À MICRO ONDES 17 INSTRUCTIONS D INSTALLATION 19 Déballage 19 Exigences d emplacement 19 Spécifications électriques 19 PIÈCES ET CARACTÉRISTIQUES 20 Plateau rotatif 20 TABLEAU DE COMMANDE DU FOUR À MICRO ONDES 20 Affichage 21 Mise en marche 21 Ajouter 30 secondes 21 Annuler 21 Signaux sonores 21 Horloge 21 Minuterie 22 Verrouillage des commandes 22 Langue 22 Mode ...

Страница 3: ...sealed containers for example closed glass jars are able to explode and should not be heated in the microwave oven Use the microwave oven only for its intended use as described in the manual Do not use corrosive chemicals or vapors in the microwave oven This type of oven is specifically designed to heat cook or dry food It is not designed for industrial or laboratory use As with any appliance clos...

Страница 4: ...moving the container Use extreme care when inserting a spoon or other utensil into the container Do not mount over a sink Do not store anything directly on top of the microwave oven when the microwave oven is in operation PRECAUTIONS TO AVOID POSSIBLE EXPOSURE TO EXCESSIVE MICROWAVE ENERGY a Do not attempt to operate this oven with the door open since open door operation can result in harmful expo...

Страница 5: ...a sensitive thermal device may automatically turn the microwave oven off The microwave oven should work properly once it has cooled Electrical Requirements Observe all governing codes and ordinances Required A 120 volt 60 Hz AC only 15 or 20 amp electrical supply with a fuse or circuit breaker Recommended A time delay fuse or time delay circuit breaker A separate circuit serving only this microwav...

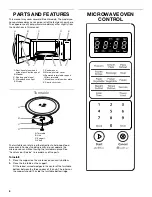
Страница 6: ...o reorder any of the parts To Install 1 Place the support on the microwave oven cavity bottom 2 Place the turntable on the support Fit the raised curved wedges in the center of the turntable bottom between the three spokes of the hub The rollers on the support should fit inside the turntable bottom ridge MICROWAVE OVEN CONTROL A Door handle on models without push button open B Window C Cooking gui...

Страница 7: ... command and cancels any program during cooking It will not erase the time of day The microwave oven will also turn off when the door is opened Close the door and touch START to resume the cycle The CANCEL control is also used to lock and unlock the control panel See Control Lock Tones Tones are audible signals that cannot be turned off These tones indicate the following One tone Valid entry Contr...

Страница 8: ...cteristics When microwave cooking the amount size and shape starting temperature composition and density of the food affect cooking results Amount of Food The more food heated at once the longer the cook time needed Check for doneness and add small increments of time if necessary Size and Shape Smaller pieces of food will cook more quickly than larger pieces and uniformly shaped foods cook more ev...

Страница 9: ... power level during a cooking cycle touch POWER LEVEL The display will briefly show the current power level then will return to the cooking countdown Use the following chart as a general guide for the suggested cooking power of specific foods MATERIAL RECOMMENDATIONS Aluminum Foil Metal See Aluminum Foil and Metal section Browning Dish Bottom must be at least 3 16 5 mm above the turntable Follow m...

Страница 10: ... Each Favorite may have 1 or 2 stages see Cooking in Stages section In the event of a power failure the saved Favorites will have to be reprogrammed To Set FAVORITE 1 Touch FAVORITE 1 will appear in the display Touch FAVORITE repeatedly to scroll through 2 and 3 until the desired Favorite program number is displayed 2 Touch COOK TIME then enter the cook time 3 Touch POWER LEVEL then enter the powe...

Страница 11: ...fresh bags of popcorn for optimal results Cooking results may vary by brand and fat content For bag sizes not listed in this section follow directions on the package NOTE During Popcorn function as with all microwave cooking functions the microwave oven should be attended at all times Listen for popping to slow to 1 pop every 1 or 2 seconds then stop the cycle PIZZA REHEAT non sensor 1 to 3 slices...

Страница 12: ... food if necessary by opening the door Close the door and touch START to resume the cycle When the cycle ends End will appear in the display and the end of cycle tones will sound 5 Touch CANCEL or open the door to clear the display Timed Defrost Timed Defrost does not have a preset program but uses only 30 PL3 cooking power To Use Timed Defrost 1 Place food uncovered on the turntable and close the...

Страница 13: ...e Inlet Cover To avoid arcing and microwave oven damage the microwave inlet cover see Parts and Features should be kept clean Wipe with wet cloth MICROWAVE OVEN DOOR AND EXTERIOR The area where the microwave oven door and frame touch when closed should be kept clean Mild nonabrasive soaps and detergents Rinse with clean water and dry with soft lint free cloth Glass cleaner and paper towels or nona...

Страница 14: ...eplace hub support and turntable Place 1 cup 250 mL of water on the turntable then restart microwave oven If it still is not working call for service See Assistance or Service section Do not operate the microwave oven without turntable and turntable support working properly Turntable alternates rotation directions This is normal and depends on motor rotation at beginning of cycle Display shows mes...

Страница 15: ...hese kits are available from the dealer or can be ordered by kit model number See Assistance or Service section for the toll free number The built in trim kits can be installed over any electric or gas built in wall oven up to 30 76 2 cm WHIRLPOOL CORPORATION COUNTERTOP MICROWAVE LIMITED WARRANTY ONE YEAR LIMITED WARRANTY For one year from the original date of purchase when this microwave is insta...

Страница 16: ...kaged to avoid damage in transit as we will not be responsible for any such damage 5 Whirlpool will return the repaired unit or at our option an identical or comparable microwave to your door free of charge DISCLAIMER OF IMPLIED WARRANTIES IMPLIED WARRANTIES INCLUDING ANY IMPLIED WARRANTY OF MERCHANTABILITY OR IMPLIED WARRANTY OF FITNESS FOR A PARTICULAR PURPOSE ARE LIMITED TO ONE YEAR OR THE SHOR...

Страница 17: ...icro ondes uniquement pour les applications auxquelles il est destiné telles qu elles sont décrites dans ce manuel Ne pas utiliser de vapeurs ou de produits chimiques corrosifs dans le four à micro ondes Ce type de four est spécifiquement conçu pour chauffer cuire ou sécher des aliments Il n est pas conçu pour des applications industrielles ou de laboratoire Comme pour tout appareil ménager les en...

Страница 18: ...ier Veiller à ne rien remiser directement sur le four lorsqu il est en service PRÉCAUTIONS CONTRE LE RISQUE D EXPOSITION EXCESSIVE À L ÉNERGIE DES MICRO ONDES a Ne pas tenter de faire fonctionner ce four lorsque la porte est ouverte car ceci pourrait susciter une exposition dangereuse à l énergie des micro ondes Il est important de ne pas entraver le fonctionnement correct du dispositif de verroui...

Страница 19: ...ion automatique du four à micro ondes Le four à micro ondes devrait fonctionner correctement une fois refroidi Spécifications électriques Observer les dispositions de tous les codes et règlements en vigueur Nécessaire Une alimentation électrique de 120 volts 60 Hz CA seulement 15 ou 20 ampères protégée par fusibles ou disjoncteur Recommandé Un fusible temporisé ou un disjoncteur temporisé Un circu...

Страница 20: ... support sur le fond de la cavité du four à micro ondes 2 Placer le plateau rotatif sur le support Insérer les protubérances arrondies au centre du dessous du plateau rotatif entre les trois rayons de l axe Les roulettes sur le support devraient se loger à l intérieur du pourtour cranté du dessous du plateau rotatif TABLEAU DE COMMANDE DU FOUR À MICRO ONDES A Poignée de porte pour les modèles sans...

Страница 21: ...ndes à sa puissance maximale pendant 30 secondes Elle ajoute ensuite 30 secondes de temps de cuisson à chaque pression supplémentaire sur la touche On peut prolonger le temps de cuisson d un programme manuel par tranches de 30 secondes tout en conservant le même niveau de puissance en appuyant sur ADD 30 SEC durant la cuisson REMARQUE Pour éviter l utilisation involontaire du four à micro ondes il...

Страница 22: ...e du four à micro ondes puis la reconnecter Mode d entrée du poids Le mode d entrée du poids avec la fonction Weight Defrost décongélation au poids est le système impérial en livres mais il peut être changé pour le système métrique en grammes Ce réglage n affecte aucun autre programme à part Weight Defrost Voir la section Décongélation Pour entrer le poids avec le système métrique Dans les 5 minut...

Страница 23: ...eau pour percer les aliments qui ont une peau ou une membrane tels que les pommes de terre jaunes d œufs foies de poulet hot dogs et saucisses Percer en plusieurs endroits pour laisser échapper la vapeur Protection Utiliser du papier d aluminium en petits morceaux plats pour protéger les parties minces d aliments de forme irrégulière les os et des aliments tels que les ailes et pilons de poulet et...

Страница 24: ...ssance de chauffage doit être utilisée par pourcentage ou nom Par exemple PL7 70 Moyenne élevée Pour voir la puissance de cuisson durant un programme de cuisson appuyer sur POWER LEVEL niveau de puissance L affichage indique brièvement le niveau de puissance actuel puis retourne au décompte de la cuisson Utiliser le tableau suivant comme guide général pour la puissance de cuisson suggérée pour les...

Страница 25: ...er 1 ou 2 étapes voir la section Cuisson par étapes Dans le cas d une panne de courant les favoris sauvegardés devront être reprogrammés Pour régler FAVORITE favori 1 Appuyer sur FAVORITE favori 1 apparaît sur l affichage Appuyer plusieurs fois sur FAVORITE pour faire défiler 2 et 3 jusqu à ce que le numéro de votre programme favori s affiche 2 Appuyer sur COOK TIME durée de cuisson puis entrer la...

Страница 26: ...3 g ou 567 g Sortir de l emballage Dégager l opercule sur 3 côtés Si le plat ne se trouve pas dans un contenant pour micro ondes le placer sur une assiette le couvrir d une pellicule de plastique et laisser une ouverture d échappement de l air Laisser reposer 2 à 3 minutes après la cuisson BEVERAGE boisson sans détection réchauffage 1 ou 2 tasses 8 oz 250 mL chacune Ne pas couvrir Le diamètre de l...

Страница 27: ...gélation au poids La caractéristique de décongélation au poids comporte des durées préréglées et des puissances de cuisson préréglées pour 3 catégories viande volaille et poisson Cette fonction ne doit pas être utilisée pour les aliments laissés à l extérieur du congélateur pendant plus de 20 minutes ou pour les plats surgelés Utilisation de la décongélation au poids 1 Placer les aliments non couv...

Страница 28: ...n linge doux sans charpie Saleté intense Savons et détergents doux non abrasifs Faire chauffer 1 tasse 250 mL d eau pendant 2 à 5 minutes dans le four à micro ondes La vapeur ramollira la saleté Rincer à l eau propre et sécher avec un linge doux sans charpie Odeurs Jus de citron ou vinaigre Faire chauffer une tasse 250 mL d eau avec 1 c à soupe 15 mL de jus de citron ou de vinaigre pendant 2 à 5 m...

Страница 29: ...acer 1 tasse 250 mL d eau sure le plateau rotatif puis remettre le four à micro ondes en marche S il ne fonctionne toujours pas faire un appel de service Voir la section Assistance ou service Ne pas faire fonctionner le four à micro ondes sans que le plateau rotatif et son support fonctionnent correctement Le plateau rotatif tourne dans les deux sens Ceci est normal et dépend de la rotation du mot...

Страница 30: ... Canada LP sont formés pour remplir la garantie des produits et fournir un service après la garantie partout au Canada Pour plus d assistance Si vous avez besoin de plus d assistance vous pouvez soumettre par écrit toute question ou préoccupation à Whirlpool Canada LP à l adresse suivante Whirlpool Canada LP Centre pour l eXpérience de la clientèle 200 6750 Century Ave Mississauga Ontario L5N 0B7 ...

Страница 31: ...et soient signalés à Whirlpool dans les 30 jours suivant la date d achat 7 Toute perte d aliments due à la défaillance du four à micro ondes 8 Les réparations aux pièces ou systèmes résultant d une modification non autorisée apportée à l appareil 9 Les fours à micro ondes dont les numéros de série et de modèle originaux ont été enlevés modifiés ou ne peuvent pas être facilement identifiés Cette ga...

Страница 32: ...on Inscrivez les renseignements suivants au sujet de votre gros appareil ménager pour mieux vous aider à obtenir assistance ou service en cas de besoin Vous devrez connaître le numéro de modèle et le numéro de série au complet Vous trouverez ces renseignements sur la plaque signalétique située sur le produit Nom du marchand ______________________________________________ Adresse ___________________...

Отзывы: