4
INSTAILATION
REQUIREMENTS
.slectrical Hequieements
Electrical Connection
• To properly install your air purifier, plug
the 2 prong power cord
into
a grounded
120-volt outlet.
• This app
l
iance has a polarized plug (one
blade is wider than the other). To reduce
the risk of electric shock
,
this plug is
intended to fit in a polarized outlet only
one way. If the plug does not fit fully in
the outlet
,
reverse the p
l
ug. If it still does
not fit, contact a qualified electrician. Do
not attempt to defeat this
safety
feature
.
Location Requirements
NOTE:
Your model may differ from the one
shown.
-------
A
-
I
-
R
--
P
-
U
--
R
-
I
-
F
-
I
-
E
-
R
---
U
-
S
--
E
-------
Staiting/Stt>pping Yow·Air Purifier
NOTE:
Before operating the air purifier,
record the date of installation on the HEPA
filter.Under normal conditions, the HEPA
filter should be replaced annually, and the
pre-filter should be replaced every
3
months. To remove and replace either
filter, see "Filter Replacement" in "Air Purifier
Care."
This manual covers several different models
.
The air purifier you have purchased may
have some or all of the features listed.
NOTE:
Your model may differ from the one
shown
.
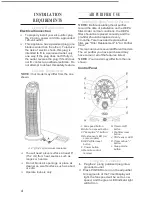
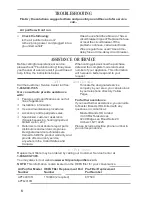
Control Panel
A.
6
"
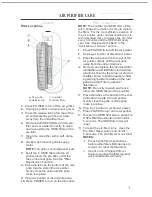
(15.2 cm) minimum clearance
• You will need a level surface at
l
east 6"
(
15.2 cm
)
from heat sources such as
A.
Fan speed button
B. Auto fan speed button
C
.
Timer plus
"+"
button
D. Dust sensor LED (on
some models)
E. HEPA filter reset
button
F. Power button
G
.
Remote control
receiver
H. Timer on
/
off
butto
n
I. Pre-filter reset
button
J. VOC sensor LED
K. Timer minus
"
-
"
button
L.
Sleep mode
button
ranges or heaters.
• Do not block air openings or place air
cleaner on a soft surface such as a bed
or sofa
.
• Operate indoors only.
Usir1g
the
Cont:!:'ane!
1.
P
l
ug the 2 p
r
ong polarized plug into a
grounded out
l
et.
2
.
Press POWER to turn on the air purifier.
All segments of the Timer Display will
light, the fan speed will be set to Low
speed, and the green LED indicator light
will
turn
on
.


