background image

10

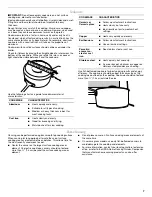
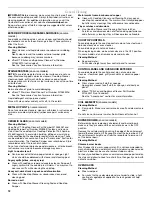
Oven Vent

The oven vent releases hot air and moisture from the oven, and 
should not be blocked or covered. Blocking or covering the vent 
will cause poor air circulation, affecting cooking and cleaning 
results. Do not set plastics, paper or other items that could melt or 
burn near the oven vent.

Baking and Roasting

ACCUBAKE™ Temperature Management System

The ACCUBAKE™ system electronically regulates the oven heat 
levels during preheat and bake to maintain a precise temperature 
range for optimal cooking results. The bake and broil elements 
cycle on and off in intervals. The bake element will glow red when 
cycling on; the broil element will not. This feature is automatically 
activated when the oven is in use.
Before baking and roasting, position racks according to 
“Positioning Racks and Bakeware” section. When roasting, it is not 
necessary to wait for the oven preheat cycle to end before putting 
food in unless it is recommended in the recipe.

Preheating

When START is pressed, the oven will begin preheating. Once 
100ºF (38ºC) is reached, the display temperature will increase as 
the actual temperature of the oven increases. When the preheat 
temperature is reached, a tone will sound, and the selected 
temperature will appear on the display.

Broiling

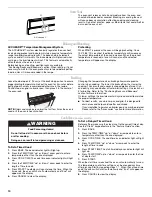
Leave the door open 6" (15 cm) at the broil stop position to ensure 
proper broiling temperature. Preheat the oven for 5 minutes before 
putting food in unless recommended otherwise in the recipe. 
Position food on grid in a broiler pan, then place it in the center of 
the oven rack. 

NOTE: Odors and smoke are normal the first few times the oven is 
used or if the oven is heavily soiled.

Changing the temperature when broiling allows more precise 
control when cooking. The lower the broil setting, the slower the 
cooking. Thicker cuts and unevenly shaped pieces of meat, fish 
and poultry may cook better at lower broil settings. Use racks 4 or 
5 for broiling. Refer to the “Positioning Racks and Bakeware” 
section for more information.
On lower settings, the broil element will cycle on and off to maintain 
the proper temperature.

For best results, use a broiler pan and grid. It is designed to 
drain juices and help avoid spatter and smoke.

If you would like to purchase a broiler pan, one may be ordered. 
Please refer to the “Accessories” section for more information. 

Cook Time 

(on some models)

To Set a Timed Cook:

1. Press BAKE. The bake indicator light will light up.

2. Press the TEMP/TIME “up” or “down” arrow pads to enter a 

temperature other than the one displayed.

3. Press COOK TIME. The cook time oven indicator light will light 

up.

4. Press the TEMP/TIME “up” or “down” arrow pads to enter the 

length of time to cook.

5. Press START. The display will count down the time. When the 

time ends, the oven will shut off automatically and “End” will 
appear on the display. 

6. Press CANCEL to clear the display.

To Set a Delayed Timed Cook:

Before setting, make sure the clock is set to the correct time of day. 
See the “Clock” keypad feature in the “Feature Guide” section.
1. Press BAKE.
2. Press the TEMP/TIME “up” or “down” arrow pads to enter a 

temperature other than the one displayed.

3. Press COOK TIME. The cook time oven indicator light will light 

up.

4. Press TEMP/TIME “up” or “down” arrow pads to enter the 

length of time to cook.

5. Press START TIME. The start time/delay oven indicator light will 

light up.

6. Press TEMP/TIME “up” or “down” arrow pads to enter the time 

of day to start.

7. Press START.
When the start time is reached, the oven will automatically turn on. 
The temperature and/or time settings can be changed anytime 
after pressing Start by repeating steps 1-7. When the set cook time 
ends, the oven will shut off automatically and “End” will appear on 
the display.
8. Press CANCEL to clear the display.

A. Oven vent

A

WARNING

Food Poisoning Hazard

Do not let food sit in oven more than one hour before 
or after cooking.

Doing so can result in food poisoning or sickness.

Содержание W10394385A

Страница 1: ...ge drawer panel ELECTRICRANGE USERINSTRUCTIONS Table of Contents RANGE SAFETY 2 The Anti Tip Bracket 2 FEATURE GUIDE 4 COOKTOP USE 5 Cookware 7 Home Canning 7 OVEN USE 8 Electronic Oven Controls 8 Sabbath Mode on some models 8 Aluminum Foil 9 Positioning Racks and Bakeware 9 Oven Vent 10 Baking and Roasting 10 Broiling 10 Cook Time on some models 10 RANGE CARE 11 Self Cleaning Cycle on some models...

Страница 2: ...ety alert symbol This symbol alerts you to potential hazards that can kill or hurt you and others All safety messages will follow the safety alert symbol and either the word DANGER or WARNING These words mean follow instructions instructions DANGER WARNING Tip Over Hazard A child or adult can tip the range and be killed Verify the anti tip bracket has been properly installed and engaged per instal...

Страница 3: ...f these pans or bowls during cooking may subject wiring or components underneath to damage Protective Liners Do not use aluminum foil to line surface unit drip bowls or oven bottoms except as suggested in the manual Improper installation of these liners may result in a risk of electric shock or fire Glazed Cooking Utensils Only certain types of glass glass ceramic ceramic earthenware or other glaz...

Страница 4: ...5 seconds START Cooking start The Start pad begins any oven function If Start is not pressed within 5 seconds PUSH appears in the display If Start is not pressed within 1 minute after pressing a keypad the function is canceled and the time of day is displayed CANCEL Range function The Cancel keypad stops any function except the Clock Timer and Oven Control Lockout TEMP TIME Temperature and time ad...

Страница 5: ...e ceramic glass could break when the lid is removed For foods containing sugar in any form clean up all spills and soils as soon as possible Allow the cooktop to cool down slightly Then while wearing oven mitts remove the spills using a scraper while the surface is still warm If sugary spills are allowed to cool down they can adhere to the cooktop and can cause pitting and permanent marks To avoid...

Страница 6: ...asive cleaners cleaning pads or harsh chemicals for cleaning The Cooktop Care Kit Part Number 31605B contains all of the items needed to clean and condition your ceramic glass cooktop Refer to the Range Care section for additional information IMPORTANT To avoid permanent damage to the cooktop surface and to make soils easier to remove clean the cooktop after each use to remove all soils Cooktop On...

Страница 7: ...p cooking surface When canning for long periods alternate the use of surface cooking areas or elements between batches This allows time for the most recently used areas to cool Center the canner on the largest surface cooking area or element On electric cooktops canners should not extend more than 1 3 cm beyond the surface cooking area or element Do not place canner on 2 surface cooking areas or e...

Страница 8: ... Sabbath Mode sets the oven to remain on in a Bake setting until turned off A Timed Bake can also be set to keep the oven on for only part of the Sabbath The Oven Control Lockout Feature if present will be disabled during the Sabbath Mode After the Sabbath Mode is set no tones will sound the display will not show the temperature the Kitchen Timer Mode will be canceled if active and only the follow...

Страница 9: ...eached the Bake On and Cook Time indicator lights will automatically turn on When the set cook time ends the oven will shut off automatically and the indicator lights will turn off indicating the end of the cycle Pressing the Cancel keypad at any time returns the oven to the normal cooking mode not Sabbath Mode compliant AluminumFoil IMPORTANT To avoid permanent damage to the oven bottom finish do...

Страница 10: ... better at lower broil settings Use racks 4 or 5 for broiling Refer to the Positioning Racks and Bakeware section for more information On lower settings the broil element will cycle on and off to maintain the proper temperature For best results use a broiler pan and grid It is designed to drain juices and help avoid spatter and smoke If you would like to purchase a broiler pan one may be ordered P...

Страница 11: ... Style 1 Electronic Oven Control with Adjustable Clean Time on some models The SELF CLEAN self cleaning cycle is time adjustable between 2 hours 30 minutes and 4 hours 30 minutes in 15 minute increments Suggested clean times are 2 hours 30 minutes for light soil and 4 hours 30 minutes for heavy soil The last 30 minutes of the cycle is for cool down To Self Clean 1 Press SELF CLEAN 2 Press the TEMP...

Страница 12: ...top cleaner Scrape off sugary spills while the cooktop is still warm You may want to wear oven mitts while cleaning the cooktop Heavy soil dark streaks specks and discoloration Clean with Cooktop Cleaner or nonabrasive cleaner and cleaning pad Burned on soil Clean with Cooktop Cleaner Cleaning Pad and Cooktop Scraper Metal marks from aluminum and copper Clean with Cooktop Cleaner and Cleaning Pad ...

Страница 13: ...website and reference the Customer Service section to possibly avoid the cost of a service call www whirlpool ca Operation PROBLEM POSSIBLE CAUSES SOLUTIONS Nothing will operate Power supply cord is unplugged Plug into a grounded outlet Household fuse is blown or a circuit breaker is tripped Replace the fuse or reset the circuit breaker If the problem continues call an electrician The control disp...

Страница 14: ...what expected Range is not level Level the range See the Installation Instructions The temperature set was incorrect Double check the recipe in a reliable cookbook Oven temperature needs adjustment See Oven Temperature Control in the Electronic Oven Controls section Oven was not preheated See Baking and Roasting section Racks were positioned improperly See Positioning Racks and Bakeware section No...

Страница 15: ...he appliance 9 Expenses for travel and transportation for product service if your major appliance is located in a remote area where service by an authorized Whirlpool servicer is not available 10 The removal and reinstallation of your major appliance if it is installed in an inaccessible location or is not installed in accordance with published installation instructions 11 Major appliances with or...

Страница 16: ... and serial number on the label located on the oven frame behind the storage drawer panel For assistance or service call 1 800 807 6777 If you need further assistance you can write to Whirlpool with any questions or concerns at the address below Whirlpool Brand Home Appliances Customer eXperience Centre 200 6750 Century Ave Mississauga Ontario L5N 0B7 Please include a daytime phone number in your ...

Страница 17: ...URITÉ DE LA CUISINIÈRE 18 La bride antibasculement 18 GUIDE DES CARACTÉRISTIQUES 21 UTILISATION DE LA TABLE DE CUISSON 23 Ustensiles de cuisson 24 Mise en conserve à la maison 25 UTILISATION DU FOUR 25 Commandes électroniques du four 25 Mode Sabbat sur certains modèles 26 Papier d aluminium 27 Positionnement des grilles et des ustensiles de cuisson au four 27 Évent du four 27 Cuisson au four et rô...

Страница 18: ...d alerte de sécurité vous signale les dangers potentiels de décès et de blessures graves à vous et à d autres Tous les messages de sécurité suivront le symbole d alerte de sécurité et le mot DANGER ou AVERTISSEMENT Ces mots signifient Risque de basculement Un enfant ou une personne adulte peut faire basculer la cuisinière ce qui peut causer un décès Vérifier que la bride antibasculement est bien i...

Страница 19: ...e foncée Les endroits près des éléments de surface peuvent devenir assez chauds pour causer des brûlures Pendant et après l utilisation ne pas toucher les éléments chauffants et ne pas laisser les vêtements ou autres matériaux inflammables entrer en contact avec ces éléments de surface ou les endroits près des éléments avant qu ils soient suffisamment refroidis Ces endroits comprennent la table de...

Страница 20: ... pour causer des brûlures Pendant et après l utilisation ne pas toucher ou laisser des vêtements ou autres matériaux inflammables venir en contact avec les éléments chauds ou les surfaces intérieures chaudes du four avant qu ils aient eu assez de temps pour refroidir D autres surfaces de l appareil peuvent devenir assez chaudes pour causer des brûlures Ces surfaces comprennent les ouvertures de l ...

Страница 21: ... pour régler la durée 3 Appuyer sur START mise en marche pour commencer le compte à rebours Si activés les signaux sonores de fin de programme retentissent à la fin du compte à rebours 4 Appuyer deux fois sur TIMER minuterie pour annuler la minuterie Ne pas appuyer sur la touche Cancel annulation sinon le four s éteindra 5 Si la MINUTERIE fonctionne mais n apparaît pas sur l affichage appuyer sur ...

Страница 22: ...r l heure de mise en marche pour un four équipé de mise en marche différée La mise en marche ne doit pas être utilisée pour les aliments tels que pains et gâteaux car ils risquent de ne pas bien cuire Pour régler une cuisson minutée ou une cuisson minutée différée voir la section Durée de cuisson COOK TIME durée de cuisson sur certains modèles Cuisson minutée La cuisson minutée permet d allumer le...

Страница 23: ...froidit de l air peut s accumuler entre le couvercle et la table de cuisson et la vitrocéramique pourrait se casser lorsqu on enlève le couvercle Nettoyer dès que possible tous les renversements et toutes les saletés des aliments contenant du sucre sous n importe quelle forme Laisser la table de cuisson refroidir légèrement Ensuite tout en portant des mitaines de four nettoyer les renversements av...

Страница 24: ... cuisson un élément ou un brûleur de surface chauds Les ustensiles de cuisson idéals doivent avoir un fond plat des parois droites un couvercle qui ferme hermétiquement et le matériau doit être d épaisseur moyenne à forte Les finis rugueux peuvent égratigner la table de cuisson L aluminium et le cuivre peuvent être utilisés comme fond ou base d un ustensile de cuisson Toutefois lorsqu ils sont uti...

Страница 25: ...ivantes Appuyer sur CANCEL annulation pour sortir de ce mode Fahrenheit et Celsius La température est préréglée en unités Fahrenheit mais on peut les permuter en degrés Celsius Appuyer sur TIMER minuterie pour alterner entre Fahrenheit et Celsius Appuyer sur CANCEL annulation pour sortir Signaux sonores de fin de programme b1 n émet qu un seul bip ou b continue à émettre des bips s affiche Appuyer...

Страница 26: ...me tout entier est annulé SAb cesse de clignoter et reste affiché Le four est à présent au mode Sabbat et respecte les modalités du mode Sabbat Si l on appuie sur la touche Cancel annulation à tout moment le four revient au mode de cuisson normal ne présente plus les modalités du mode Sabbat Pour régler une cuisson au four minutée avec le mode Sabbat sur certains modèles 1 Appuyer sur BAKE cuisson...

Страница 27: ...ille Cuisson sur plusieurs grilles Cuisson sur 2 grilles Utiliser les positions de grille 2 et 4 Cuisson de gâteaux à étages sur 2 grilles Pour de meilleurs résultats utiliser les grilles 2 et 4 pour la cuisson de gâteaux sur 2 grilles Placer les gâteaux sur les grilles tel qu indiqué Éventdufour L évent du four permet l évacuation de l air chaud et de l humidité du four il ne doit pas être obstru...

Страница 28: ...x de la durée de cuisson du four s allume 4 Appuyer sur les touches à flèche vers le haut ou vers le bas de TEMP TIME pour entrer la durée de cuisson 5 Appuyer sur START mise en marche L afficheur présente le compte à rebours de la durée Lorsque la durée est écoulée le four s arrête automatiquement et End fin apparaît sur l afficheur 6 Appuyer sur CANCEL annulation pour effacer l affichage Réglage...

Страница 29: ...e programme d autonettoyage Style 1 Commande de four électronique avec durée de nettoyage réglable sur certains modèles La durée du programme d autonettoyage SELF CLEAN est réglable entre 2 h 30 et 4 h 30 par tranches de 15 minutes Les durées de nettoyage suggérées sont de 2 h 30 pour un niveau de saleté faible et de 4 h 30 pour un niveau de saleté élevé Pendant les 30 dernières minutes du program...

Страница 30: ...uillure légère à modérée Nettoyer avec des essuie tout ou une éponge propre et humide Pour nettoyer de petites taches on doit utiliser le nettoyant et le tampon à récurer Renversements de matières sucrées gelées confiseries sirop Nettoyer avec le grattoir pour table de cuisson et le nettoyant pour table de cuisson Gratter les renversements de matières sucrées lorsque la table de cuisson est encore...

Страница 31: ...ur La lampe du four est une ampoule standard de 40 watts pour appareil électroménager Avant le remplacement s assurer que le four et la table de cuisson sont froids et que les boutons de commande sont à la position d arrêt Remplacement 1 Débrancher la cuisinière ou déconnecter la source de courant électrique 2 Tourner le couvercle en verre de l ampoule à l arrière du four dans le sens antihoraire ...

Страница 32: ... par intermittence en raison d un coupe circuit thermique Ceci correspond au fonctionnement normal de la machine L élément peut fonctionner par intermittence pour protéger la table de cuisson contre une surchauffe Le four ne fonctionne pas La mise en marche différée est activée Voir la section Durée de cuisson Le verrouillage des commandes est activé Appuyer sur la touche START mise en marche pend...

Страница 33: ... grilles et ustensiles de cuisson au four Le mélange est distribué de façon inégale dans le plat Vérifier que la pâte est répartie uniformément dans le plat Brunissage plus foncé des aliments à cause d ustensiles de cuisson au four plus ternes ou plus foncés Diminuer la température du four de 25 F 15 C ou déplacer la grille plus haut dans le four Brunissage moins prononcé des aliments à cause d us...

Страница 34: ...ignalés à Whirlpool dans les 30 jours suivant la date d achat 6 Toute perte d aliments due à une défaillance du réfrigérateur ou du congélateur 7 Les coûts associés au transport du gros appareil ménager du domicile pour réparation Ce gros appareil ménager est conçu pour être réparé à domicile et seul le service à domicile est couvert par la présente garantie 8 Les réparations aux pièces ou système...

Страница 35: ... UNE AUTRE Si vous résidez à l extérieur du Canada et des 50 États des États Unis contactez votre marchand Whirlpool autorisé pour déterminer si une autre garantie s applique 2 09 Pour des informations supplémentaires sur le produit visiter www whirlpool ca Si vous n avez pas accès à Internet et que vous nécessitez une assistance pendant l utilisation du produit ou que vous souhaitez prendre un re...

Страница 36: ...ous droits réservés Registered Trademark TM Trademark of Whirlpool U S A Whirlpool Canada LP Licensee in Canada Marque déposée TM Marque de commerce de Whirlpool U S A emploi sous licence par Whirlpool Canada LP au Canada 11 11 Printed in U S A Imprimé aux É U ...

Отзывы: