background image

23

GB

we

q

D

URING


USE


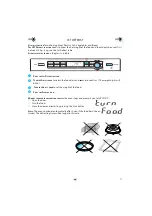
of the programs for cookies and canned or frozen rolls the oven needs to pre-heat be-

fore you can add food in it. PRE- HEAT is displayed and the current temperature is displayed with 
flickering digits until the set temperature is reached.

W

HEN


THE


CORRECT


TEMPERATURE

 is reached, the oven will prompt you to add food. If the door isn’t 

opened within 3 minutes the oven will stop and go to “ stand by mode ”.

Open the door.
Place the baking plate with food on the guides situated on the cavity walls.
Close the door and restart by pressing the Start button.

U

SE


THIS


FUNCTION


FOR


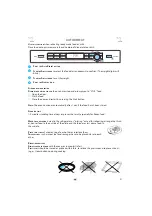
foods listed in the table. 

AUTO FORCED AIR COMBI

q

  P

RESS


THE

 A

UTO

 F

ORCED

 A

IR

 C

OMBI


BUTTON

.

w

  T

URN


THE

 A

DJUST


KNOB


to


select food class and 

PRESS


IT

 to confirm. ( The weight digits will blink.)

e

  T

URN


THE

 A

DJUST


KNOB


 to set the weight.

r

  P

RESS


THE

 S

TART


BUTTON

r

F

OR


CHICKEN


AND

 L

ASAGNE

Ensure before cooking that the dish you use is ovenproof and microwave safe. Else, you may ob-
tain a poor end result.

D

O


NOT


USE


THE


BAKING


PLATE

 with food classes 1 & 2.

A

LWAYS


USE


the baking plate when making cookies and canned or frozen rolls. 

Grease the baking plate lightly or cover it with baking paper.

Содержание Jet Chef JT 368

Страница 1: ...1 GB JT 368 www whirlpool com ...

Страница 2: ...ity wall They prevent grease food parti cles from entering the mi crowave inlet channels CHECK THAT THE VOLTAGE on the rating plate corresponds to the voltage in your home WHEN THE APPLIANCE is first plugged in or after a power failure the display is blank If required the oven can display a 24 hour digital clock When the clock function is not programmed the display will remain blank until the cook...

Страница 3: ...ic or oth er combustible materials in the cook ing process Paper can char or burn and some plastics can melt if used when heating foods Do not leave the oven unattended if you are using a lot of fat or oil since they can overheat and cause a fire IF MATERIAL INSIDE OUTSIDE THE OVEN SHOULD IGNITE OR SMOKE IS OBSERVED keep oven door closed and turn the oven off Dis connect the power cord or shut off...

Страница 4: ...t the teaspoon remain in the container 3 After heating allow standing for a short time stirring again before carefully re moving the container from the oven CAREFUL ALWAYS REFER to a microwave cookbook for de tails Especially if cooking or reheating food that contains alcohol AFTER HEATING BABY FOOD or liquids in a baby bot tle or in a baby food jar always stir and check the temperature before ser...

Страница 5: ...ing the oven If the turnta ble isn t able to turn freely you should use a smaller vessel CRISP PLATE PLACE THE FOOD DIRECTLY ON THE CRISP PLATE Always use the Glass turn table as support when us ing the Crisp plate DO NOT PLACE ANY UTENSILS on the Crisp plate since it will quickly be come very hot and is likely to cause damage to the utensil THE CRISP PLATE may be preheated before use max 3 min Al...

Страница 6: ...n the cooking is finished Press the STOP button or open the door to cancel the signal THIS FEATURE can be switched on or off by keeping the Stop button pressed for 3 seconds until a beep is heard NOTE The oven will only hold the settings for 60 seconds if the door is opened and then closed after the cooking is finished START PROTECTION CHILD LOCK THIS AUTOMATIC SAFETY FUNCTION IS ACTIVATED ONE MIN...

Страница 7: ...K BUTTON w TURN THE ADJUST KNOB to set the time to measure e PRESS THE START BUTTON AN ACOUSTIC SIGNAL will be heard when the timer has finished to count down ONE PRESS ON THE CLOCK BUTTON displays how much is left on the Timer It s displayed for 3 seconds and then returns to displaying the cooking time If you are currently cooking TO STOP THE KITCHEN TIMER when it is operating in the background o...

Страница 8: ...flicker e TURN THE ADJUST KNOB to set the minutes r PRESS THE ADJUST KNOB or CLOCK or START BUTTON THE CLOCK IS SET and in operation IF YOU WISH TO REMOVE THE CLOCK from the display once it has been set simply press the Clock button again for 3 seconds until the left hand digits hours flicker then press the Stop button TO REINSTATE THE CLOCK follow the above procedure NOTE KEEP THE DOOR OPEN WHILE...

Страница 9: ... by pressing the Start button Each press increas es the time with 30 seconds You may also alter the time by turning the adjust knob to increase or decrease the time CHOOSING POWER LEVEL q PRESS THE MICROWAVE BUTTON w TURN THE ADJUST KNOB to set the microwave power and PRESS IT to confirm The time digits will blink e TURN THE ADJUST KNOB to set the cooking time r PRESS THE START BUTTON q w e r MICR...

Страница 10: ...ts TURN LARGE JOINTS halfway through the defrost ing process FROZEN FOOD IN PLASTIC BAGS plastic films or card board packages can be placed directly in the oven as long as the package has no met al parts e g metal twist ties THE SHAPE OF THE PACKAGE alters the de frosting time Shallow packets defrost more quickly than a deep block SEPARATE PIECES as they begin to defrost Individual slices defrost ...

Страница 11: ...DEFROST BUTTON w TURN THE ADJUST KNOB to select the food class and PRESS IT to confirm The weight digits will blink e TURN THE ADJUST KNOB to set the weight of the food r PRESS THE START BUTTON MIDWAY THROUGH THE DEFROSTING PROCESS the oven stops and prompts you to TURN FOOD Open the door Turn the food Close the door and restart by pressing the Start button NOTE The oven continues automatically af...

Страница 12: ...ture 18 C choose higher weight of the food JET DEFROST FOOD CLASS AMOUNT HINTS q MEAT 100G 2KG Minced meat cutlets steaks or roasts w POULTRY 100G 3KG Chicken whole pieces or fillets e FISH 100G 2KG Whole steaks or fillets r VEGETABLES 100G 2KG Mixed vegetables peas broccoli etc t BREAD 100G 2KG Loaf buns or rolls FOR FOOD NOT LISTED IN THIS TABLE and if the weight is lesser or greater than recomm...

Страница 13: ...or long periods when the Grill is in operation as this will cause a drop in temperature FOR FOOD LIKE cheese toast steaks and sausages place food on the high wire rack ENSURE THAT THE UTENSILS used are heat resistant when you use this function DO NOT USE PLASTIC utensils when grilling They will melt Items of wood or paper are not suitable either BE CAREFUL NOT TO TOUCH the ceiling beneath the gril...

Страница 14: ...the microwave power level to 0 W just press the adjust knob and turn it When 0 W is reached the oven switches to Grill only mode CHOOSING POWER LEVEL DO NOT LEAVE THE OVEN DOOR OPEN for long periods when the Grill is in operation as this will cause a drop in temperature ENSURE THAT THE UTENSILS used are microwave safe and heat resistant when you use this function DO NOT USE PLASTIC utensils when g...

Страница 15: ...susceptible to heat THE OVEN AND THE CRISP PLATE become very hot when using this function q PRESS THE CRISP BUTTON w TURN THE ADJUST KNOB to set the cooking time e PRESS THE START BUTTON IT IS NOT POSSIBLE TO CHANGE OR SWITCH the Power level or Grill on off when using the Crisp function ONLY USE the supplied Crisp plate with this function Other available Crisp plates on the market will not give th...

Страница 16: ...b and the temperature by pressing the adjust knob and then turning it If the adjust knob is pressed dur ing cooking the temperature digits will blink The new temperature setting will be valid after the adjust knob has been pressed or when 3 seconds has elapsed without movement of the adjust knob Once the temperature digits are lit continously the new setting is valid NOTE Pressing the Forced Air b...

Страница 17: ...twice and then turning it The new temperature and power settings will be valid after the microwave power setting has been confirmed by pressing the adjust knob or when 3 seconds has elapsed without movement of the adjust knob Once the temperature and microwave power digits are lit continously the new settings are valid THE MAX POSSIBLE MICROWAVE POWER LEVEL when using the Forced air Combi is limit...

Страница 18: ...splayed and the current temperature is displayed with flickering digits until the set temperature is reached WHEN THE SET TEMPERATURE IS REACHED the oven automatically switches to the Forced Air function or Forced Air Combi function depending on what button was used to enter quick heat function It keeps the End state for 10 minutes before switching off During this time it is waiting for you to ins...

Страница 19: ... or wrappings on the Crisp plate ONLY USE the supplied Crisp plate with this function Other available Crisp plates on the market will not give the correct result when using this function ADD If the door isn t opened within 3 minutes the oven will stop and go to stand by mode STIR If the door isn t opened within 1 minutes the oven will continue automatically TURN If the door isn t opened within 1 m...

Страница 20: ...0G Preheat the crisp plate with a little butter or oil Add the food when the oven stops and promts you to Add Food Turn the food when the oven beeps t FISH FINGERS 200G 600G Preheat the crisp plate with a little butter or oil Add the food when the oven stops and promts you to Add Food Turn the food when the oven beeps FOR FOOD NOT LISTED IN THIS TABLE and if the weight is lesser or greater than re...

Страница 21: ...the cover or some plastic foil PLASTIC FOIL should be scored or pricked with a fork to relieve the pressure and to prevent burst ing as steam builds up during cooking q PRESS THE AUTO REHEAT BUTTON w TURN THE ADJUST KNOB to select the food class and PRESS IT to confirm The weight digits will blink e TURN THE ADJUST KNOB to set the weight r PRESS THE START BUTTON w q STIRRING DURING HEATING DURING ...

Страница 22: ... PORTION 250G 600G Follow the directions on package I E ventilation pricking and so on r MILK 100G 500G Heat uncovered and use a teaspoon in a mug or cup t CASSEROLE 200G 800G Reheat under cover Stir when oven beeps FOR FOOD NOT LISTED IN THIS TABLE and if the weight is lesser or greater than recommended weight you should follow the procedure for Cook and reheat with microwaves function AUTO REHEA...

Страница 23: ...ituated on the cavity walls Close the door and restart by pressing the Start button USE THIS FUNCTION FOR foods listed in the table AUTO FORCED AIR COMBI q PRESS THE AUTO FORCED AIR COMBI BUTTON w TURN THE ADJUST KNOB to select food class and PRESS IT to confirm The weight digits will blink e TURN THE ADJUST KNOB to set the weight r PRESS THE START BUTTON r FOR CHICKEN AND LASAGNE Ensure before co...

Страница 24: ...te Put the plate in the oven when it prompts you to Add food r CANNED BREAD DOUGH To be used for items like croissants and rolls Place the unbaked bread on the baking plate Put the plate in the oven when it prompts you to Add food t FROZEN ROLLS To be used for ready baked frozen rolls Place the rolls on the baking plate Put the plate in the oven when it prompts you to Add food FOR FOOD NOT LISTED ...

Страница 25: ...s front and rear of the door and the door opening DO NOT ALLOW GREASE or food particles to build up around the door FOR STUBBORN STAINS boil a cup of water in the oven for 2 or 3 minutes Steam will soften the marks ADDING SOME LEMON JUICE to a cup of water plac ing this on the turntable and boiling for a few minutes can eliminate odors inside the oven IF THE GRILL IS NOT USED REGULARLY it should b...

Страница 26: ... against exposure to microwave energy DO NOT REMOVE ANY COVER ENVIRONMENTAL HINTS THE PACKING BOX may be fully recy cled as confirmed by the recy cling symbol Follow local disposal regulations Keep potentially hazardous pack aging plastic bags polysty rene etc out of the reach of chil dren THIS APPLIANCE is marked according to the Euro pean directive 2002 96 EC on Waste Electri cal and Electronic ...

Страница 27: ...27 GB ...

Страница 28: ...t risk The fan turnta ble and light operate This is normal After this procedure the oven switches off automatically The cooling procedure can be interrupted without any harm to the oven by opening the door Test Amount Approx time Power level Container 12 3 1 1000 G 11 MIN 750 W PYREX 3 227 12 3 2 475 G 5 MIN 750 W PYREX 3 827 12 3 3 900 G 15 MIN 750 W PYREX 3 838 12 3 4 1100 G 28 30 MIN FORCED AIR...

Отзывы: