background image

14

ACCESSING COMPONENTS IN THE DOOR

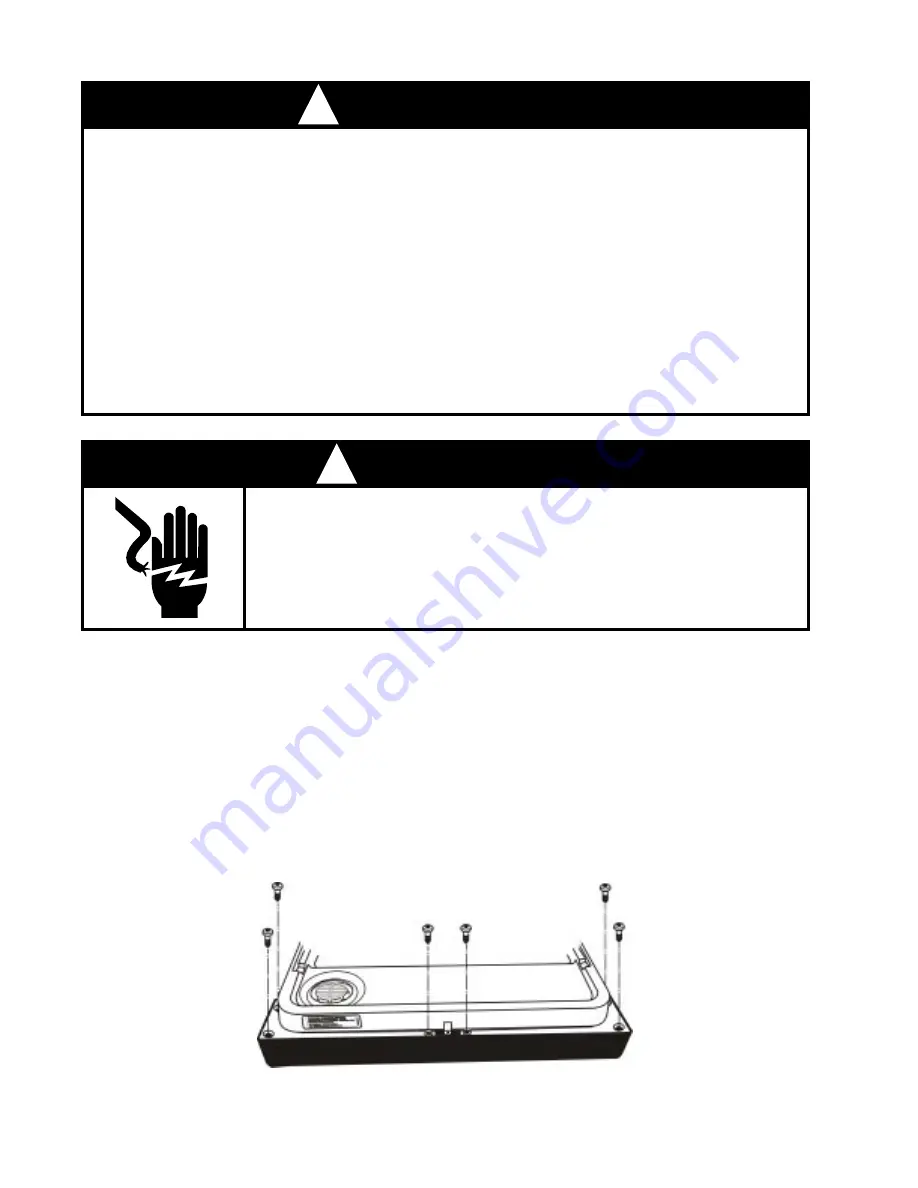
Removing the Console Panel

The control panel on the Voyager Dishwasher can be removed from the dishwasher door.

1.

Remove the six (6) screws securing the control panel to the door frame. 

(Fig. 3-1)

2.

The control panel will now drop down and be free of the door assembly.  The wiring harness
will remain connected to the console components.

!    

WARNING

ELECTRICAL SHOCK HAZARD

Disconnect power before servicing the dishwasher.

Replace all panels before operating the dishwasher.

Failure to do so can result in death or electrical shock.

!    

IMPORTANT

Electrostatic Discharge (ESD) Sensitive Electronics

ESD problems are present everywhere.  ESD may damage or weaken the electronic control as-
sembly.  The new control assembly may appear to work well after repair is finished, but failure may
occur at a later date due to ESD stress.

Use an antistatic wrist strap.  Connect wrist strap to green ground connection point or un-
painted metal in the appliance. - OR - Touch your finger repeatedly to a green ground connec-
tion point or unpainted metal in the appliance.

Before removing the part from its package, touch the antistatic bag to a green ground connec-
tion point or unpainted metal in the appliance.

Avoid touching electronic parts or terminal contacts; handle electronic control assembly by
edges only.

When repacking failed electronic control assembly in antistatic bag, observe above instruc-
tions.

Fig. 3-1

Содержание GU1200XT

Страница 1: ...I MODEL NUMBERS GU1200XT GU1500XT POINT VOYAGER DISHWASHER CONSUMER SERVICES TECHNICAL EDUCATION GROUP PRESENTS KD 12 JOB AID Part No 8178022 ...

Страница 2: ...Job Aid is to provide detailed information that will enable the service technician to properly diagnose malfunctions and repair the Point Voyager dishwasher The objectives of the Job Aid are The service technician will Understand proper safety precautions Successfully troubleshoot and diagnose malfunctions Successfully perform necessary repairs Successfully return the dishwasher to proper operatio...

Страница 3: ...ANEL 7 Model GU1500XTK Cycle Selection Chart 7 FUNCTION DESCRIPTION 9 Section Three COMPONENT ACCESS COMPONENT ACCESS COMPONENT ACCESS COMPONENT ACCESS COMPONENT ACCESS 13 13 13 13 13 COMPONENT LOCATION 13 ACCESSING COMPONENTS IN THE DOOR 14 ACCESSING COMPONENTS INSIDE THE TUB 17 ACCESSING COMPONENTS OF THE PUMP ASSEMBLY 20 SERVICING THE DOOR HINGE 23 Section Four TROUBLESHOOTING AND DIAGNOSIS TRO...

Страница 4: ...trical shock Model Serial Number Plate Left side of frame behind door MODEL NUMBER Product Group G Gold Series Dishwasher Product Identification U Undercounter Series Code 800 Baseline and Contract Models 900 Midline and Retail Derivatives 1000 Voyager Platform Feature Code PW Premium Wash System SW Standard Wash System XT Extra Tall Tub Year of Introduction K 2001 Color Code B Black Monochromatic...

Страница 5: ...rpeted floors An outside wall behind the dishwasher should be insulated to prevent the water line inlet valve and drain line from rupturing The application of a horizontal pump and filter technology allows for the tub to be designed three inches deeper than current models This deeper tub and longer door design will impact the instal lation process because there is less working space available unde...

Страница 6: ...120psi Max 20psi Min SUPPLY WATER TEMPERATURE 120 F to 160 F 49 C to 71 C WATER CHARGE 1 8 Gal 6 8 L First Fill 1 7 Gal 6 5 L All Other Fills LOWER SPRAY ARM ROTATION 25 TO 40 RPM UPPER SPRAY ARM ROTATION 25 TO 35 RPM APF DRAIN 1 Gal 38 L HEATING ELEMENT HEATING RATE 1 F Rise per Minute SPECIFICATIONS ...

Страница 7: ...t steps are in each cycle Temperatures indicate where extra heat is added Water usage is shown in U S gallons liters Cycle time includes dry time An asterisk by the cycle time indicates the cycle time might be longer depending on the temperature of the water entering the dishwasher The cooler the water the longer the cycle time If the water is already hot enough the cycle time will be as shown Pot...

Страница 8: ...nsor detects exces sive soils This can occur during selected wash or rinse cycles APF mode provides one or more purges of excess soils trapped in the soil accu mulator at specified intervals in the cycle The APF operates for a total of 10 seconds while the wash motor is operating in a wash or rinse mode The accumulator screen will be cleaned from jets on the underside of the lower spray arm During...

Страница 9: ...r raises this target water temperature to 145 F 63 C in the Main Wash for all cycles In the Pots Pans cycle Hi Temp Scour also raises the target water temperature to 135 F 57 C in the pre wash Heating the water helps improve washing results Hi Temp Scour is useful when loads contain baked on food This option adds heat water and wash time by adding at least one additional rinse mode to the cycle NO...

Страница 10: ... the delay and begin cycle immediately press Delay Hours until all delay hours LEDs are off Control lock Use the Control Lock to prevent the dishwasher from accidentally being turned on Use the ControlLock also to prevent accidental cycle or option changes during a cycle When the Lock LED is lit all buttons are disabled NOTES The dishwasher door can be opened while the controls are locked The lock...

Страница 11: ...ures The light goes off when any key is selected or the door is opened and reclosed Clean CLEAN glows when a cycle is finished The light turns off when the door is opened and reclosed or any key is pressed CONTROL PANEL MODEL GU1500XTK CYCLE SELECTION CHART Select the wash cycle and options desired Upon selecting the cycle key the cycle will begin immedi ately Cycles may be changed at any time dur...

Страница 12: ...8 High Low High Low 130 F 54 C º º High Low Rinse High Low Purge Rinse ...

Страница 13: ...h the water delivery system 3 4 Water is drawn through the impeller and into the pump chamber 4 5 Here 20 percent of the water is diverted towards the soil accumulator Food soils in this water stream are captured by the separation screen 5 6 Downstream restrictions limit the water flow into the accumulator to 10 percent 6a The remaining water is allowed to rejoin the main wash flow by passing thro...

Страница 14: ...e water is drained from the unit 2 3 Second negative pressure in the main wash pump inlet chamber keeps the check valve closed allowing the drain pump to remove soiled water from the accumulator 3 4 Third the spray arms will rinse down the interior of the wash tub while the water is drained leaving the inside free of soils 4 1 2 3 4 2 5 5 The main wash pump then stops creating positive pressure in...

Страница 15: ...he drain pump turns on and the fill valve is activated This purges the soiled water from the accumulator and begins to add fresh water 3 APF Function First Five Seconds 2 4b 4a APF Function Last Five Seconds 4 For the remaining five seconds the drain pump is turned off 4a but the fill valve remains activated to bring wash water up to the proper level 4b Theory Resources The tech sheet found behind...

Страница 16: ...12 NOTES ...

Страница 17: ...ment Float Door Latch Assembly Electronic Control Board Interconnect Board Underneath Active Vent LowerSpray Arm Sump and Motor Assembly Upper Spray Arm Dispenser Assembly Control Panel Check Valve in drain hose Accumulator Soil Sensor Pressure Switch Drain Pump Motor Thermistor Start Capacitor Wash Pump Motor Wash Pump ...

Страница 18: ...Electronics ESD problems are present everywhere ESD may damage or weaken the electronic control as sembly The new control assembly may appear to work well after repair is finished but failure may occur at a later date due to ESD stress Use an antistatic wrist strap Connect wrist strap to green ground connection point or un painted metal in the appliance OR Touch your finger repeatedly to a green g...

Страница 19: ... a flat bladed screwdriver to depress the holding tabs at the left end of the control board assembly while pulling up Fig 3 3 Inset Release the tabs securing the door latch assembly to the control panel and lift the assembly out Fig 3 4 Inset Removing the Door Latch Assembly Fig 3 4 Tab Inset Fig 3 2 Fig 3 3 Inset Use a flat bladed screwdriver to depress the holding tabs at the left end of the con...

Страница 20: ...r in the slot provided at the bottom of the interior vent grille turn the vent grille counterclockwise turn and remove the grille Fig 3 6 5 The active vent assembly will drop free of the dishwasher door Fig 3 6 Removing the Door Microswitches The Door Switches are located on the right and left side of the door latch assembly 1 Disconnect the wiring harness connectors from the microswitch terminals...

Страница 21: ...assembly to the inner door liner Fig 3 8 4 Bend the two locking tabs at the top and bottom of the dispenser assembly up away from the dispenser body 5 The dispenser assembly can now be lifted from the inner door liner Fig 3 8 Fig 3 7 SERVICING COMPONENTS INSIDE THE WASH TUB Removing the Inner Feed Tube and Lower Spray Arm The Inner Feed Tube is held in place by two 2 screws Fig 3 9 One is located ...

Страница 22: ... turn counterclockwise and remove the grille Fig 3 12 2 The water inlet can now be separated from the dishwasher tub Fig 3 11 Rear Feed Cap Water Inlet Servicing the Heating Element The heating element Fig 3 13 should not be re moved unless it has failed All critical components of the dishwasher can be removed without remov ing the heating element If the heating element must be removed it must be ...

Страница 23: ...ver the overfill con trol switch 3 Lift the overfill control switch from the as sembly 4 Disconnect the wiring harness connectors from the switch terminals Removing the Overfill Assembly 1 Remove the toe and access panels from the bottom of the dishwasher 2 Remove the float 3 Remove the standpipe nut 4 Push the overfill assembly through the bottom of the tub 5 Open the cover and lift the overfill ...

Страница 24: ...back and then lift it out Fig 3 15 Fig 3 16 SERVICING COMPONENTS IN THE SUMP ASSEMBLY Removing the Wash Motor 1 Remove the bolt securing the wash motor and drip shield in place on the pump assembly Fig 3 18 2 Once the bolt and drip shield are removed turn the wash motor until it stops approxi mately turn 3 Pull the motor straight back from the sump assembly Some effort may be necessary to dislodge...

Страница 25: ...e dishwasher tub 1 Remove the four 4 screws securing the soil accumulator from the sump base Fig 3 19 2 The soil accumulator will now lift free of the sump base Fig 3 20 Fig 3 19 Fig 3 20 3 Remove the screw securing the foreign objects protector to the sump base and remove the protector Fig 3 21 4 Remove the screw securing the inlet pro tector to the pump base and lift the inlet protector out Fig ...

Страница 26: ...k valve located between the wash motor and the drain can be removed with a pair of needle nose pliers Fig 3 24 NOTE When replacing the check valve simply drop it in place The inlet protector will seat the flapper valve properly when it is reinstalled Fig 3 25 If so equipped a soil sensing pressure switch is mounted on the pump outlet Disconnect the two wiring harness connectors from the switch ter...

Страница 27: ...h sealed surfaces on the impeller or the volute Contamination or damage will cause premature failure Volute SERVICING THE DOOR HINGE To service the door hinge the dishwasher must be removed from its installed position Be sure to Disconnect power from the unit Disconnect the water supply line from the unit Disconnect the drain line from the unit Once the side of the dishwasher is accessible 1 Remov...

Страница 28: ...door panel Fig 3 31 5 Open the door slightly Hold onto the door assembly With the counterbalance spring removed the door will drop open easily 6 Lift the door up to disengage it from the hinge pin Fig 3 30 INSET and then carefully pull the hinge plate from the in ner door panel SCREWS Fig 3 31 ...

Страница 29: ... in door latch assembly Check that the door switch is opening and closing properly 2 Turn child lock OFF See Use and Care Guide 3 Review setting Wash Cycles in the Use and Care Guide 4 Have a qualified electrician check the circuit breaker or fuse 5 Have customer call a qualified electrician 1 Check that the overflow pro tection float is free to move up and down Check that the overfill switch in o...

Страница 30: ...ing CLOCK pattern in INTERVALS 45 42 for some models see NOTE 5 95 94 94 94 82 80 79 LOW SOIL or Non Sensor Model No soil sensed in Interval 42 NOTE 1A 87 25 w o Th Holds NUMERIC DISPLAY CYCLE TIME spinning CLOCK pattern in INTERVALS 45 42 for some models see NOTE 5 95 94 94 94 82 80 79 LOW SOIL or Non Sensor Model No soil sensed in Interval 42 E STAR MODEL NOTE 1A 78 20 w o Th Holds NUMERIC DISPL...

Страница 31: ...IN WASH 37 36 35 34 33 32 31 30 29 28 THERMAL HOLD 145F 63C 90 88 88 87 87 67 63 62 145F 63C 90 88 88 87 87 67 63 62 145F 63C 82 81 80 80 80 60 56 55 THERMAL HOLD 145F 63C 88 86 86 85 85 67 63 62 140F 60C 88 86 86 85 85 67 63 62 140F 60C 80 79 78 78 78 60 56 55 THERMAL HOLD 145F 63C 86 84 84 83 83 67 63 62 140F 60C 86 84 84 83 83 67 63 62 145F 63C 78 77 76 76 76 60 56 55 135F 57C 78 77 76 76 76 60...

Страница 32: ...some cycles that will not apply to the specific model being serviced Common Cycle Time Chart Layout The wash cycles are listed on the left side of the chart Cycle names such as Anti Bacterial Baked On Cookware may be designated as Anti Bacterial on some models and Baked On Cookware on others Cycle variations are listed directly underneath each cycle name These variations are depen dent on one or m...

Страница 33: ...OLD Thermal Cap Temperature 135F 57C 135F 57C 135F 57C Cycle Minutes Remaining When Thermal Hold is Initiated 1 35 0 05 0 05 4 00 2 00 1 00 1 00 45 44 43 42 41 40 39 38 99 99 98 98 98 98 94 92 92 91 98 98 94 92 92 91 99 98 98 98 86 84 84 83 Intervals Length of Interval Fig 4 2 Time Remaining in Display THERMAL HOLD 135F 57C 135F 57C 135F 57C Reading the Common Cycle Time Chart The following inform...

Страница 34: ...and components to check See Section Five TECH TIPS 4 Whenever possible check components for resistance or continuity On components where resistance or continuity checks are not reliable conduct voltage checks Wash Motor should be running CYCLE PROGRESSION STATUS INDICATORS PROG BAR W1 PROG BAR W2 WASHING PROG BAR W3 PROG BAR R1 CIRC PROG BAR R2 This LED will be labeled as WASHING on models that us...

Страница 35: ...ut pressure switches soil sensors never get sensor trips and thus always default to the light non sensor version of the cycle and never execute APF purges See Model Specifics Table to identify models without pressure switches Note The Power Scour High Temp Scrub option can override or alter the soil based cycle modifica tions see Note 14 page 34 b Time Saver Quick CleanUp Cycles The control does N...

Страница 36: ...limit is 1 for 120 F thermal holds and 3 for all other thermal hold setpoint temperatures Note Models without pressure switches soil sensors never get sensor trips and thus never execute APF purges See Model Specifics Table to identify models without pressure switches NOTE 3 WATER HEATING THERMAL HOLD INTERVALS During water heating thermal holds intervals 40 33 15 cycle timing is interrupted and t...

Страница 37: ...itoring sensors or still making decisions based on sensor inputs Specifically this includes all APF intervals all thermal hold intervals and the first four intervals of each cycle see Notes 1 2 and 3 The Soaking Sensing indicator also turns on during soaking events like the soaking pause intervals in the Energy Star low soil non sensor version of the Normal cycle see Note 9 A dedicated Soaking ind...

Страница 38: ...the control to run no less than a 5 fill Wash Wash Rinse Rinse Rinse Dry version of the cycle even if no soil is sensed Raises the pre wash water heating thermal hold interval 40 to 135 F 57 C Raises the main wash water heating thermal hold interval 33 to 145 F 63 C except Anti Bacterial Cookware cycle which is already 145 F 63 C b Normal cycles Forces the control to run no less than a 4 fill Wash...

Страница 39: ...35 Diagnostic Cycle Time Chart ...

Страница 40: ...t interval of the Diagnostics or currently running cycle DIAGNOSTICS CYCLE TIME CHART NOTES DIAGNOSTICS CYCLE NOTE 1 R A SENSOR ASSY CHECK To help detect a defective or disconnected Rinse Aid level sensor the Rinse Aid Empty LED should light up in Diagnostics if the Rinse Aid dispenser is empty or the circuit is shorted If the Rinse Aid dispenser is full the LED indicator will not light up during ...

Страница 41: ...37 SECTION FIVE TECH TIPS WIRING DIAGRAM Stainless Steel Tub Wiring Diagram Plastic Tub Wiring Diagram Table References See next page ...

Страница 42: ...38 MODEL SPECIFIC SERVICE PARTS TABLE USER INTERFACE SWITCH MATRIX NOTE Switches may not appear on all models IDs vary by model ...

Страница 43: ...39 STRIP CIRCUITS FILL WASH RINSE DRAIN DISPENSER VENT HEAT DRY ...

Страница 44: ...ERMISTOR FILL VALVE DISPENSER OPEN TO CONTROL POWER SUPPLY DRAINMOTOR WASH MOTOR AUX WINDING WASH MOTOR RUN WINDING SWITCHED L1 TO HEATER AC NEUTRAL SWITCHED L1 FROM TCO SWITCHED L1 TO WASH MOTOR COMMON SWITCHED L1 TO VENT FILL VALVE DISPENSER PRESSSURE SWITCH OPTIONAL RINSE AID O GY Y BK BR LBU O BK T GY Y BU W R W V T R BK BU BK R PIN NO DESCRIPTION WIRE COLOR ELECTRONIC CONTROL CONNECTOR PINS ...

Страница 45: ...S HOME CALL THE TECHNICAL ASSISTANCE LINE 1 800 253 2870 HAVE YOUR STORE NUMBER READY TO IDENTIFY YOU AS AN AUTHORIZED SERVICER FOR LITERATURE ORDERS PHONE 1 800 851 4605 _____________________________________________________________________ IN CANADA FOR PRODUCT SPECIFICATIONS AND WARRANTY INFORMATION CALL 1 800 461 5681 FOR TECHNICAL ASSISTANCE WHILE AT THE CUSTOMER S HOME CALL THE TECHNICAL ASSI...

Страница 46: ...42 CO RPO RATIO N ...

Отзывы: