Whirlpool g2microven GH6178XP Скачать руководство пользователя страница 18

18

Sizzle Pan Feature

The Sizzle Pan feature uses the pan to brown, crisp, and pan-fry 
foods in the oven. The Sizzle Pan reaches its optimal cooking 
temperature in approximately 3 minutes. Use the pan as quickly 
as possible after it is heated for best results.

While microwaves heat food from above, they also heat the pan 
very quickly from below to brown and crisp the food.

Oven cavity and door will become very hot during grill 
element use. The use of oven mitts is recommended.

The Sizzle Pan will become very hot. Use the handle to grasp 
and remove the pan from the oven. Do not place hot Sizzle 
Pan directly on heat-sensitive surfaces. Damage may occur.

Do not use plastic utensils on the pan, as it becomes very hot 
quickly and could melt the utensils.

Do not use metal utensils, as they can scratch the pan.

Do not use the pan in any other microwave oven or in a 
thermal oven.

Do not place the pan on the rectangular cooking rack or 
circular grill rack. Always use the turntable as a support for 
the pan.

For best results, coat pan lightly with cooking oil to make 
removing food and cleaning easier.

Sizzle Pan Cooking Chart

Use the following chart as a guide when using the Sizzle function.

*Requires preheating of Sizzle Pan.

Requires turning or stirring of food. 
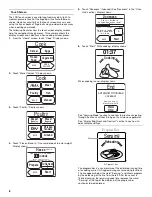
To Use:

Determine whether the pan needs to be preheated before putting 
food in pan and placing in oven. See Sizzle Cooking Chart.

1. Place Sizzle Pan on turntable. If preheating is not required, 

place food in pan.

2. On “Home” screen, touch “More Choices.”

3. Touch “Sizzle Pan.”

4. Select food or touch “Manual” for foods not on the menu. 

5. Touch number pads to enter amount.

Doneness may be adjusted at this time by touching 
“Doneness,” and then touching “+” or “-.”

Preparation instructions can be viewed for the specific food 
by touching “Prepare.”

6. Touch “Start” or START pad.

If preheating is required for the food, “Preheating Pan” will 
appear in the display. When Sizzle Pan is preheated, 2 short 
tones will sound, and “Place food in pan.” will appear in the 
display. Open door, place food in Sizzle Pan, close door and 
touch “Continue.”

If preheating is not required, the food will start cooking.

The display will count down the cooking time.

If required, when food is ready to be turned or stirred, two 
short tones will sound, and “Turn over food.” or “Stir food.” 
will appear in the display. Open the door, turn or stir food, 
close door and touch “Continue.”

When the cycle ends, the “End” screen will appear in the 
display, 4 end-of-cycle tones will sound, and then reminder 
tones will sound every minute for 15 minutes.

7. Touch CANCEL or open the door to clear the display and/or 

stop reminder tones.

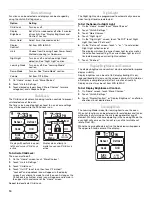
To Use Manual Sizzle:

1. On “Home” screen, touch “More Choices.”

2. Touch “Sizzle Pan.”

3. Touch “More Choices.”

4. Touch “Manual Sizzle.”

5. Enter a sizzle time.

6. Touch START pad.

When the cycle ends, the “End” screen will appear in the 
display, 4 end-of-cycle tones will sound, and then reminder 
tones will sound every minute for 15 minutes.

7. Touch CANCEL or open the door to clear the display and/or 

stop reminder tones.

“Manual Sizzle” may be used as the first stage in stage cooking. 
See “Cooking in Stages” section.

Soften & Melt

The oven uses low power to soften and melt certain foods. 
Soften butter and cream cheese so they will be ready to use in a 
recipe. Ice cream will be softened enough to make scooping 
easier. Melt items such as butter, chocolate and marshmallows 
with minimal spatter. Use the following chart as a guide.

FOOD

Fried Eggs*

: 1-4 eggs

Omelet*: 2-4 eggs

French Toast*

: 1-4 frozen pieces

Hamburger Patties*

: 1-4 patties

Hash Browns

: 1-4 frozen patties

Nuts*

: 0.5, 1, 1.5 or 2 cups (125, 250, 375 or 500 mL)

Pizza*: 6-12'' (15-30 cm) pizza

Poultry, Breast*

: 1-3 pieces, 0.4 lb (180 g) each

FOOD TO BE SOFTENED

FOOD TO BE MELTED

Butter: 1, 2 or 3 sticks

Butter: 1, 2 or 3 sticks

Cream cheese: 3 or 8 oz
(85 or 227 g)

Cheese: 8 or 16 oz
(227 or 454 g)

Frozen Juice: 6, 12 or 16 oz
(177, 355 or 473 mL)

Chocolate: 4, 6, 8 or 12 oz
(113, 170, 227 or 340 g)

Ice cream: 16, 32 or 64 oz
(473, 946 or 1893 mL)

Marshmallows: 5 or 10 oz
(142 or 283 g)

Содержание g2microven GH6178XP

Страница 1: ...NCE Use CareGuide For questions about features operation performance parts accessories or service call 1 800 253 1301 or visit our website at www whirlpool com Table of Contents 2 8204914 4619 652 64091 Model GH6178XP ...

Страница 2: ...Night Light 10 Display Brightness and Contrast 10 Learning Mode 10 Demo Mode 11 OVEN USE 11 Food Characteristics 11 Cooking Guidelines 11 Cookware and Dinnerware 12 Aluminum Foil and Metal 12 Cooking Power 12 Cooking 13 Doneness 13 Prepare 13 Preset Cooking 13 Popcorn 14 Cooking in Stages 14 Reheating 14 Defrosting 15 Baked Goods 15 Grill 16 Simmer Cooking and Steaming 16 Sizzle Pan Feature 18 Sof...

Страница 3: ...Some products such as whole eggs in the shell and sealed containers for example closed glass jars are able to explode and should not be heated in the microwave oven Use the microwave oven only for its intended use as described in this manual Do not use corrosive chemicals or vapors in the microwave oven This type of oven is specifically designed to heat cook or dry food It is not designed for indu...

Страница 4: ...e overheating of the oven Do not store anything directly on top of the microwave oven when the microwave oven is in operation To reduce the risk of injury to persons Liquids such as water coffee or tea are able to be overheated beyond the boiling point without appearing to be boiling Visible bubbling or boiling when the container is removed from the microwave oven is not always present THIS COULD ...

Страница 5: ...e oven must be grounded In the event of an electrical short circuit grounding reduces the risk of electric shock by providing an escape wire for the electric current The microwave oven is equipped with a cord having a grounding wire with a grounding plug The plug must be plugged into an outlet that is properly installed and grounded WARNING Improper use of the grounding plug can result in a risk o...

Страница 6: ... Turntable The turntable can be turned off except during an auto function This is helpful when cooking with plates that are larger than the turntable or when cooking with two 10 26 cm plates that are side by side To Turn Off Touch TURNTABLE ON OFF A turntable off icon will appear in the display The turntable will turn back on automatically when cooking is over or CANCEL is touched CookingRack The ...

Страница 7: ...ssistance or Service to order replacement parts OVEN CONTROL A Light sensor Display TouchScreen The display touch screen functions as both a display and a menu driven touch screen control Display The display screen shows the time of day and Home screen when the oven is not in use If the time of day is hidden see Clock section Home will appear in its place During programming the display screen disp...

Страница 8: ...ing on the microwave generator See Display Brightness and Contrast section to see how to adjust display settings ProgressBar A Progress bar The progress bar is a visual picture of the estimated running time of a cooking cycle It will appear during sensor cooking functions The line appears below the word Sensing and shows progress by the darkening of the line from the left After the sensor is finis...

Страница 9: ... and seconds up to 90 minutes and counts down the set time NOTE The Timer does not start or stop the oven A Timer countdown When the Timer is in use the oven can still operate During an oven operation Timer will appear in the upper right hand corner of the display The countdown may also be seen by touching TIMER SET OFF Touch Return to go back to the previous screen or wait for the timer to end If...

Страница 10: ...st may be adjusted to improve display visibility Display brightness can be set at full display backlight is on reduced backlight is low and the screen is dim but still visible or off display is completely dark after 2 minutes of inactivity Display contrast may be set from MIN to MAX To Set Display Brightness or Contrast 1 On Home screen touch More Choices 2 Touch Hints Settings 3 Touch Display Con...

Страница 11: ...ity of the food affect cooking results Amount of Food The more food heated at once the longer the cook time Check for doneness and add small increments of time if necessary Size and Shape Smaller pieces of food will cook more quickly than larger pieces and uniformly shaped foods cook more evenly than irregularly shaped food Starting Temperature Room temperature foods will heat faster than refriger...

Страница 12: ...cify which cooking power to use by percent name or number For example 70 7 Medium High Use the following chart as a general guide for the suggested cooking power of specific foods MATERIAL RECOMMENDATIONS Aluminum Foil Metal See Aluminum Foil and Metal section Browning Dish Bottom must be at least 5 mm above the turntable Follow manufacturer s recommendations Ceramic Glass Glass Acceptable for use...

Страница 13: ...is available Touch Prepare for preparation instructions as well as additional information about the food item cookware etc PresetCooking Times and cooking power have been preset for many common microwavable foods Use the following chart as a guide Sensor function Use Sizzle Pan To Use Preset Cooking 1 On the Home screen touch Cook 2 Touch desired food category or More Choices 3 Follow the menu scr...

Страница 14: ...m another stage then repeat from Step 5 The cook time and power of the cycling stage may be changed without interrupting cooking by touching Adjust Stage changing the cook time and or power and then touching Okay Reheating Times and cooking power have been preset for reheating specific foods plus manual Sensor function To Use 1 On the Home screen touch Reheat 2 Touch desired food category or More ...

Страница 15: ...op reminder tones Manual Defrost may be used as the first stage in stage cooking See Cooking in Stages section BakedGoods The oven has a baking function which uses the grill element in conjunction with the Sizzle Pan and microwaves Times and cooking powers have been programmed for 5 baked goods settings The oven cavity and door will become very hot during grill element use The use of oven mitts is...

Страница 16: ...ill sound and then reminder tones will sound every minute for 15 minutes 6 Touch CANCEL or open the door to clear the display and or stop reminder tones Custom Grill may be used as the first stage in stage cooking See Cooking in Stages section After Grilling The food circular grill rack Sizzle Pan and oven cavity and door will be very hot Using oven mitts grasp the Sizzle Pan securely with both ha...

Страница 17: ...ook function Use a dish large enough to completely cover food with water To Use Steam Cook 1 On Home screen touch More Choices 2 Touch Steam Simmer 3 Touch Steam Cook 4 Enter steam time 5 Touch Start or START pad Steam Cook will appear in the display When water begins to boil the display will count down the steam time When the cycle ends the End screen will appear in the display 4 end of cycle ton...

Страница 18: ... Sizzle Pan is preheated 2 short tones will sound and Place food in pan will appear in the display Open door place food in Sizzle Pan close door and touch Continue If preheating is not required the food will start cooking The display will count down the cooking time If required when food is ready to be turned or stirred two short tones will sound and Turn over food or Stir food will appear in the ...

Страница 19: ...hing Prepare 5 Touch Start or START pad The display will count down the cook time When the cycle ends the End screen will appear in the display 4 end of cycle tones will sound and then reminder tones will sound every minute for 15 minutes 6 Touch CANCEL or open the door to clear the display and or stop reminder tones WarmHold Hot cooked food can be kept warm in the oven Warm Hold can be used by it...

Страница 20: ...ers steel wool pads or gritty washcloths Damage may occur Unplug oven or disconnect power to avoid touch screen activation Use gentle pressure when wiping the touch screen Glass cleaner and soft cloth Apply glass cleaner to soft cloth not directly on panel Mild soap water and soft washcloth OVEN DOOR AND EXTERIOR The area where the oven door and frame touch when closed should be kept clean Mild no...

Страница 21: ...his side out printed on the edge of the filter should be facing out Then replace the vent grille by aligning the bottom tabs and snapping it back into place GREASE FILTERS To Remove and Replace Grease Filters 1 Remove each of the grease filters by pushing the back of the filter up grasping the tab and sliding the filter to the back Pull tab down until the filter drops out 2 Replace grease filters ...

Страница 22: ...mmand Try using fingertip or fingernail See Display Touch Screen section Oven door looks wavy This is normal and will not affect performance Turntable will not operate Is the turntable properly in place Make sure turntable is correct side up and is sitting securely on the turntable support Is the turntable support operating properly Remove turntable Remove and replace turntable support Replace tur...

Страница 23: ...parts If you need to order replacement parts we recommend that you use only FSP replacement parts FSP replacement parts will fit right and work right because they are made with the same precision used to build every new WHIRLPOOL appliance To locate FSP replacement parts in your area call our Customer Interaction Center telephone number or your nearest Whirlpool designated service center IntheU S ...

Страница 24: ...T BE LIABLE FOR INCIDENTAL OR CONSEQUENTIAL DAMAGES Some states do not allow the exclusion or limitation of incidental or consequential damages so this exclusion or limitation may not apply to you This warranty gives you specific legal rights and you may also have other rights which may vary from state to state Outside the 50 United States this warranty does not apply Contact your authorized Whirl...

Отзывы: