


13
Cooking
To Use the Auto Cooking Functions:
When using preset cooking powers and cook times for selected
food types (Cereal, Eggs, Frozen Food, Vegetable, Grains, Meat,
Poultry, and Fish), follow the “Cook” menus to select amounts
and begin the auto function. See “Display/Touch Screen” section
for sample programming.
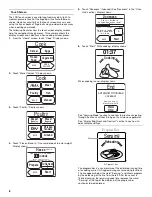
To Cook Manually:
1. Touch COOK TIME/POWER.
2. Touch number pads to enter desired cook time.
If using a cooking power other than 100%, touch “Power,”
then enter desired cooking power.
3. Touch START.
Display will count down the cook time.
When the cooking cycle ends, the “End” screen will appear in
the display, 4 end-of-cycle tones will sound, and then
reminder tones will sound every minute for 15 minutes.
4. Touch CANCEL or open the door to clear the display and/or
stop reminder tones.
To Change Cook Time or Power During a Cooking Cycle:
Cook time and/or power may be changed after cooking begins
without interrupting cooking.
1. Touch “Time” or “Power.”
2. Enter new time or power.
3. Touch START pad.
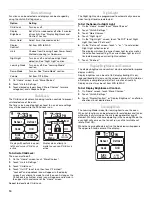
Doneness
For many cooking functions, the screen displays a “Doneness”
bar which can be adjusted by touching “+” or “-.” For most
foods, the maximum and minimum doneness settings add to, or
subtract from normal cook time.
For Defrost, the controlled percentage depends on food type and
weight.
When doneness has been set for a specific food, the “Doneness”
bar remembers that setting, and will remain at that setting for all
future cooking cycles of that specific food, until it is reset.
Doneness control for Poultry, Pork, Fish, Hamburger and Steak
can be set for no less than the default doneness.
Prepare
For many cooking functions, the “Prepare” screen is available.
Touch “Prepare” for preparation instructions, as well as additional
information about the food item, cookware, etc.
Preset Cooking
Times and cooking power have been preset for many common
microwavable foods. Use the following chart as a guide.
*Sensor function.
**Use Sizzle Pan.
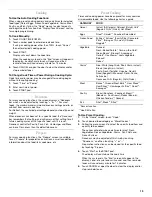
To Use Preset Cooking:
1. On the “Home” screen, touch “Cook.”
2. Touch desired food category or “More Choices.”
3. Follow the menu screens to select the specific food item and
quantity to be cooked.
The sensor will determine cook times for most Fresh
Vegetables, Frozen Vegetables, Grains, Fish Fillets and
Frozen Entrées.
Doneness may be adjusted at this time by touching
“Doneness,” and then touching “+” or “-.”
Preparation instructions can be viewed for the specific food
by touching “Prepare.”
4. Touch “Start” or the START pad.
The display will count down the cook time.
When the cycle ends, the “End” screen will appear in the
display, 4 end-of-cycle tones will sound, and then reminder
tones will sound every minute for 15 minutes.
5. Touch CANCEL or open the door to clear the display and/or
stop reminder tones.
CATEGORY
FOOD
Cereal
Instant (All Cereals), Oatmeal (Quick), Grits*
(Regular), Grits* (Quick), Hot Wheat
Eggs
Fried**, Omelet**, Poached, Scrambled
Frozen Food
Entrées*, Entrées* (Family Size), Casserole,
Pizza** (Rising or Thin crust), Chicken
Nuggets**
Vegetable
Canned
Fresh: Baked Potato*, Corn-on-the-Cob*,
Green Beans*, Broccoli*, Asparagus*,
Carrots*, Cauliflower*, Leafy Vegetable,
Spinach*
Frozen*
Grains*
Rice: White (Long Grain, Short Grain, Instant),
Brown (Long Grain, Instant)
Pasta: Fresh (Tortellini, Linguine, Ravioli),
Dried (Spaghetti, Macaroni, Rotini, Penne,
Fettuccine)
Couscous, Grits (Regular), Grits (Quick)
Meat
Bacon**, Ground, Meat Balls**, Ham Steak**,
Ham Slices**, Hamburger Patties**, Roast**,
Sausages**
Poultry
Breast (Boneless - Poached), Breast**
(Boneless - Pan Brown), Pieces (Bone-in),
Chicken Tenders**, Ground
Fish
Fillet*, Steak**, Stick**