


17
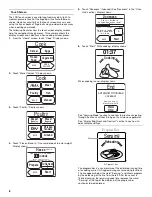
To Use Simmer Rice/Simmer Pasta:
1. On “Home” screen, touch “More Choices.”
2. Touch “Simmer Rice” or “Simmer Pasta.”
3. Follow menu to select specific food to be simmered.
4. Enter amount.
Doneness may be adjusted at this time by touching
“Doneness,” and then touching “+” or “-.”
Preparation instructions can be viewed for the specific food
by touching “Prepare.”
5. Touch “Start” or START pad.
“Boiling Water” will appear in the display for pasta, or
“Cooking” will appear in the display for rice.
If simmering pasta, when water begins to boil, 2 short tones
will sound, and “Add food.” will appear in the display. Open
door, remove container, add food to boiling water, replace
container in oven, close door and touch “Continue.” The
display will count down the simmer time.
If simmering rice, when water begins to boil, the display will
count down the simmer time.
When the cycle ends, the “End” screen will appear in the
display, 4 end-of-cycle tones will sound, and then reminder
tones will sound every minute for 15 minutes.
6. Touch CANCEL or open the door to clear the display and/or
stop reminder tones.
To Use Simmer Cook:
1. On “Home” screen, touch “More Choices.”
2. Touch “Steam/Simmer.”
3. Touch “Simmer Cook.”
4. Enter simmer time.
See “Simmer Cook Chart” for instructions.
5. Touch “Start” or START pad.
“Simmer Cook” will appear in the display. When water begins
to boil, the display will count down the simmer time.
When the cycle ends, the “End” screen will appear in the
display, 4 end-of-cycle tones will sound, and then reminder
tones will sound every minute for 15 minutes.
6. Touch CANCEL or open the door to clear the display and/or
stop reminder tones.
Simmer Cook Chart
Use the following chart as a guide when using the “Simmer
Cook” function.
*Use a dish large enough to completely cover food with water.
To Use Steam Cook:
1. On “Home” screen, touch “More Choices.”
2. Touch “Steam/Simmer.”
3. Touch “Steam Cook.”
4. Enter steam time.
5. Touch “Start” or START pad.
“Steam Cook” will appear in the display. When water begins
to boil, the display will count down the steam time.
When the cycle ends, the “End” screen will appear in the
display, 4 end-of-cycle tones will sound, and then reminder
tones will sound every minute for 15 minutes.
6. Touch CANCEL or open the door to clear the display and/or
stop reminder tones.
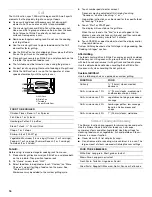
Steamer Vessel
Use the steamer vessel, (provided with the oven) with the Steam
Cook feature to steam foods.
See “General Cleaning” section for additional information.
■
The steamer vessel will become hot. Always use oven mitts
or pot holders when handling.
■
Do not use in a conventional or combination-type oven, with
Sizzle or Grill functions or on electric or gas burners.
■
To avoid scratching, use plastic utensils.
■
Do not overfill. One-half full is recommended.
Cooking Cover: Always use when cooking. Place directly over
the dish with or without the colander.
Colander: Use for foods such as fish, vegetables and potatoes.
Do not use with foods such as rice, pasta and white beans. When
using, place directly over the dish.
Dish: Use for foods such as rice and pasta.
FOOD
INSTRUCTIONS
Pasta
Add 1 tbsp (15 mL) oil to water. Place the dish
containing water in the oven. No need to enter a
simmer time. The water will heat to a boil and
then the oven will turn off. Place the pasta in the
water and cover the dish. Repeat steps 1-3
under “To Use Simmer Cook,” then enter
simmer time.
Rice and
Vegetables
Place water and food in dish. Use ¼-½ cup
(60-125 mL) water with vegetables. Place dish
in the oven. Set simmer time.
Soup and
liquid foods
Place food in dish and place dish in the oven.
Set simmer time.
A. Cooking cover
B. Colander
C. Dish
A
B
C