background image

33

GB

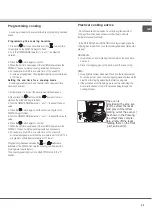
Programming cooking

 A cooking mode must be selected before programming can take

place.

Programming the cooking duration

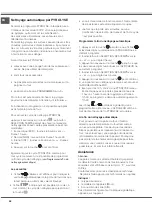
1. Press the 

 button several times until the 

 icon and the

three digits on the DISPLAY begin to flash.
2. Turn the TIMER KNOB towards “+” and “-” to adjust the
duration.

3. Press the 

 button again to confirm;

4. When the set time has elapsed, the text END appears on the
DISPLAY, the oven will stop cooking and a buzzer sounds.
• For example: it is 9:00 a.m. and a time of 1 hour and 15

minutes is programmed. The programme will stop automatically
at 10:15 a.m.

Setting the end time for a cooking mode

 A cooking duration must be set before the cooking end time

can be scheduled.

1. Follow steps 1 to 3 to set the duration as detailed above.
2. Next, press the 

 button until the 

 icon and the two

digits on the DISPLAY begin to flash.
3. Turn the TIMER KNOB towards “+” and “-” to adjust the hour
value.
4. Press the 

 button again until the other two digits on the

DISPLAY begin to flash.
5. Turn the TIMER KNOB towards “+” and “-” to adjust the minute
value.
6. Press the 

 button again to confirm.

7. When the set time has elapsed, the text END appears on the
DISPLAY, the oven will stop cooking and a buzzer sounds.
• For example: it is 9:00 a.m. and a time of 1 hour and 15

minutes is programmed, while the end time is set to 12:30. The
programme will start automatically at 11:15 a.m.

Programming has been set when the 

 and 

 buttons are

illuminated. The DISPLAY shows the cooking end time and the
cooking duration alternately.
To cancel programming, turn the SELECTOR knob to the “0”
position.

Practical cooking advice

 Do not place racks in position 1 and 5 during fan-assisted

cooking. This is because excessive direct heat can burn
temperature sensitive foods.

 In the SPIT ROAST and ROASTING cooking modes, place the

dripping pan in position 1 to collect cooking residues (fat and/or
grease).

MULTILEVEL
• Use positions 2 and 4, placing the food which requires more

heat on 2.

• Place the dripping pan on the bottom and the rack on top.

PIZZA
• Use a light aluminium pizza pan. Place it on the rack provided.

For a crispy crust, do not use the dripping pan as it prevents the

crust from forming by extending the total cooking time.

• If the pizza has a lot of toppings, we recommend adding the

mozzarella cheese on top of the pizza halfway through the
cooking process.

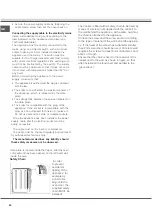
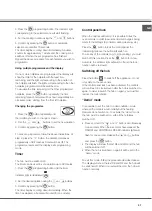
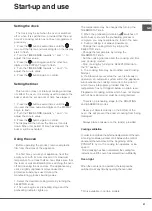
The oven is 

provided with a stop sys-

tem to extract the racks 

and prevent them from 

coming out of the oven.(1)

As shown in the drawing, 

to extract them comple-

tely, simply lift the racks, 

holding them on the front  


    part, and pull (2).

Содержание AXMT 6634/IX

Страница 1: ...AXMT 6634 IX AXMT 6634 WH ...

Страница 2: ...en marche et utilisation 15 Utilisation du plan de cuisson 16 Utilisation du plan 20 Nettoyage et entretien 25 English Operating Instructions COOKER AND OVEN Contents Operating Instructions 1 SAFETY INSTRUCTIONS 7 Description of the appliance Overall view 27 Description of the appliance Control Panel 27 Installation 29 Start up and use 31 Cooking modes 32 Using the hob 36 Care and maintenance 41 F...

Страница 3: ... enfants loin du four lors du cycle de pyrolyse Les substances déversées et les objets doivent être retirés de la cavité du four avant le nettoyage uniquement pour les fours dotés la fonction de pyrolyse Le présent appareil a été conçu à des fins domestiques uniquement pour la cuisson Tout usage pour des fins autres que celles prévues est prohibé chauffage de pièce L appareil et ses parties access...

Страница 4: ...lé par deux personnes ou plus Avant d effectuer toute opération d installation assurez vous de débrancher l appareil du secteur Lors de l installation assurez vous que l appareil n endommage pas le câble d alimentation Allumez l appareil uniquement lorsque la procédure d installation a été achevée Les unités de cuisine en contact avec l appareil doivent être résistantes à la chaleur min 90 C Après...

Страница 5: ...portes et les grilles si présente afin que les enfants ne puissent y grimper facilement et se coincer à l intérieur Cet appareil est fabriqué avec des matériaux recyclables ou réutilisables Mettez le au rebut conformément à la réglementation d élimination des déchets locaux Pour de plus amples renseignements sur le traitement la récupération et le recyclage des appareils électroménagers con tactez...

Страница 6: ...IE déclarée pour la classe de convection forcée mode de chauffage Rôtissage Avant d appeler le service après vente 1 Voyez si vous pouvez régler le problème vous même voir Guide de dépannage 2 Eteignez l appareil et rallumez le pour voir si le problème persiste Si le défaut persiste après les vérifications ci dessus contactez votre service après vente le plus proche Spécifiez le type d anomalie le...

Страница 7: ...r other flammable materials until all the components have cooled down completely During and after use do not touch the heating elements or interior surface of the appliance risk of burns Overheated oils and fats catch fire easily Always remain vigilant when cooking foods rich in fat oil or alcohol e g rum cognac wine Never leave the appliance unattended during food drying If alcoholic beverages ar...

Страница 8: ...with the appliance must be heat resistant min 90 C Carry out all cabinet cutting works before fitting the appliance in the furniture and carefully remove all wood chips and sawdust After installation the bottom of the appliance must no longer be accessible For correct appliance operation do not obstruct the minimum gap between the worktop and the upper edge of the oven The appliance must not be in...

Страница 9: ... corrosive products chlorine based cleaners or pan scourers DISPOSAL OF PACKAGING MATERIALS SAFEGUARDING THE ENVIRONMENT The packaging material is 100 recyclable and is marked with the recycle symbol The various parts of the packaging must therefore be disposed of responsibility and in full compliance with local authority regulations governing waste disposal SCRAPPING OF HOUSEHOLD APPLIANCES When ...

Страница 10: ...he appliance off and on again to see if the problem persists If the fault persists after the above checks contact your nearest After Sales Service Specify the type of fault exact type and model of oven the After Sales Service number the number given after the word Service on the dataplate located inside the storage compartment flap The service number is also given in the warranty booklet your full...

Страница 11: ...RE 3 Indicateur de Préchauffage 4 Voyant PORTE VERROUILLEE 5 Icône STOP 6 Icône DUREE 7 Icône FIN DE CUISSON 8 Icône MINUTEUR 9 Icône HORLOGE 10 Chiffres TEMPS et TEMPERATURE 1 Table de cuisson céramique 2 Tableau de bord 3 Support GRILLE 4 Support LECHEFRITE 5 Pied de réglage 6 GLISSIERES de coulissement 7 niveau 5 8 niveau 4 9 niveau 3 10 niveau 2 11 niveau 1 Description de l appareil Vue d ense...

Страница 12: ...00 W du foyer voir Mise en marche et utilisation 12Voyant BOOSTER il signale que la fonction de suralimentation du booster est activée 13Voyant MINUTEUR il signale que le minuteur est activé 14 TOUCHE MAX pour allumer le foyer à son niveau maximum 16 voir Mise en marche et utilisation 15 TOUCHE INTERMÉDIAIRE pour allumer le foyer à son niveau intermédiaire 8 voir Mise en marche et utilisation 16 T...

Страница 13: ...re l appareil bien à plat visser les pieds de réglage fournis aux emplacements prévus aux coins à la base de la cuisinière voir figure Montage des pieds par encastrement sous la base Raccordement électrique Montage du cordon d alimentation Ouverture du bornier Faites pression à l aide d un tournevis sur les languettes latérales du couvercle du bornier Tirez et ouvrez le couvercle du bornier Pour m...

Страница 14: ... appareil le câble électrique et la prise de courant doivent être facilement accessibles Le câble ne doit être ni plié ni excessivement écrasé Le câble doit être contrôlé périodiquement et ne peut être remplacé que par un technicien agréé Nous déclinons toute responsabilité en cas de non respect des normes énumérées ci dessus N existe que sur certains modèles La chaîne de sécurité Pour éviter le b...

Страница 15: ...pour protéger le four 1 Pour sélectionner le programme de cuisson souhaité tourner la manette PROGRAMMES 2 Le four se place en phase de préchauffage l indicateur préchauffage s allume Pour modifier la température tourner le bouton THERMOSTAT 3 L extinction de l indicateur de préchauffage et le déclenchement du signal sonore indiquent la fin du préchauffage il est temps d enfourner les plats 4 En c...

Страница 16: ...nction est idéale pour la cuisson des gâteaux Placez les aliments à l intérieur du four pendant qu ils sont encore froids Vous pouvez également placer le plat dans un four préchauffé Vous ne pourrez régler la durée qu entre 10 et 10 minutes PAIN Pour obtenir des meilleurs résultats nous vous recommandons de suivre à la lettre les instructions ci dessous Suivez la recette Ne dépassez pas le poids m...

Страница 17: ... confirmer 7 à expiration de la durée sélectionnée l AFFICHEUR affiche END le four stoppe la cuisson et un signal sonore retentit Exemple il est 9h00 la durée programmée est de 1h15 et l heure de fin de cuisson est fixée à 12h30 Le programme démarre automatiquement à 11h15 Les icônes et éclairées signalent qu une programmation a été lancée L AFFICHEUR affiche à tour de rôle l heure de fin de cuiss...

Страница 18: ...caccia Oui 2 190 250 15 35 Plateau de dégivrage MULTINIVEAU Oui 1 3 190 250 15 35 Grille 3 plaque de cuisson sur l étagère grillagée Grille 1 plateau de dégivrage MULTINIVEAU Oui 1 3 5 190 250 25 40 Grille 5 plaque de cuisson sur l étagère grillagée niveaux de commutation à mi cuisson Grille 3 plaque de cuisson sur l étagère grillagée niveaux de commutation à mi cuisson Grille 1 plateau de dégivra...

Страница 19: ...u au fromage strudel tarte aux pommes PÂTISSERIE 2 Moule à gâteaux sur l étagère grillagée Gâteau quatre quarts gâteau marbré Pizza épaisse PIZZA 2 Plateau de dégivrage Focaccia Pain PAIN 2 Grille 5 plateau de dégivrage contenant de l eau Grille 2 plaque de cuisson sur l étagère grillagée RECETTES ÉPROUVÉES conformément à IEC 60350 1 Recette Fonction Préchauffage Grille depuis la partie inférieure...

Страница 20: ... technologie de l induction et ne signalent pas forcément des défauts de fonctionnement Mise sous tension de la table de cuisson Pour mettre la table de cuisson sous tension appuyer sur la touche pendant une seconde environ N existe que sur certains modèles Allumage des foyers Pour mettre en marche un foyer sélectionner la touche du foyer souhaité et indiquer la puissance désirée à l aide du slide...

Страница 21: ...le voyant minuteur s allume 2 Sélectionner la durée désirée à l aide des touches et 3 Appuyer sur la touche pour valider Le compte à rebours du minuteur démarre aussitôt Une fois le temps écoulé un signal sonore retentit pendant 1 minute Verrouillage des commandes Pendant le fonctionnement de la table il est possible de verrouiller les commandes pour empêcher toute intervention extérieure sur le r...

Страница 22: ... foyer L afficheur de puissance clignote pour signaler une casserole incompatible une casserole de trop petit diamètre que la casserole a été soulevée Surchauffe En cas de surchauffe de ses composants électroniques la table s éteint automatiquement et l afficheur indique F suivi d un chiffre clignotant Cet affichage disparaît et la table est à nouveau utilisable dès que la température est redescen...

Страница 23: ... automatiquement en mode standard non Une fois que la zone de cuisson est activée il est possible de la programmer en procédant comme décrit pour les plaques individuelles Accessoires Pour un bon fonctionnement de la zone de cuisson nous conseillons d utiliser des cocottes à fond elliptique ou allongé et ayant au moins 250 mm de dimension principale en cas d utilisation de casseroles d un diamètre...

Страница 24: ...n douce Cuisson très douce Crepes Saise et coloration Rotis Steack Escalope Filets de poisson Oeufs au plat Réduction rapide Sauce liquides Eau Frémissante Pates Riz Légumes Lait Réduction lente Sauce épaisses Cuisson au bain marie Cuisson Autocuiseur après chuchotement Mijotage Ragouts Réchauffage des préparations Sauce chocolat Maintien au chaud ...

Страница 25: ...9 Remettre le couvercle en place en prenant bien soin de repositionner correctement le joint voir figure Ne pas utiliser la lampe du four comme éclairage de la pièce Nettoyage du plan de cuisson vitrocéramique Ne jamais utiliser de détergents abrasifs ou corrosifs tels que des bombes aérosols pour grilloirs et fours des détacheurs et dérouilleurs des poudres à récurer ou des éponges à surface abra...

Страница 26: ...ie de fonctionnement l alimentation des résistances est automatiquement coupée une fois que la porte est verrouillée aucune modification de sélection de durée et de fin de cycle n est plus possible Programmer la fin du nettoyage automatique 1 Appuyer sur la touche jusqu à ce que l icône et les deux digits numériques de l AFFICHEUR ne se mettent à clignoter 2 tourner le bouton SELECTION DES TEMPS v...

Страница 27: ...he appliance Overall view 2 3 4 6 9 10 11 1 5 5 7 8 1 Glass ceramic hob 2 Control panel 3 Sliding grill rack 4 DRIPPING pan 5 Adjustable foot 6 GUIDE RAILS for the sliding racks 7 position 5 8 position 4 9 position 3 10 position 2 11 position 1 GB Description of the appliance Control panel GB 1 SELECTOR knob 2 DISPLAY 3 THERMOSTAT TIMER knob 4 PYROLITIC CYCLE button 5 SET TIMER button 1 2 3 4 5 1 ...

Страница 28: ...ER indicator light shows that the booster function has been activated 13TIMER indicator light shows that the timer has been activated 14MAX BUTTON switches the cooking zone on at its maximum power level 16 see Start up and use 15 MED BUTTON switches the cooking zone on at its medium power level 8 see Start up and use 16 MIN BUTTON switches the cooking zone on at its minimum power level 1 see Start...

Страница 29: ... necessary to level the appliance screw the adjustable feet into the positions provided on each corner of the base of the cooker see figure The legs fit into the slots on the underside of the base of the cooker Electrical connection Fitting the power supply cable To open the terminal board Insert a screwdriver into the side tabs of the terminal board cover Pull the cover to open it To install the ...

Страница 30: ...horised technician to replace it Do not use extension cords or multiple sockets Once the appliance has been installed the power supply cable and the electrical socket must be easily accessible The cable must not be bent or compressed The cable must be checked regularly and replaced by authorised technicians only The manufacturer declines any liability should these safety measures not be observed D...

Страница 31: ... Select the desired cooking mode by turning the SELECTOR knob 2 The oven begins its preheating stage and the preheating indicator lights up The temperature may be changed by turning the THERMOSTAT knob 3 When the preheating indicator switches off and a buzzer sounds the preheating process is complete you may now place the food in the oven 4 During cooking it is always possible to Change the cookin...

Страница 32: ...t heating dishes at the required speed and slow cooking at low temperatures The temperature options are 40 65 90 C BAKED CAKES This function is ideal for baking cakes Place the food inside the oven while it is still cold The dish may also be placed in a preheated oven It will only be possible to adjust the duration by 10 10 minutes BREAD To obtain the best results we recommend that you carefully o...

Страница 33: ...AY theovenwillstopcookingandabuzzersounds For example it is 9 00 a m and a time of 1 hour and 15 minutes is programmed while the end time is set to 12 30 The programmewillstartautomaticallyat11 15a m Programminghasbeensetwhenthe and buttonsare illuminated TheDISPLAYshowsthecookingendtimeandthe cookingdurationalternately Tocancelprogramming turntheSELECTORknobtothe 0 position Practical cooking advi...

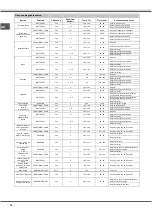
Страница 34: ...y on wire shelf switch levels halfway through cooking Shelf 1 drip tray Pizze surgelate ROASTING Yes 2 250 10 20 Shelf 2 drip tray griglia Torte salate torta di verdura quiche TRADITIONAL OVEN Yes 2 180 190 40 55 Cake tin on wire shelf MULTILEVEL Yes 1 3 180 190 45 60 Shelf 3 cake tin on wire shelf Shelf 1 cake tin on wire shelf Voulevant Salatini di pasta sfoglia TRADITIONAL OVEN Yes 2 190 210 20...

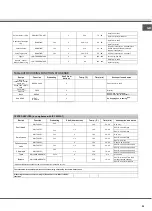
Страница 35: ... IEC 60350 1 Recipe Function Preheating Shelf from bottom Temp C Time min Accessories and notes Short bread MULTILEVEL 2 140 30 40 Drip tray MULTILEVEL 1 3 140 30 40 Shelf 3 universal tray Shelf 1 universal tray Small cakes MULTILEVEL 3 160 20 30 Drip tray MULTILEVEL 1 3 160 25 35 Shelf 3 universal tray Shelf 1 drip tray Fatless sponge cake MULTILEVEL 2 150 35 45 Cake tin on wire shelf MULTILEVEL ...

Страница 36: ...o switch the hob on press and hold the button for approximately one second Switching on the cooking zones To operate a cooking zone select the button corresponding to the desired zone and set the required power level by pressing down on the slider and moving it towards the right to increase the power level or towards the left to decrease the power level The min med max buttons can also be pressed ...

Страница 37: ...luminated 2 Set the desired duration using the and buttons 3 Confirm by pressing the button The timer begins counting down immediately When the time has elapsed a buzzer will sound for one minute Controlpanellock When the hob is switched on it is possible to lock the oven controls in order to avoid accidental changes being made to the settings by children during cleaning etc Press the button to lo...

Страница 38: ...icator display flashes this may be because An incompatible pan A pan whose diameter is too small The pan has been removed from the hotplate Overheating protection If the electronic elements overheat the hob switches off automatically and Fappears on the display followed by a flashing number When the temperature has reached a suitable level this message disappears and the hob may be used again Safe...

Страница 39: ...be programmed using the same procedure as described for the individual hotplates To exit this mode follow the procedure described above The display will show the text DE and OF and the hob will be switched off When it is next switched on the hob will function normally Accessories For optimal EXTENSO TECHNOLOGY performance we recommend the use of pans with an elliptical or elongated base and a majo...

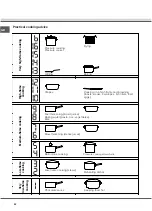
Страница 40: ...ow flame cooking Very low flame cooking Crêpes Cooking on a high flame and browning roasts steaks escalopes fish fillets fried eggs Fast thickening liquid juices Boiling water pasta rice vegetables Milk Slow thickening dense juices Bain marie cooking Pressure cooking after whistle Low flame cooking stews Reheating dishes Chocolate sauce Keeping food hot ...

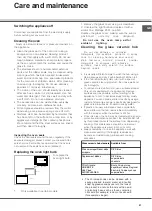
Страница 41: ... oven lamp as for ambient lighting Cleaning the glass ceramic hob Do not use abrasive or corrosive detergents for example products in spray cans for cleaning barbecues and ovens stain removers anti rust products powder detergents or sponges with abrasive surfaces these may scratch the surface beyond repair It is usually sufficient simply to wash the hob using a damp sponge and dry it with absorben...

Страница 42: ... heating elements will be switched off Once the oven door has been locked you cannot change the duration and cycle end time settings Programming the automatic cleaning end time 1 Press the button until the icon and the two digits on the DISPLAY begin to flash 2 Turn the TIMER KNOB towards and to adjust the hour value 3 Press the button again until the other two digits on the DISPLAY begin to flash...

Страница 43: ...43 ...
Страница 44: ...XEROX FABRIANO 03 2016 195136687 02 Indesit Company S P A Viale Aristide Merloni 47 60044 Fabriano AN www whirlppppppp ool com p 44 ...

Отзывы: