background image

6

F

CLOCK

K

EEP


THE


DOOR


OPEN

 while setting the Clock. 

This gives you 10 minutes to complete the 
setting of the Clock. Otherwise, each step 
must be accomplished within 60 seconds.
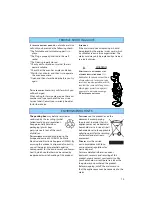
1(a). Turn the multifunction knob to the 

zero position.

2(b). Press the Select button (3 seconds) until 

the left-hand digit (hour’s) fl icker.

3. Turn the +/- knob to set the hours.
4. Press the Select button again. (The two right 

hand digits (minutes) fl icker).

5. Turn the +/- knob to set the minutes.
6. Press the Select button again.
The Clock is set and in operation.

N

OTE

When the appliance is fi rst plugged in or 

after a power failure, the display is blank. If the 
clock is not set, the display will remain blank 
until the cooking time is set.

START PROTECTION / CHILD LOCK

T

HIS


AUTOMATIC


SAFETY


FUNCTION


IS


ACTIVATED


ONE


MINUTE


AFTER

 the oven has returned to “stand by 

mode“.

PAUSE OR STOP COOKING

T

O


PAUSE


COOKING

:

The cooking can be paused to check, turn or 
stir the food by opening the door. The setting 
will be maintained for 10 minutes.

T

O


CONTINUE


COOKING

:

Close the door and press the Start 
button 

ONCE

. The cooking is resumed 

from where it was paused.
Pressing the Start button 

TWICE

 will increase 

the time by 30 seconds.

I

F


YOU


DON

T


WANT


TO


CONTINUE


COOKING

:

Remove the food, close the door and 
press the STOP button

BEEP


WILL


SIGNAL

 once a minute for 10 

minutes when the cooking is fi nished. 
Press the STOP button or open the door to 
cancel the signal.

N

OTE

:

 The oven will only hold the settings for 60 

seconds if the door is opened and then closed 
after the cooking is fi nished.

T

HE


DOOR


MUST


BE


OPENED


AND


CLOSED

 e.g. putting 

food into it, before the safety lock is released. 
Else the display will show 

“door“

.

1(a)

3

5

2

4

I

F


YOU


WISH


TO


REMOVE


THE


CLOCK

 from the display 

once it has been set,
follow steps (a) & (b) and press the Stop button 
(c).

(c)

T

O


REINSTATE


THE


CLOCK

,

 follow the above 

procedure.

6

(b)

Содержание AMW 520

Страница 1: ...1 Instructions for use www whirlpool com AMW 520 ...

Страница 2: ...nufacturers are not liable for any problems caused by the user s failure to observe these instructions THE EARTHING OF THIS APPLIANCE is compulsory The manufacturer will accept no responsibility for injury to persons animals or damage to objects arising from the non observance of this requirement IN THE CASE OF A PERMANENT CONNECTION the appliance should be installed by a qualified technician ENSU...

Страница 3: ... USE YOUR MICROWAVE oven for drying textiles paper spices herbs wood flowers fruit or other combustible materials Fire could result IF MATERIAL INSIDE OUTSIDE THE OVEN SHOULD IGNITE keep oven door closed and turn the oven off Disconnect the power cord or shut off power at the fuse or circuit breaker panel DO NOT OVER COOK FOOD Fire could result DO NOT LEAVE THE OVEN UNATTENDED especially when usin...

Страница 4: ...DO NOT USE YOUR MICROWAVE oven for deep frying because the oil temperature cannot be controlled USE HOT PADS OR OVEN MITTS to prevent burns when touching containers oven parts and pan after cooking CAREFUL ALWAYS REFER to a microwave cookbook not included for details Especially if cooking or reheating food that contains alcohol After heating baby food or liquids in a baby bottle or in a baby food ...

Страница 5: ...T USE THE TURNTABLE SUPPORT under the Glass turntable Never put any other utensils on the turntable support Fit the turntable support in the oven CRISP PLATE PLACE THE FOOD DIRECTLY ON THE CRISP PLATE Always use the Glass turntable as support when using THE CRISP PLATE DO NOT PLACE ANY UTENSILS on the Crisp plate since it will quickly become very hot and is likely to cause damage to the utensil TH...

Страница 6: ...de PAUSE OR STOP COOKING TO PAUSE COOKING The cooking can be paused to check turn or stir the food by opening the door The setting will be maintained for 10 minutes TO CONTINUE COOKING Close the door and press the Start button ONCE The cooking is resumed from where it was paused Pressing the Start button TWICE will increase the time by 30 seconds IF YOU DON T WANT TO CONTINUE COOKING Remove the fo...

Страница 7: ...the knob to set the preferred power level 5 Press the Start button COOK REHEAT WITH MICROWAVES USE THIS FUNCTION for normal cooking and reheating such as vegetables fish potatoes and meat ONCE THE COOKING PROCESS HAS BEEN STARTED The time can easily be increased in 30 second steps by pressing the Start button Each press increases the time with 30 seconds You may also alter the time by turning the ...

Страница 8: ...atically starts with full microwave power level and the cooking time set to 30 seconds Each additional press increases the time with 30 seconds You may also alter the time by turning the knob to increase or decrease the time after the function has started 1 Turn the multifunction knob to the microwave position 2 Press the Start button 2 1 IMPORTANT ENSURE that the utensils used are heat resistant ...

Страница 9: ...urn the knob to set the cooking time 5 Press the Start button The Max possible microwave power level when using the Turbo Grill is limited to a factory preset level USE THIS FUNCTION TO cook such food as Gratin s Lasagne Poultry and Baked potatoes 1 2 3 4 5 Do not use with this function PLACE FOOD on the wire rack or on the glass turntable when cooking with this function ...

Страница 10: ...ANT 1 2 3 Do not use with this function IT IS NOT POSSIBLE to change or switch the Power level or Grill on off when using the Crisp function ENSURE that the Crisp plate is correctly placed in the middle of the Glass turntable THE OVEN AND THE CRISP PLATE become very hot when using this function DO NOT PLACE THE HOT CRISP PLATE on any surface susceptible to heat BE CAREFUL NOT TO TOUCH the ceiling ...

Страница 11: ...E HEATING PROCESS the digits flicker and PRE HEAT is displayed at intervals until the set temperature is reached ONCE THE HEATING PROCESS has been started the temperature can easily be adjusted by turning the multifunction knob THE OVEN THEN KEEPS the set temperature for 10 minutes before switching off During this time it is waiting for you to insert food and choose a Forced Air function to begin ...

Страница 12: ...ING PLATE when baking small items like cookies or rolls DURING THE HEATING PROCESS the digits flicker until the set temperature is reached 1 Turn the multifunction knob to the Forced Air position 2 Turn the knob to set the temperature 3 Press the Select button to select microwave power 4 Turn the knob to set the power level 5 Press the Select button to select cooking time 6 Turn the knob to set th...

Страница 13: ...STING DONENESS WHEN USING the Auto functions except the Jet Defrost function you also have the possibility to personally control the end result through the Adjust doneness feature This feature enables you to achieve higher or lower end temperature or longer and shorter time increases the end temperature decreases the end temperature NOTE The Personal Preference can only be set or altered during th...

Страница 14: ...o TURN food Open the door Turn the food Close the door and restart by pressing the Start button JET DEFROST USE THIS FUNCTION for defrosting Meat Poultry Fish vegetables and bread For food not listed in the table below you should follow the procedure for Cook and reheat with microwaves and choose 160 W when defrosting NOTE the oven continues automatically after 2 min if the food hasn t been turned...

Страница 15: ...meat on top of each other or interlace them THICKER SLICES such as meat loaf and sausages have to be placed close to each other RELEASING PRESSURE ALWAYS COVER THE FOOD with the Cover or some plastic foil PLASTIC FOIL should be pricked with a fork or cocktail stick to relieve the pressure and to prevent bursting as steam builds up during cooking Place food onto a microwave safe heatproof dinner pl...

Страница 16: ...the fish fingers when the oven stops and promts you to Add Food Turn the fish when the oven beeps AUTO CRISP USE THIS FUNCTION TO quickly reheat your food from frozen to serving temperature AUTO CRISP IS USED ONLY for frozen ready made food and fish fingers Do not use with this function DURING THE HEATING PROCESS the oven may stop depending on program and prompts you to STIR or TURN food Open the ...

Страница 17: ...e the rolls on the baking plate Put the plate in the oven when it promts you to Add food AUTO FORCED AIR COMBI FOR CHICKEN AND LASAGNE ensure that the dish you use is oven proof and allow microwaves to pass through it before cooking Else you may obtain a poor end result ALWAYS USE the baking plate when making cookies and canned or frozen rolls Grease the baking plate lightly or cover it with bakin...

Страница 18: ...l panel and the interior and exterior oven surfaces Use a sponge with a mild detergent or a paper towel with spray glass cleaner Apply spray glass cleaner to a paper towel DO NOT spray directly on the oven Crisp handle Wire rack Baking plate FAILURE TO MAINTAIN THE OVEN in a clean condition could lead to deterioration of the surface that could adversely affect the life of the appliance and possibl...

Страница 19: ...tially hazardous packaging plastic bags polystyrene etc out of the reach of children THIS APPLIANCE is marked according to the European directive 2002 96 EC on Waste Electrical and Electronic Equipment WEEE By ensuring this product is disposed of correctly you will help prevent potential negative consequences for the environment and human health which could otherwise be caused by inappropriate was...

Страница 20: ...comparative testing of heating performance of different microwave ovens We recommend the following for this oven Test Amount Approx time Power level Container 12 3 1 1000 g 11 min 750 W Pyrex 3 227 12 3 2 475 g 5 min 750 W Pyrex 3 827 12 3 3 900 g 15 min 750 W Pyrex 3 838 12 3 4 1100 g 28 30 min Forced air 200 ºC 350 W Pyrex 3 827 12 3 5 700 g 25 min Forced air 200 ºC 90 W Pyrex 3 827 12 3 6 1000 ...

Отзывы: