background image

Convection 4 x 2/3GN     Analogic electric models


11

ISTRUZIONI PER L’INSTALLATORE 

INSTRUCTIONS FOR THE INSTALLER


ANLEITUNGEN FÜR DEN INSTALLATEUR 

NOTICE POUR L'INSTALLATEUR 

INSTRUCCIONES PARA EL INSTALADOR


3.1  SOSTITUZIONE PARTI DI RICAMBIO. 

Prima di procedere alla sostituzione delle parti di ricambio è necessario, ai fini della sicurezza, disinserire l’interruttore elettrico di protezione e chiudere 
la valvola di intercettazione-acqua installati a monte dell’apparecchio. 

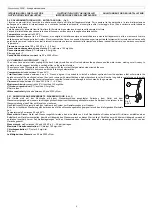
3.1A  Ventola motore:

 1-sganciare i pannelli portateglie dx e sx dai relativi perni di incastro; 2-togliere il pannello di convogliamento e aspirazione 

aria dopo aver svitato e tolto i 4 dadi a calotta del fissaggio; 3-svitare e togliere la vite frontale di bloccaggio della ventola all’albero motore; 4-tramite 
un estrattore facente leva sull’albero motore sfilare la ventola e sostituirla. 

3.1B  Motore:

 dopo avere eseguito lo smontaggio della ventola, come sopra descritto, procedere come segue: 

1-scollegare i cavi elettrici di collegamento; 2- svitare e togliere le 4 viti di fissaggio del motore alla camera forno; 3-estrarre il motore sostituendolo 
con quello nuovo. 
Prima di rimontare la ventola assicurarsi che l’albero motore giri senza attrito sulla flangia di tenuta, in caso contrario svitare le 3 viti che fissano la 
flangia alla camera di cottura e procedere alla centratura e successivo bloccaggio in modo tale che l’albero ruoti nella flangia senza attriti. 

3.1C  Resistenza di riscaldamento:

 1-dopo la rimozione dei pannelli portateglie dx e sx e di quello di convogliamento e aspirazione aria, procedere 

allo smontaggio dello schienale posteriore in acciaio inox; 2-svitare e togliere le 3 viti ed il dado che fissano la resistenza alla parete della camera di 
cottura; 3-disconnettere i cavi del collegamento elettrico; 4-estrarre la resistenza dall’interno della camera di cottura e procedere al montaggio di 
quella nuova. 
Al fine di garantire la tenuta al vapore, applicare del sigillante al silicone resistente alla temperatura tra la flangia della nuova resistenza e la parete 
della camera di cottura. 

3.1D  Componenti elettrici del cruscotto:

 il selettore cicli, i termostati, il timer sono accessibili dopo aver smontato il fianco di rivestimento dx . Per 

la loro sostituzione è sufficiente: 1-smontare il cruscotto; 2-estrarre le manopole; 3-svitare e togliere le relative viti di fissaggio; 4- scollegare i cavi 
elettrici e procedere alla sostituzione del componente. Per la sostituzione dei termostati bisognerà sfilare verso l’esterno i bulbi inseriti nei vari punti 
della  camera di cottura. A tale scopo i premistoppa, che bloccano i capillari dei bulbi, devono essere rimossi per permetterne la sostituzione e 
l’inserimento dei nuovi componenti. 

3.1E  Lampada illuminazione camera di cottura:

 è sufficiente aprire il cristallo esterno mobile della porta, smontare la copertura in acciaio inox 

della porta e provvedere alla sostituzione della/e lampade di tipo alogeno. Si raccomanda di evitare il contatto diretto della lampada con le mani. 

3.1F  Guarnizione di tenuta della porta:

 è sufficiente tirarla, staccandola dalla sede nella quale è inserita a pressione. Ad estrazione avvenuta 

inserire quella nuova nella stessa posizione. 

CONTROLLO DELLE FUNZIONI. 

Mettere in funzione l’apparecchio come da ISTRUZIONI PER L’UTENTE. 
Eseguire una prova di tenuta delle condutture idriche e quelle del gas. 
E’ indispensabile spiegare all’utente il funzionamento dell’apparecchiatura e consegnargli il libretto istruzioni a cui si dovrà attenere nell’uso. 
 

3.1  REPLACING SPARE PARTS. 

Before starting to replace spare parts make sure - for safety reasons - that the electricity main switch is off and that the water on-off valve is closed and 
that (for gas powered ovens) the gas supply is turned off. 

3.1A  Motor fan:

 1-unhook the right and left baking tray support panels from their pins; 2-remove the air conveyance and suction panel after having 

unscrewed and removed the 4 cap nuts fixing it; 3-unscrew and remove the front screw locking the fan to the motor shaft; 4-with an extractor lever on 
the motor shaft, pull the fan out and change it. 

3.1B  Motor:

 once the fan has been removed as described above, proceed as follows: 

1-disconnect the electrical cables; 2- unscrew and remove the 4 screws securing the motor to the oven; 3-extract the motor and put the new one in its 
place. 
Before putting the fan back, check that the motor shaft turns without friction on the sealing flange. To the contrary, unscrew the 3 screws fixing the 
flange to the oven, centre the shaft and lock it so it turns smoothly in the flange without friction. 

3.1C Heating element electric version:

 1-after removing the right and left baking tray support panels and the air conveyance and suction panel, 

remove the rear stainless steel panel; 2-unscrew and remove the 3 screws and the nut that are fixing the heating element to the oven wall; 3-
disconnect the electrical cables; 4-pull the heating element out from inside the oven and put the new one in its place. 
To guarantee tightness to steam, seal with a temperature resistant silicon between the flange of the new heating element and the oven wall. 

3.1D  Components on the control panel:

 the cycle selector, the thermostats, the timer can be accessed after the right cladding panel has been 

removed. To change these components simply: 1-remove the control panel; 2-extract the knobs; 3-unscrew and remove the relative securing screws; 
4-disconnect the electrical cables and change the component. When changing the thermostats, the bulbs installed in the various points of the oven 
have to be pulled out. For this purpose the stuffing boxes, that are blocking the bulb capillaries, must be removed so the new ones can be fitted. 

3.1E  Oven light:

 just open the external part of the double glass door, take off the stainless steel cover and change the halogen bulb. We advise you 

not to touch the bulb directly with your hands. 

3.1F  Door seal:

 simply pull it away – it is only pressed into position. Put the new seal in place. 

CHECKING THE FUNCTIONS 

Start the appliance following the INSTRUCTIONS FOR THE USER. 
Test the water pipes for leaks. 
It is essential to explain to the user exactly how the appliance works and to supply him with the instruction handbook that he must follow when using the 
oven. 


Содержание AGB 629/WP

Страница 1: ...ATION AND MAINTENANCE INSTRUCTIONS HEISSLUFTDÄMPFER INSTALLATIONS BEDIENUNGS UND WARTUNGSANLEITUNG FOURS MIXTES À CONVECTION VAPEUR INSTRUCTIONS POUR L INSTALLATION L EMPLOI ET LA MAINTENANCE HORNOS CONVECCIÓN VAPOR INSTRUCCIONES PARA LA INSTALACIÓN EL USO Y EL MANTENIMIENTO Serie SC SU Mod Analogic AGB 629 WP AGB 630 WP ...

Страница 2: ...mitätserklärung Installazione dell apparecchio Installation de l appareil 2 0 Installing the appliance Instalación del aparato Geräteinstallation Posizionamento dell apparecchio Position de l appareil 2 1 Positioning the appliance Colocación del aparato Geräteaufstellung Collegamento elettrico Connexion électrique 2 3 Electrical connection Conexión eléctrica Elektroanschluss Collegamento idraulico...

Страница 3: ...elettrica Electrical connection Elektroanschluß Branchement électrique Conexión eléctrica B Entrata acqua φ 3 4 gas Water inlet φ 3 4 gas Wasserzufuhr φ 3 4 Gas Arrivée eau φ 3 4 gaz Entrada agua φ 3 4 de gas C Sfiato camera cottura φ 32 mm Cooking chamber relief valve φ 32mm Schnüffelventil Garraum φ 32 mm Purge chambre de cuisson φ 32 mm Desagüe camara coccion φ 32 mm Modelli con serbatoio acqua...

Страница 4: ...sabilità in caso di danni diretti derivati da uso non corretto errata installazione e da cattiva manutenzione 2 0 CONFORMANCE DECLARATION The Manufacturer declares that the appliances conform to the EEC guidelines They must be installed in accordance with current standards especially regarding aeration of the premises and the exhaust gas evacuation system Note The Manufacturer declines all and eve...

Страница 5: ...ständigen Behörden Ihrer Gemeindeverwaltung an den lokalen Recyclinghof für Haushaltsmüll oder an den Händler bei dem Sie dieses Gerät erworben haben um weitere Informationen über Behandlung Verwertung und Wiederverwendung dieses Produkts zu erhalten DIRECTIVE EUROPÉENNE 2002 96 CE Cet appareil porte le symbole du recyclage conformément à la Directive Européenne 2002 96 CE concernant les Déchets d...

Страница 6: ... in diesem Handbuch angeführten Anleitungen und den gültigen Normen durchgeführt werden Die Wasser und Stromversorgungsanlagen sowie der Aufstellungsort müssen den geltenden Installations und Sicherheitsbestimmungen entsprechen Den Backofen in einem gut belüfteten Raum aufstellen und mit den höhenverstellbaren Füßen waagrecht ausrichten sodass ein Mindestabstand von 6 cm zwischen dem Backofenboden...

Страница 7: ...ür den Betrieb mit der am Typenschild auf der rechten Seite des Geräts angebracht angegebenen Versorgungsspannung eingestellt Die Anschlussklemmleiste wird durch Abnehmen der rechten Seitenwand zugänglich Der Anschluss muss mit einem Netzkabel mit den Eigenschaften des Typs H07 RN F mit Gummiisolierung durchgeführt werden Die Leiterquerschnitte müssen jenen unter Technische Daten angeführten entsp...

Страница 8: ...the system that generates steam inside the oven The water must be suitable to human use with the following characteristics Temperature included between 20 and 90 C Total hardness included between 4 and 8 French degree it is advisable to install a softener upstream from the appliance that will maintain the hardness level at the mentioned values the oven s running with water that has a higher hardne...

Страница 9: ... entre 100 250 KPa 1 2 5 bar Concentration maximale en chlorures Cl inferieure à 150 mgr l Concentration en Chlore Cl 2 inferieure à 0 2 mg l Ph superieurere à 7 Conductibilité de l eau 50 à 2000 µS cm 2 41 CONEXIÓN HÍDRICA ENTRADA DEL AGUA Fig 3 Los hornos disponen de una conexión para la entrada del agua situada en la parte trasera del aparato Entre el aparato y la red de abastecimiento es preci...

Страница 10: ... Wärmeschutzschalter Motor Der motor wird durch die elektrische Impedanz geschützt 3 0C Sicherheitsthermostat Garraum hat die Funktion bei erhöhten Temperaturen im Garraum die Gaszufuhr zu unterbrechen Die Rückstellung des Thermostats muss manuell erfolgen nachdem die Ursachen die zur Überhitzung geführt haben behoben wurden 3 0D Mikroschalter Tür unterbricht den Backofenbetrieb jedes Mal wenn die...

Страница 11: ...arnizione di tenuta della porta è sufficiente tirarla staccandola dalla sede nella quale è inserita a pressione Ad estrazione avvenuta inserire quella nuova nella stessa posizione CONTROLLO DELLE FUNZIONI Mettere in funzione l apparecchio come da ISTRUZIONI PER L UTENTE Eseguire una prova di tenuta delle condutture idriche e quelle del gas E indispensabile spiegare all utente il funzionamento dell...

Страница 12: ...lgen ist ausgehändigt werden 3 1 REMPLACEMENT DES PIÈCES Pour des raisons de sécurité avant de remplacer les pièces à usure déconnecter l interrupteur de protection électrique et fermer le robinet d arrêt de l eau installés tous deux en amont de l appareil 3 1A Ventilateur moteur 1 dégager les panneaux porte bacs droit et gauche de leurs supports 2 enlever le panneau d acheminement et d aspiration...

Страница 13: ...3 desconectar los cables de la conexión eléctrica 4 extraer la resistencia de dentro de la cámara de cocción y proceder con el montaje de la nueva Para garantizar la estanqueidad al vapor aplicar un sellador de silicona resistente a la temperatura entre la brida de la nueva resistencia y la pared de la cámara di cocción 3 1D Componentes electrónicos del panel se accede a los termostatos y a los co...

Страница 14: ...on Rimedi alle anomalie di cottura Abhilfe bei abnormalem garen Remedios para las anomalías de cocción 9 2 Remedies to cooking hitches Que faire pour résoudre les problèmes de cuisson 4 0 PREMESSA Leggere attentamente le istruzioni per l uso con particolare attenzione alle norme relative ai dispositivi di sicurezza Questa apparecchiatura dovrà essere destinata solo all uso per il quale è stata esp...

Страница 15: ...ung und Injektion Bei der Erreichung von mindestens 150 C kann Dampf direkt im Garraum dadurch erzeugt werden daß Wasser auf die Lüfter eingespritzt wird Die Wasser und Dampfmenge hängt davon ab wie lange der Knopf B gezogen wird 4 1 PROGRAMMATION ET FONCTIONNEMENT Fig 10 11 4 1A Cycle convection air chaud plage température 50 270 C Tourner le bouton du sélecteur de cycles A dans la position indiq...

Страница 16: ...urées supérieures choisir la position de durée continue La mise en marche du minuteur lorsque la porte est fermée permet de faire démarrer le cycle de cuisson avec la mise en marche du moto ventilateur du chauffage et de la génération de vapeur s il a été sélectionné Lorsque le temps programmé est écoulé un signal acoustique annoncera la fin du cycle de cuisson avec l arrêt de toutes les fonctions...

Страница 17: ...en Zeit ertönt ein Signal was bedeutet dass der Garvorgang beginnen kann 5 2 PRÉCHAUFFAGE DE L ENCEINTE DU FOUR Versions ANALOGIC et ELECTRONIC Nous conseillons de toujours effectuer cette opération avant d introduire des aliments dans l enceinte du four Le temps nécessaire au préchauffage doit être programmé en tenant compte qu il faut au moins 10 minutes pour atteindre la température de 220 C po...

Страница 18: ...icles that oxidising would cause rust to form Do not wash the appliance with jets of water Do not use chlorine based products bleach hydrochloric acid to clean stainless steel parts even if they are diluted in water All food residuals and grease must be removed from the oven each time it is used for cooking The juices and fat that drip from the food and fall to the bottom are conveyed to the drain...

Страница 19: ...rte entrouverte afin que l air puisse circuler pour éviter la formation de mauvaises odeurs 4 étendre une couche de protection sur toutes les surfaces en acier inox en passant un chiffon légèrement imbibé d huile de vaseline 8 0 MANTENIMIENTO Antes de efectuar cualquier operación de mantenimiento es obligatorio desconectar el interruptor eléctrico de protección y cerrar la llave de paso del agua i...

Страница 20: ... werden Den Kundendienst benachrichtigen Sämtliche Installations Wartungs und Reparaturarbeiten dürfen ausschließlich vom Fachpersonal durchgeführt werden Das Gerät muss mindestens alle 6 Monate überprüft werden aus diesem Grund ist der Abschluss eines Wartungsvertrags ratsam N B Die Herstellerfirma haftet für die in diesem Handbuch enthaltenden Fehler bzw Druckfehler nicht Außerdem behält sich de...

Страница 21: ...ble do not put this tray immediately under another To choose the best cooking temperature bear the following rule in mind select a temperature that is about 20 below the one normally used in traditional non fan ovens The forced ventilation system of these ovens guarantees shorter cooking times If you fail to follow this rule it is possible that the food you are cooking will not be perfect 9 0B Ste...

Страница 22: ...tendres et la perte en poids est limitée Ce système est idéal surtout pour la cuisson de viandes braisées de ragoûts ou de gros morceaux de viande pour lesquels nous conseillons de contrôler la température au cœur de l aliment grâce à la spéciale sonde à piquer 9 0 CONSEJOS PARA LAS COCCIONES 9 0A Cocción por convección El sistema convección por aire caliente y temperaturas entre 50 y 270 C está i...

Страница 23: ...erung von Fett und Flüssigkeit es ist ausreichend die Speisen vor dem Hineinschieben in den Garraum einzufetten und zu würzen Die Gartemperaturen können zwischen 150 und 180 C schwanken und müssen je nach Größe des Fleischstücks gewählt werden Je größer das Stück ist um so niedriger muss die Temperatur eingestellt werden 9 1C Grillen Die Speisen auf die zur Ausstattung des Backofens gehörenden Ros...

Страница 24: ... verhindert die korrekte Belüftung des zu garenden Produkts Sicherstellen dass die zu garenden Speisen nicht zu nahe beieinander liegen und dadurch eine korrekte Belüftung zwischen den Produkten verhindern Die Gartemperatur könnte zu hoch sein Eine niedrigere Temperatur einstellen Wenn das Produkt den direkten Kontakt mit der Heißluft nicht verträgt muss es in einem Gastro Norm Behälter mit angeme...

Отзывы: