5019 318 33305
ИНСТРУКЦИЯ ПО УСТАНОВКЕ
Расстояние между опорной поверхностью для посуды на плите и самой нижней частью
вытяжки ДОЛЖНО СОСТАВЛЯТЬ НЕ МЕНЕЕ 50 cm в случае электрических плит и не менее
65 cm в случае газовых или комбинированных плит.
Если инструкциями по установке газового прибора предусмотрено большее расстояние,
то данное указание должно быть соблюдено. Рекомендуется выполнять монтаж,
проконсультировавшись с квалифицированным специалистом. Последовательность
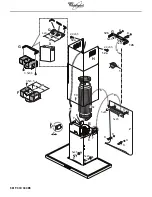
действий при монтаже должна соответствовать нумерации (1
Ö
2
Ö
3
Ö
.....). Не
подключайте вытяжку к сети электропитания до полного окончания монтажа.
ОСТОРОЖНО: Проверьте, входят ли в комплект поставки выпускная труба и
крепежные зажимы. В противном случае необходимо приобрести их отдельно.
Примечание: детали, отмеченные символом “(*)”, представляют собой дополнительные
принадлежности, поставляемые только в некоторых моделях или не включаемые в
комплект поставки. В последнем случае эти детали приобретаются отдельно.
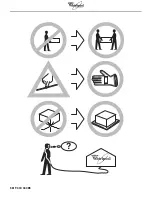
Данный прибор отличается большим весом; для его переноски и установки требуется не
менее двух человек.
КАРТА ЗА ИНСТАЛИРАНЕ
Минималното разстояние между опорната повърхност на съдовете върху устройството за
готвене и найCниската част на кухненския аспиратор, НЕ ТРЯБВА ДА БЪДЕ поCмалко от
50 cm за случая на електрически печки и 65 cm за печки на газ или комбинирани.
Ако в инструкциите на устройството за готвене на газ е указано поCголямо разстояние за
тази спецификация, трябва да се изпълнява това разстояние. Препоръчва се за
инсталирането на аспиратора да се посъветвате с квалифициран техник. За монтаж
следвайте номерацията (1
Ö
2
Ö
3
Ö
.....). Не включвайте захранването на уреда, докато
инсталирането не е завършено докрай.
ВНИМАНИЕ: Проверете дали тръбата за отвеждане и скобите за фиксиране са
приложени в комплекта. В противен случай те трябва да се закупят.
Забележка: Частите, означени със символа “(*)” са допълнителни принадлежности,
които са включени само към някои модели, или части, които се закупуват допълнително.
Уред с много голямо тегло C преместването и инсталирането на аспиратора трябва да се
извършва от найCмалко двама души.
FI
Ş
A DE INSTALARE
Distanţa minimă între suprafaţa de sprijin a recipientelor de pe mașina de gătit și partea cea mai
joasă a hotei de bucătărie NU TREBUIE SĂ FIE mai mică de 50 cm în cazul plitelor electrice și
de 65 cm în cazul plitelor cu gaz sau mixte.
Dacă instrucţiunile de instalare ale mașinii de gătit cu gaz specifică o distanţă mai mare decât
cea indicată, trebuie să ţineţi cont de ea. Se recomandă să consultaţi un tehnician calificat
pentru instalare. Pentru montaj urmaţi numerotarea (1
Ö
2
Ö
3
Ö
.....). Nu branșaţi aparatul la
curent până când nu terminaţi definitiv operaţia de instalare.
ATENŢIE: Verificaţi dacă tubul de evacuare și manșoanele de fixare sunt furnizate în dotare.
În caz contrar, trebuie cumpărate separat.
Notă: Elementele marcate cu simbolul “(*)” sunt accesorii opţionale furnizate doar la unele
modele sau sunt elemente care nu sunt furnizate, ci trebuie cumpărate.
Produs cu greutate mare, deplasarea și instalarea hotei trebuie efectuate de cel puţin două sau
mai multe persoane.
INSTALLATION DATA SHEET
The minimum distance between the support surface of the recipients on the cooking device and the
lowest part of the hood MUST NOT BE less than 50 cm in the case of electric cookers and 65 cm for
gas or combination cookers.
If the installation instructions for a gas cooker specify a greater distance, then this distance must be
observed. It is advisable to contact a qualified technician for installation. To install, follow steps
(1
Ö
2
Ö
3
Ö
.....). Do not connect the hood to the electrical power supply until installation is completed.
WARNING: Check whether the exhaust pipe and clamps are provided. If not, they must be
purchased separately.
Note: Parts marked with the symbol “(*)” are optional accessories supplied only with some models
or parts not supplied, to be purchased separately.
Very heavy product; hood handling and installation must be carried out by at least two persons.
RUS
BG
RO
GB
Содержание 968
Страница 3: ...5019 318 33305 ...

