background image

5019 318 33305

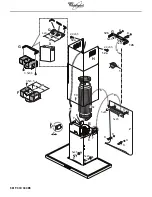
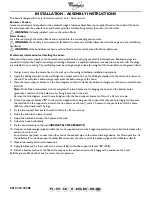
Fig.1

1. Control panel

2. Grease filter

3. Grease filter release handle

4. Halogen lamps

5. Steam deflector

6. Telescopic flue

7. Side air outlets (for filter version only)

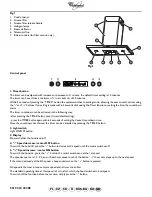
Control panel

1. Timer button

The timer can be adjusted with increases or decreases of 1 minute, the default timer setting is 10 minutes.
The timer can be set from a minimum of 1 to a maximum of 20 minutes.
Within 5 seconds of pressing the “TIMER” button the system switches to setting mode, allowing the user to set the timer using 
the “-” and “+” buttons. If no setting is made within 5 seconds of choosing the Timer function or setting the time, the countdown 
starts.
The timer countdown can be activated in the following way:
- after pressing the TIMER button once (timer default setting);
- press the TIMER button again within 5 seconds of setting the desired countdown time.
Once the countdown has started, the timer can be cancelled by pressing the TIMER button.

2. Light switch

Light ON/OFF button.

3. Display

Shows whether the hood is on/off.

4. “-” Speed decrease / motor OFF button

To switch the hood off, press the “-” button to decrease the speed until the motor switches off.

5. “+” Speed increase / motor ON button

To switch the hood on, press the “+” button: the motor switches on at the 1st speed.
The speed sequence is 1-2-3-4, so with each successive touch of the button “+” the motor steps up to the next speed.
If the motor is already at the 4th speed, a beep sounds when the “+” button is pressed.

4th speed is the most intensive motor speed and is timer controlled.
The standard operating time at this speed is 5 min, after which the hood switches to 2nd speed.
To switch off the function before the set time, simply press the “-” button.

Fig.1

GB

SK

CZ

PL

H RUS BG RO

Содержание 968

Страница 1: ...ěkterým modelům nebo se vůbec nedodává a je nutné je zakoupit Vzhledem k tomu že je odsavač par velmi těžký musí jeho stěhování a instalaci provádět nejméně dvě osoby INŠTALAČNÁ SCHÉMA Minimálna vzdialenost medzi plochou varnej dosky a najnižšej časti odsávača pár NESMIE BYT menšia ako 50 cm v prípade elektrickej varnej dosky a 65 cm v prípade plynovej alebo kombinovanej varnej dosky Ak pokyny na ...

Страница 2: ... които са включени само към някои модели или части които се закупуват допълнително Уред с много голямо тегло C преместването и инсталирането на аспиратора трябва да се извършва от найCмалко двама души FIŞA DE INSTALARE Distanţa minimă între suprafaţa de sprijin a recipientelor de pe mașina de gătit și partea cea mai joasă a hotei de bucătărie NU TREBUIE SĂ FIE mai mică de 50 cm în cazul plitelor e...

Страница 3: ...5019 318 33305 ...
Страница 4: ...5019 318 33305 X X G 10 13 12a 12a B H 7 8 7 8 8 7 9 9 6 6 2 3 1 3 3 3 3 12b 12b 5 G 4 4 4 11 G F X F 5x45 5x45 2 9x6 5 2 9x6 5 4x8 5x45 5x45 5x45 5x45 3 5x6 5 3 5x6 5 ...

Страница 5: ...ions and or pipes 10 The ventilation ducts must always discharge to the outside 11 The Manufacturer declines any liability for improper use or incorrect setting of the controls 12 The appliance is not intended for use by children or persons with limited physical sensory or mental abilities or without experience and knowledge of it unless they are under the supervision of or instructed in its use b...

Страница 6: ...has not been damaged during transport Declaration of conformity This product has been designed manufactured and put on the market in conformity with safety objectives of the Low Voltage Directive 2006 95 EC which replaces 73 23 EEC as amended protection requirements of EMC Directive 89 336 EEC amended by Directive 93 68 EEC Troubleshooting guide If the hood does not work Is the plug properly inser...

Страница 7: ...the hood 3 Place the lower support bracket on the hole diagram so that it matches the dotted rectangle mark the two external holes and drill Note Drill all the holes indicated on the template the top 2 holes are for hanging the hood and the bottom holes generally 1 central or 2 side holes are for fixing it securely to the wall Remove the hole diagram insert the wall plugs and fix the hood support ...

Страница 8: ...ting press the TIMER button again within 5 seconds of setting the desired countdown time Once the countdown has started the timer can be cancelled by pressing the TIMER button 2 Light switch Light ON OFF button 3 Display Shows whether the hood is on off 4 Speed decrease motor OFF button To switch the hood off press the button to decrease the speed until the motor switches off 5 Speed increase moto...

Страница 9: ...his the Charcoal Filter warning disappears resetting is confirmed by a beep and the display shows the normal operation functions After this procedure the carbon filter counter returns to zero Enabling Disabling the Carbon Filter Indicator The carbon filter indicator can be enabled or disabled by pressing the and buttons at the same time for 5 seconds The motor and light must be switched off in ord...

Страница 10: ...r is in a dishwasher at the highest temperature possible using a normal dishwasher detergent To avoid particles of food or dirt settling on the filter during washing and giving rise to unpleasant smells it is advisable to wash the filter on its own After washing dry the filter in the oven at 100 C for 10 minutes to reactivate it The filter will retain its odour absorbing capacity for three years a...

Отзывы: