3-10
REMOVING THE SMART VALVE
1. Unplug refrigerator or disconnect power.
2. Turn off the water supply to the refrigera-
tor.
3. Pull the refrigerator away from the wall so
that you can access the rear of the unit.
4. Remove the screws from the unit access
cover and remove the cover.
5. Remove the two screws from the smart
valve bracket, and remove the assembly
from the side of the refrigerator.
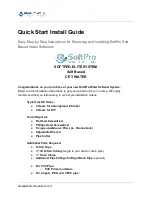
Unit Access Cover
6. Place a towel or a small container to catch
any water when you disconnect the water
supply tubing.
7. Push down on the quick-disconnect locking
rings, and pull the water inlet, ice maker,
and dispenser outlet water tubes from the
fittings.
8. Disconnect the smart valve wire connec-
tors from the smart valve and remove the
smart valve assembly.
Smart Valve Screws
Water Inlet Tube
Smart Valve
Wire Connectors
Ice Maker Tube
Electrical Shock Hazard
Disconnect power before servicing.
Replace all parts and panels before
operating.
Failure to do so can result in death or
electrical shock.
Dispenser
Outlet Tube
Содержание 8178501A
Страница 4: ... iv NOTES ...
Страница 30: ...5 2 WHIRLPOOL MODELS ...
Страница 31: ...5 3 KITCHENAID MODELS ...
Страница 32: ...5 4 MODULAR ICE MAKER ICE LEVEL DETECTOR MODELS ...
Страница 42: ...5 14 NOTES ...
Страница 44: ...6 2 WIRING DIAGRAM 2 A B ...
Страница 45: ...6 3 SCHEMATIC DIAGRAM 1 Color Code ...
Страница 46: ...6 4 SCHEMATIC DIAGRAM 2 ...
Страница 47: ...6 5 KITCHENAID MODELS WIRING DIAGRAM 1 See A On Wiring Diagram 2 See B On Wiring Diagram 2 Color Code ...
Страница 48: ...6 6 WIRING DIAGRAM 2 A B ...
Страница 49: ...6 7 SCHEMATIC DIAGRAM 1 Color Code ...
Страница 50: ...6 8 SCHEMATIC DIAGRAM 2 ...
Страница 52: ...CORPORATION ...