11
Operation
Before first Use
Take the unit out of the package and dispose of the packaging
material (e. g. plastic bags) or store it out of the reach of children.
There is a danger of suffocation!
Operating
1. Place the soldering iron station on a level and solid surface.
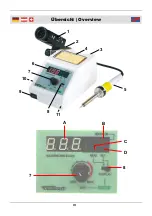
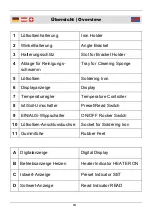
2. Mount the iron holder (1), as shown in the
figure and insert the holder into the left
holder slot (3). To mount the iron holder on
the right side of the iron station, turn the
bracket holder (2) to 180°.
The iron holder can be upturned around
45°. Adjust the iron holder to the desired
position and tighten the screw.
3. Insert the plug of the iron into the suitable socket (10) at the
left side of the station.
4. Turn the temperature controller (7) to the light in direction to
MIN and insert the power plug into a wall socket.
5. Switch on the iron station by pressing the ON/OFF rocker
switch (9) and place the iron into the iron holder.
Adjusting the Temperature
1. After switching on the iron station, slide the preset/read switch
(8) to the right into the position SET. The preset value indica-
tor (D) lights up.
2. Adjust the temperature controller to the desired temperature.
The adjusted value is indicated on the digital display (A).
3. Slide the preset/read switch to the left into the position READ.
The read value indicator (C) lights up. As long as the adjusted
temperature is not reached, the heater indicator HEATER ON
(B) light up.


