background image

17

ETL-ES-GreatFalls-WH16

LiGHT FiXTurE inSTaLLaTiOn

inSTaLaCión dEL arTEFaCTO LuMinOSO

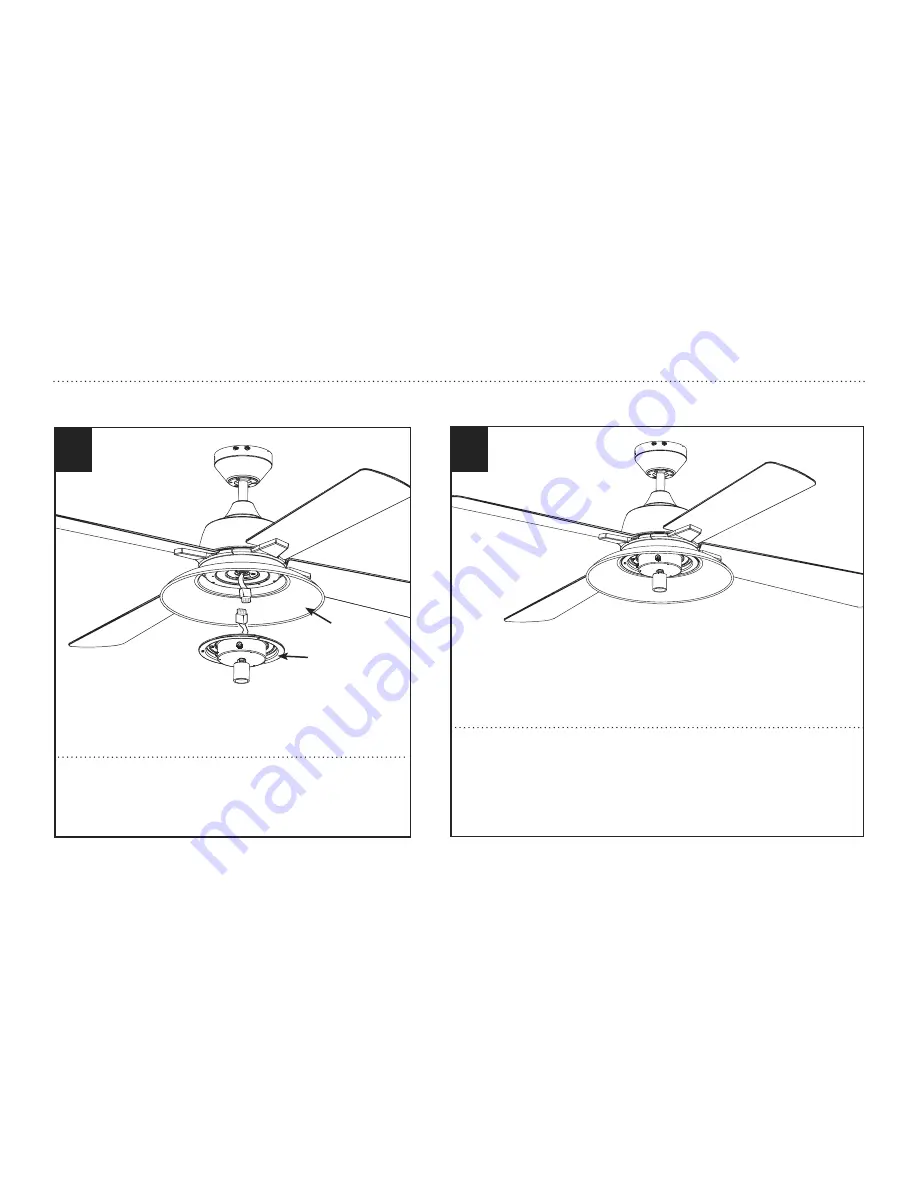
Attach the light kit to the switch housing by placing the keyslot holes from the light 

kit onto the two protruding screw heads from the switch housing. Twist the light kit 

until the screwheads engage the keyslots. Install the screw removed from the switch 

housing (step 22) into the closed hole in the light kit. Tighten all screws to complete 

attachment of the light kit.
Fije el juego de luces al alojamiento del interruptor colocando las ranuras del juego 

de luces sobre las dos cabezas de los tornillos que sobresalen del alojamiento del 

interruptor. Gire el juego de luces hasta que las cabezas de los tornillos enganchen en 

las ranuras. Coloque el tornillo que extrajo del alojamiento del interruptor (paso 22) 

en el agujero cerrado del juego de luces. Ajuste todos los tornillos para completar la 

instalación del juego de luces.

Remove one of the screws on the switch housing (1), and loosen (do not 

remove) the other two. Connect the wires from switch housing (1) to the 

wires from the light kit (2), using the 9-pin molex plug, be sure to line up 

the indicating lines.
Quite uno de los tornillos del alojamiento del interruptor (1) y afloje los 

otros dos (sin sacarlos del todo). Conecte los cables del alojamiento del 

interruptor (1) a los cables del juego de luces (2) utilizando el conector 

Molex de 9 pines and asegurese de alinear las marcas rojas cuandoo con-

nectando.

22

23

1

2

Содержание WH16

Страница 1: ...Falls WH16 Owner s Manual Manual del usuario Great Falls Please write model number here for future reference Por favor incluya el número del modelo aquí para futura referencia NetWeight 17 16 LBS Peso Neto 7 8 KGS ...

Страница 2: ...tedtoanoutletboxmarked AcceptableforFanSupport 11 WARNING Toreducetheriskoffireorelectricshock donotusethisfanwithanysolidstatefanspeedcontroldevice orvariablespeedcontrol 12 Ifthisunitistobeinstalledoveratuborshower itmustbemarkedasappropriatefortheapplication 13 NEVERplaceaswitchwhereitcanbereachedfromatuborshower 14 Thecombustionairflowneededforsafeoperationoffuel burningequipmentmaybeaffectedb...

Страница 3: ...incendiosochoqueseléctricos nouseesteventiladorconundispositivodecontroldevelocidaddeestadosólidoparaventilador ouncontroldevelocidadvariable 12 Siestaunidadseinstalarásobreunabañeraounaducha debeestaridentificadacomoadecuadaparaesetipodeaplicación 13 NUNCAcoloqueuninterruptordondesepuedaalcanzardesdeunabañeraounaducha 14 Esposiblequelaoperacióndeestaunidadafecteelflujodeairedecombustiónnecesariop...

Страница 4: ...a requerir una varilla vertical más larga se vende por separado FLUSH MOUNT INSTALLATION INSTALACIÓN ALTECHO For low ceilings Para techo bajos Features Características Note For sloped ceiling installation please refer to westinghouselighting com for specially designed canopy kit options Nota Para instalación en techo inclinados visite westinghouselighting com para obtener información sobre juegos ...

Страница 5: ...he fan to wobble 2 pREPARING for installation Antes de la instalación Quite el envoltorio e inspeccione detenidamente el ventilador para verificar que todas las piezas estén incluidas Apague la alimentación en la caja de fusibles para evitar la posibilidad de descarga eléctrica Use una caja de embutir de metal adecuada para soportar un ventilador debe soportar 35 libras Antes de fijar el ventilado...

Страница 6: ...themountingbracketcounter clockwiseandremovefromthecanopy Quitelostornillosylasdosarandelasenestrelladelosdosagujeroscoincidentes 1 deldosel Afloje noquite lostornillosdelasranurascoincidentes 2 deldosel Gireelsoportedemontajeensentidocontrarioalasagujasdelrelojyextráigalodeldosel Mounting bracket Installation Instalación con soporte de montaje 3 1 2 1 2 ...

Страница 7: ...la opción de montaje al techo proceda a la página 8 paso 6 NORMAL DOWNROD OPTION If installing downrod supplied with fan proceed to page 9 step 8 OPCIÓN CON VARILLA VERTICAL PARA TECHO NORMAL Si instala la varilla vertical incluida con el ventilador proceda a la página 9 paso 8 EXTENDED DOWNROD OPTION Ifinstallingwithlongerdownrodthansuppliedwithfan proceedtopage10 step10 OPCIÓN CON VARILLA VERTIC...

Страница 8: ...ectamente sobre el alojamiento del motor con los tornillos de montaje al techo las arandelas de goma y las arandelas de presión incluidas Apriete los tornillos asegurándolos 1 2 Forflushmountoption raisefanassemblyandplaceontohook 1 frommount ingbracketintoaclosedholeonthecanopy Thiswillallowforhandsfreewiring PROCEEDDIRECTLYTOPAGE 13FOR WIRING OPTIONS Para la opción de montaje al techo levante el...

Страница 9: ...rta de goma de la varilla vertical en la bola de la varilla vertical Esto evitará que el agua pase a través de la varilla vertical 8 4 2 3 1 NORMAL DOWNROD OPTION OPCIÓN CON VARILLA VERTICAL PARA techo NORMAL 9 Insert downrod into downrod coupling Make sure to align hole in downrod with the hole in downrod coupling Insert pin 1 through coupling and downrod Insert cotter pin 2 into pin until it sna...

Страница 10: ...loje la bola de la varilla vertical 1 de la varilla vertical 2 quitando el tornillo 3 2 3 1 11 Slidedownrodball 1 offofdownrodandremovepin 2 Deslicelaboladelavarillavertical 1 hastasepararladela varillaverticalyquiteelpasador 2 2 1 EXTENDED DOWNROD OPTION OPCIÓN CON VARILLA VERTICAL MÁS LARGA ...

Страница 11: ... a instalar el pasador en la varilla vertical más larga y deslice la bola de la varilla hasta el extremo superior de la misma Vuelva a insertar el tornillo de fijación para asegurar la bola a la varilla vertical Nota Algunas varillas verticales más largas tienen un agujero previamente perforado para el tornillo Si la varilla vertical más larga tiene un agujero previamente perforado ajuste el torni...

Страница 12: ... 13 Carefully lift fan assembly onto mounting bracket Rotate fan until notch on downrod ball 1 engages the ridge on the mounting bracket 2 This will allow for hands free wiring Levante con cuidado el conjunto del ventilador hasta el soporte de montaje Gire el ventilador hasta que la muesca de la bola de la varilla vertical 1 calce sobre la saliente del soporte de montaje 2 De este modo tendrá las ...

Страница 13: ... la luz vivo Verde de tierra DelVentilador De La Casa conectar conectar conectar conectar Conecte el cable azul sólo si conecta un juego de luces al ventilador Control de pared Siga las instrucciones del diagrama anterior para hacer las conexiones de cableado para el ventilador con control de pared Siga las instrucciones del diagrama anterior para hacer las conexiones de cableado para el ventilado...

Страница 14: ...d star wahers to slide into the mating slots Rotate the canopy clockwise until both screws from the mounting bracket drop into the slot recesses Tighten screws securely Install two screws and star washers into the mating holes of the canopy and tighten to secure the canopy to the mounting bracket El dosel tiene dos ranuras coincidentes 1 y dos agujeros coincidentes 2 Coloque ambas ranuras del dose...

Страница 15: ...e colocan para el embalaje y retírelas si las hay Adjunta las juntas de amor tiguación de ruido 2 y asemblaje de los soportes de las aletas al motor usan do los tornillos del motor incluidos NOTA Algunos modelos no utilizan juntas para el motor arandelas o lengüetas de embalaje o estan pre instaladas 19 18 Attach blade brackets to blades using the blade bracket screws 1 flat washers 2 and rubber w...

Страница 16: ...w heads engage the key slots Install the screw removed from mounting plate step 20 into the closed hole in the switch housing Tighten all screws to complete assembly of the switch housing Pase los cables del motor a través del agujero central del alojamiento del inter ruptor 1 Fije el alojamiento del interruptor a la placa de montaje colocando las ranuras del alojamiento del interruptor sobre las ...

Страница 17: ...l interruptor Gire el juego de luces hasta que las cabezas de los tornillos enganchen en las ranuras Coloque el tornillo que extrajo del alojamiento del interruptor paso 22 en el agujero cerrado del juego de luces Ajuste todos los tornillos para completar la instalación del juego de luces Remove one of the screws on the switch housing 1 and loosen do not remove the other two Connect the wires from...

Страница 18: ...oosen do not remove the other two While holding the metal frame with glass slide the fan pull chain and the lamp pull chain through the side holes of metal frame separately Quitale solamente el tornillo del artefacto de luces identificado con el rotulo de papel y afloje no quite los otros dos Mientras sujetas la montura de metal y vidrio deslice las cadenillas del ventilador y las del juego de luc...

Страница 19: ...las en la pieza de unión Attach the metal frame to the light kit by placing the key slot holes from the metal frame onto the two protruding screw heads from the light kit Twist the metal frame until the screw heads engage the key slots Install the screw removed from the light kit step 25 into the closed hole in the metal frame Tighten all screws to complete attachment of the metal frame with glass...

Страница 20: ...t kit NOTE Turn off and wait for fan to stop before changing the setting of the forward reverse slide switch Quitale la montura de metal y vidrio del ventilador el interruptor de march atras 1 se encuentra en el artefacro luminoso NOTA Apague el ventilador y espere a que se detenga antes de cambiar la dirección de adelante atrás con el interruptor de march atrars ...

Страница 21: ...ade Bracket 3 Blade 4 Glass 5 Fan Speed Switch 6 Light Control Switch 7 Capacitor 8 Hardware Pack No Descripción 1 Soporte de montaje 2 Soporte para aleta 3 Aleta 4 Pantalla de vidrio 5 Interruptor de control de velocidad para ventilador 6 Interruptor de control de luz 7 Condensador 8 Tornillería 3 4 2 ...

Страница 22: ...s warm air off the ceiling area as shown in illustration B This allows you to set your heating unit on a lower setting without affecting your comfort NOTE Turn off and wait for fan to stop before changing the setting of the forward reverse slide switch Maintenance 1 Because of the fan s natural movement some connections may become loose Check the support connections brackets and blade attachments ...

Страница 23: ...ire ascendente aleja el aire caliente del área del ventilador de techo como lo indica la ilustración B Esto le permite ajustar la calefacción a un nivel más bajo sin que afecte su comodidad NOTA Apague el ventilador y espere a que se detenga antes de cambiar la dirección de adelante atrás con el conmutador de tipo deslizante Mantenimiento 1 El movimiento natural del ventilador podría hacer que se ...

Страница 24: ...heck to make sure all screws in motor housing are snug not over tightened 2 Check to make sure the screws which attach the fan blade holder to the motor are tight 3 Some fan motors are sensitive to signals from Solid State variable speed controls DO NOT USE a Solid State variable speed control 4 Allow break in period of 24 hours Most noises associated with a new fan will disappear after this perio...

Страница 25: ...ados no los apriete demasiado 2 Compruebe para asegurarse de que los tornillos que fijan el soporte de la aleta del ventilador al motor estén apretados 3 Algunos motores de ventilador son sensibles a las señales de los controles de velocidad variable de estado sólido para motores NO USE un control de velocidad variable de estado sólido 4 Permita el rodaje del ventilador durante un período de 24 ho...

Страница 26: ...26 ETL ES GreatFalls WH16 ...

Страница 27: ...27 ETL ES GreatFalls WH16 ...

Страница 28: ...ing Philadelphia PA 19154 1029 U S A www westinghouselighting com WESTINGHOUSE and INNOVATION YOU CAN BE SURE OF are trademarks of Westinghouse Electric Corporation Used under license by Westinghouse Lighting All rights reserved Made in China ...

Отзывы: