background image

59

English

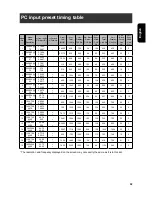
PC input preset timing table 

* The resolution and frequency displayed on the screen may not exactly the same as it is in this list.

Mode

No.

Mode

Name

Resolution

H.Freq.(KHZ) 

V.Freq.(HZ) 

H. Polarity 

V. Polarity 

Pixel 

CLK

(MHZ)

Hor. 

Total 

CLK No.

Hor. 

Display

CLK No.

Hor. Back

Porch

CLK No.

Hor.

Sync.
Width

CLK

No.

Vert.
Total 

Line No. 

Vert.

Display 

Line No. 

Vert.

Back

Porch

Line

No.

Vert.

Sync

Width

Line

No.

1

720*400@

70

31.469
70.087

-

+

28.322

900 720  54  108 449  400  35  2 

2

640*480@

60

31.469
59.941

-
-

25.175

800 640  48  96 525  480  33  2 

3

640*480@

67

35.000
66.667

-
-

30.24

864 640  96  64 525  480  39  3 

4

640*480@

72

37.861
72.809

-
-

31.5 832  640  120  40 520  480  20  3 

5

640*480@

75

37.5
75.0

-
-

31.5 840  640  120  64 500  480  16  3 

6

800*600@

56

35.156
56.250

+
+

36.0 1024  800  128  72  625  600  22  2 

7

800*600@

60

37.879
60.317

+
+

40.0 1056  800  88  128 628  600  23  4 

8

800*600@

72

48.077
72.188

+
+

50.0 1040  800  64  120 666  600  23  6 

9

800*600@

75

46.875

75.0

+
+

49.5 1056  800  160  80  625  600  21  3 

10

832*624@

75

49.72
74.55

-
-

57.28

1152 832  224  64  667  624  39  10 

11 

1024*768

@60

48.363
60.004

-
-

65.0 1344 1024

160  136 806  768  29  6 

12

1024*768

@70

56.476
70.069

-
-

75.0 1328 1024

144  136 806  768  29  6 

13

1024*768

@75

60.023
75.029

+
+

78.75

1312 1024

176  96  800  768 

28  3 

14

1280*720

@60

44.76

60.0

-

+

74.481

1664 1280

192  136  746  720 

22  3 

15

1280*800

@60

49.68

60.0

-

+

83.462

1680 1280

200  136  828  800 

24  3 

16

1280*1024

@60

63.72
60.00

-
-

109.47

1718 1280

238  156 1062  1024  32  3 

17

1360*768

@60

47.712
60.015

+
+

85.5 1792 1360

256  112 795  768  18  6 

18

1366*768

@60

48.96

60.0

+

-

73.25

1496 1366

58 

32  816  768 

41  5 

19

1920x540

@60

33.75
60.05

+
+

74.25

2200 1920

148  44  1125  540 

15

5

Содержание VK-40F580D - 40" LCD TV

Страница 1: ...USER S MANUAL MANUEL DE L UTILISATEUR MANUAL DEL USUARIO VK 40F580D 1080P HDTV DVD Combo 1080P HDTV COMBO LECTEUR...

Страница 2: ...www wde com Westinghouse Digital Electronics Santa Fe Springs CA SE UM 4003 0701...

Страница 3: ...he model and serial numbers are located on the back of the TV Keep a record of the numbers in the spaces provided below Refer to them whenever you call upon your Westinghouse Digital dealer regarding...

Страница 4: ...DVD player game console with component input 16 For Video Devices with S video or composite Input 17 For PC connection with D Sub and PC audio output jacks 18 How to remove the base 18 Watching TV 19...

Страница 5: ...equipment may void the user s authority to operate it Important One Federal Court has held that unauthorized recording of copyrighted TV programs is an infringement of U S copyright laws Certain Cana...

Страница 6: ...o your outlet consult an electrician for replacement of the obsolete outlet 10 Protect the power cord from being walked on or pinched particularly at plugs convenience receptacles and the point where...

Страница 7: ...ded multi channel sound decoder for stereo and bilingual broadcasts Automatic sleep timer control from 15 to 90 minutes The sequence is 15 30 45 60 90 TV automatically power off while there is no sign...

Страница 8: ...6 Accessories User Guide Remote Control Batteries AAAx2 Warranty Card Power Cord Screw driver Screws Quick Connect Guide NOTE 1 The number of screws may differ depending on your purchase Quick connect...

Страница 9: ...nent HDMI VGA Photo USB Also highlighted a selected source with CH button 5 POWER Power on off TV 6 REMOTE CONTROL SENSOR Point the remote control towards remote sensor to command TV 7 POWER INDICATOR...

Страница 10: ...8 TV Rear Connectors...

Страница 11: ...optical input Audio output R L Connect this output to an external stereo audio amplifier receiver or surround sound processor with R L audio inputs 5 AUDIO OUT SUBWOOFER Connect this output to an ext...

Страница 12: ...list Use arrow keys and enter key to select add or remove the channel 9 Channel number keys Select specific channel 10 Enter Execute a command 11 Input Select input source 12 VOL Volume Up Down adjus...

Страница 13: ...D Menu setup 23 Play Pause The play pause function of DVD 24 Stop The stop function of DVD 25 Previous section Press to the previous section 26 Next section Press to the next section 27 Backward Backw...

Страница 14: ...tside antenna is connected to the product make sure the antenna is properly grounded so as to provide some protection against voltage surges and build up static charges Coaxial connector shielding fro...

Страница 15: ...13 English For Digital Cable Satellite with Component video inputs Digital Cable Connection Satellite Connection Antenna Digital Cable STB Satellite Satellite Receiver TV rear input TV rear input...

Страница 16: ...D DVD with HDMI Input NOTE 1 HDMI High Definition Multimedia Interface NOTE 2 No audio cable required for HDMI connection NOTE 3 HDMI cable is exclude from standard accessory pack HDMI Cable HD Cable...

Страница 17: ...ideo signal is transmitting through HDMI to DVI connection NOTE 2 Audio signal is transmitting through 3 5 mm mini jack audio cable with PC audio in NOTE 3 Diagram above is applicable to any video dev...

Страница 18: ...nt input NOTE 1 Diagram above is applicable to any video device contains YPbPr connector NOTE 2 Cables above are excluded from standard accessory pack Component Cable Audio Cable TV rear input HD DVD...

Страница 19: ...composite Input NOTE 1 Prioritize S Video jack ahead of Video jack if your video device possesses both connectors NOTE 2 Cables above are excluded from standard accessory pack Video Cable Audio Cable...

Страница 20: ...ransmitting through 3 5 mm mini jack audio cable with PC audio in NOTE 3 Cables above are excluded from standard accessory pack How to remove the base a Carefully place the TV face down on a soft clea...

Страница 21: ...may result in cracking or leakage which may pose a fire risk or lead to personal injury Insert batteries according to and markings Inserting the batteries incorrectly may result in cracking or leakage...

Страница 22: ...s the POWER button on TV or on remote control to turn on the display The LED indicator will light up in blue Turning off When the display is on press POWER button of the display or press the POWER but...

Страница 23: ...remote control to continue Time Zone selection 2 Press arrow keys to select on your Time Zone and press Enter button on the remote control to continue Daylight Saving 3 Press arrow keys to set the Day...

Страница 24: ...o continue 7 Press Enter and start to watch TV Scanning Channels program may take a few minutes to complete If you press Enter button on the remote control to Stop Scan process intermediately we sugge...

Страница 25: ...r functions by using the OSD menu To activate OSD function by pressing MENU button either on remote control or on TV control button panel OSD menu overview Instruction Use the arrow buttons on the rem...

Страница 26: ...rol to turn on OSD main menu and adjust the settings 1 Press MENU button to display the main menu 2 Use arrow keys to choose the desired item in order to adjust the setting parameter later 3 Press Ent...

Страница 27: ...25 English 4 Press menu button to quit OSD menu picture...

Страница 28: ...nnels on the same frequency in a list Then press button repeatedly to select a channel for TV to tune to Using the RTN buttons to switch back previous channel To quickly switch between two channels tu...

Страница 29: ...al detected you will see a warning message No Signal shows on the screen In Tuner Video1 Video2 Component HDMI1 HDMI2 Photo mode While there is no signal detected in Tuner Video Component HDMI modes t...

Страница 30: ...The power consumption is no more than 1W in the power off status It takes about 15 20 seconds to turn on the LCD TV Picture Control Adjusting picture settings Adjust the picture settings to your pref...

Страница 31: ...en to handle different picture formats Three modes are available Standard Fill and Overscan When in PC mode only Standard and Fill modes are available 1 When access AV sub menu press arrow keys to sel...

Страница 32: ...ase Adjusts when characters have low contrast or when the picture flickers Auto Sync System automatically adjust the best fit parameter at horizontal vertical and phase items in view of the current VG...

Страница 33: ...depends on broadcaster 1 When access AV sub menu press arrow keys to select Analog Preference 2 Press arrow keys and Enter button on the remote to select your preferred mode Tip You can press INFO bu...

Страница 34: ...from your TV to an external amplifier or sound system 1 When access AV sub menu press arrow keys to select Optical Out SPDIF 2 Press arrow keys and Enter button on the remote to select AC3 or PCM TV S...

Страница 35: ...he stage of Initial Setup see page 22 please ensure to follow the below procedures to reach a completion 1 When access TV sub menu press arrow keys and Enter button on the remote control to select Sca...

Страница 36: ...ns to change channels the channel which are not filed in Master Channel List will be skipped Finding channel directly 1 When access TV sub menu press arrow keys on the remote control to display Find C...

Страница 37: ...w keys and Enter button on the remote control to select Channel Up or Channel Down Timer Setting Set Date Time 1 When access Settings sub menu Press arrow keys to display Date Time screen 2 Press arro...

Страница 38: ...Channel to turn on and off TV will automatically turn on at scheduled times at the date you selected This function works when the clock setting is active Please note Timer 1 takes precedence over Time...

Страница 39: ...ption content if supported by the program This function serves those who are hearing impaired or foreigner 1 When access TV sub menu press arrow keys to select Closed captions 2 Press arrow keys to se...

Страница 40: ...losed Captions sub menu press arrow keys on the remote control to select Advanced Selection sub menu 2 Press arrow keys and Enter button on the remote control to select AdvancedCS1 AdvancedCS6 Service...

Страница 41: ...remote control to select Caption Preference sub menu 2 Press arrow keys and Enter button on the remote control to select your desired mode Reset Closed Captions User decide to restore all Closed Capt...

Страница 42: ...also change the personal Password please refer to page 41 Block Unrated Shows When TV programs are not explicitly labeled user can select the function to lock or unlock the programs ON Block all prog...

Страница 43: ...TV program which system lock is on to block viewing If TV is tuned to a restricted channel the System Lock is activated and the following screen will appear Enter correct password in 4 digit in order...

Страница 44: ...se memorized your password and keep this manual properly well Reset Locks 1 When access TV sub menu press arrow keys to display the RESET LOCKS PIN entry 2 Press arrow keys and Enter button on the rem...

Страница 45: ...Favorite channel lists etc When access Settings sub menu press arrow keys and Enter button on the remote control to reset all settings Once a PIN was set before the system will require a PIN no to be...

Страница 46: ...onnection of the new source s device When access Settings sub menu press arrow keys and Enter button on the remote control to turn Autosouoce ON or OFF Power On Plug Set TV power on memory when un plu...

Страница 47: ...button When access Settings sub menu press arrow keys and Enter button on the remote control to power off the TV The Guide Display an explanation of how to connect devices to the TV When access Settin...

Страница 48: ...46...
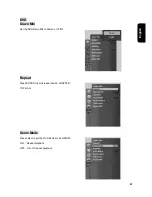
Страница 49: ...Down Mix Set the DVD Down Mix to Stereo or LT RT Repeat Press ENTER to scroll repeat option CHAPTER TITLE ALL Demo Mode Press select to set the DVD demo mode ON OFF ON Repeat playback OFF Turn off re...

Страница 50: ...set the DVD subtitle function only available for DVD Auto Wake Press select to set the Auto Wake ON OFF ON Turn on auto wake function OFF Turn off auto wake function Audio Select To select Audio lang...

Страница 51: ...49 English DVD Locks Set up the DVD Rating Locks Reset DVD Reset DVD to factory settings clearing any adjustments you have made...

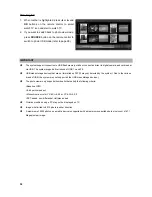
Страница 52: ...age before turning on TV Such action may damage the USB storage or TV 3 When user inserts a USB storage to the SERVICE port the Photo Viewer application shall stay in the current mode until it searche...

Страница 53: ...ISO value Flash information Exposure mode Bias 1 When toolbar is highlighted select the information icon and press OK button on the remote control to display the information for the current photo if...

Страница 54: ...USB 1 x and 2 0 USB mass storage devices that are not formatted as FAT32 may not detected by the system Due to the various brand of USB the system may not support all the USB mass storage devices The...

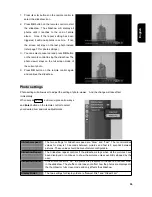
Страница 55: ...usting photo with pan zoom out zoom in rotation slideshow control info and thumbnail browser functions Press or and OK buttons on the remote control to adjust the setting The pan and zoom out function...

Страница 56: ...r view Also the pan function is now available for further adjustment 2 Press or and OK buttons on the remote control to select the pan and system will switch to pan mode Press OK button again and be b...

Страница 57: ...the change will take effect immediately When access Photos sub menu press arrow keys and Enter button on the remote control to select your desired item and make adjustments Slideshow speed The two set...

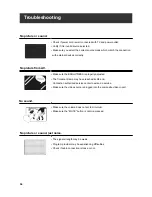
Страница 58: ...ure the BRIGHTNESS is properly adjusted The florescent lamp may have reached its life end Contact an authorized service center to extend a service Make sure the video source is plugged into the compos...

Страница 59: ...have reached its life end Contact an authorized service center to extend a service Remote control does not work Install new batteries Make sure the remote sensor window doesn t covered in any means Ma...

Страница 60: ...parameter in Picture Settings Picture shifts The signal strength may be weak Program provider may be experiencing difficulties Check if cable connection is loose or not Picture shows multiple image or...

Страница 61: ...6 3 6 800 600 56 35 156 56 250 36 0 1024 800 128 72 625 600 22 2 7 800 600 60 37 879 60 317 40 0 1056 800 88 128 628 600 23 4 8 800 600 72 48 077 72 188 50 0 1040 800 64 120 666 600 23 6 9 800 600 75...

Страница 62: ...oadcasting Close Caption V Chip Composite Signal Video x 2 Component Signal Y Pb Pr x 1 720P 1080i HDTV ready HDMI Connection HDMI x 2 VGA Connection D Sub 15 pin x 1 Video Input Scanning Frequency fH...

Отзывы: