background image

5

ETL-ES-GW-IndustrialWC-WH17

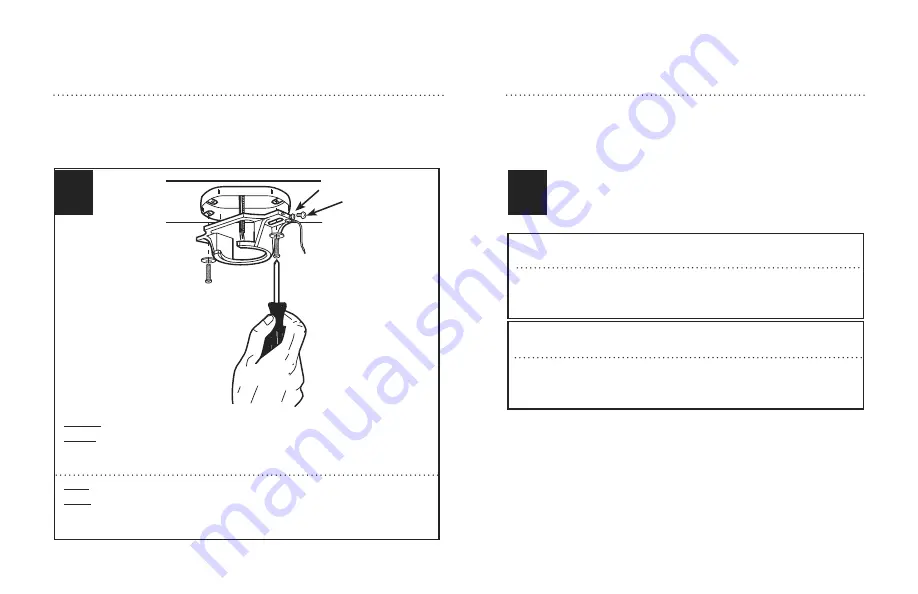
MOunTInG BraCKET InSTaLLaTIOn

InSTaLaCIÓn COn SOPOrTE 

dE MOnTaJE

Remove the screws (1) from the bracket as shown above.

Loosen 

(do not remove)

 the screws (2) from the bracket as shown above.

Install mounting bracket to outlet box in ceiling using the screw and washer's 

provided with the outlet box.
Quite los tornillos (1) del soporte como indica más arriba.

Afloje

 (no quite)

 los tornillos (2) del soporte como se indica más arriba.

Instale el soporte de montaje a la caja de embutir del techo can la tornillería 

suministrada con la caja embutir.

3

4

MOunTInG OPTIOnS

OPCIOnES dE MOnTaJE

Choose a MOunTInG OPTIOn

Elija una OPCIÓn dE MOnTaJE

nOrMaL dOWnrOd OPTIOn

If installing downrod supplied with fan, proceed to page 10, step 11.

OPCIÓn COn VarILLa VErTICaL Para TECHO nOrMaL

Si instala la varilla vertical incluida con el ventilador, 

proceda a la página 10, paso 11.

EXTEndEd dOWnrOd OPTIOn

If installing with longer downrod than supplied with fan, proceed to page 6, step 5.

OPCIÓn COn VarILLa VErTICaL MÁS LarGa

Si instala una varilla vertical más larga que la que se incluye con el 

ventilador, proceda a la página 6, paso 5.

2

1

Содержание ETL-ES-GW-IndustrialWC-WH17

Страница 1: ...trialWC WH17 Owner s Manual Manual del usuario Please write model number here for future reference Por favor incluya el n mero del modelo aqu para futura referencia Net Weight 12 56 LBS Peso Neto 5 7...

Страница 2: ...ou choose allows the fan blades to rotate without any obstructions Allow a minimum clearance of 10 feet from the floor to the trailing edge of the blade 8 To reduce the risk of fire electric shock or...

Страница 3: ...cir el riesgo de incendios choques el ctricos o heridas personales este ventilador se debe montar sobre una caja de embutir que tenga una marca que indique que es adecuada para soportar un ventilador...

Страница 4: ...the fan to wobble 2 pREPARING for installation Antes de la instalaci n Quite el envoltorio e inspeccione detenidamente el ventilador para verificar que todas las piezas est n incluidas Apague la alim...

Страница 5: ...rte de montaje a la caja de embutir del techo can la torniller a suministrada con la caja embutir 3 4 MOUNTING OPTIONS OPCIONES DE MONTAJE Choose a MOUNTING OPTION Elija una OPCI N DE MONTAJE NORMAL D...

Страница 6: ...je la esfera de la varilla vertical 1 de la varilla vertical 2 quitando el tornillo 3 2 3 1 EXTENDED DOWNROD OPTION OPCI N CON VARILLA VERTICAL M S LARGA 6 Slidedownrodball 1 offofdownrodandremovepin...

Страница 7: ...against the downrod to secure the downrod ball Vuelva a instalar el pasador en la varilla vertical m s larga y deslice la esfera de la varilla hasta el extremo superior de la misma Vuelva a insertar e...

Страница 8: ...tter pin nut lock washer and bolt from the yoke Insert the down rod into the yoke Install bolt 1 through yoke 2 and downrod Install lockwasher 3 and nut 4 and tighten Install cotter pin 5 Quitale la c...

Страница 9: ...properly Tighten set screw in the lower canopy Alineeelinterruptordemarchaatr sdelahorquillaalagujeroparaelinterruptordemarchaatr scorrespondienteubicadoeneldoselinferior Desliceeldoselinferiorhaciaab...

Страница 10: ...el ventilador hasta el soporte de montaje Gire el ventilador hasta que la muesca de la bola de la varilla vertical 1 calce sobre la saliente del soporte de montaje 2 De este modo tendr las dos manos l...

Страница 11: ...bleado del control de pared 1 Conecte el cable negro marcado AC In L del control de pared con el cable negro de suministro de CA 2 Conecte el cable negro marcado To Motor L del control de pared con el...

Страница 12: ...the mating holes of the canopy and tighten to secure the canopy to the mounting bracket Para ventiladores con varilla vertical deslice el dosel hacia arriba hasta el soporte de montaje El dosel tiene...

Страница 13: ...laci n de las ALETAS 3 Install blades to top of motor using screws and washers See above drawing for reference 15 Instale las aletas en la parte superior del motor con los tornillos y arandelas de seg...

Страница 14: ...de embutir usando los dos tornillos provistos Operations 0 Fan Speed OFF 1 Fan Speed HIGH 2 Fan Speed MEDIUM HIGH 3 Fan Speed MEDIUM 4 Fan Speed LOW Operaci n 0 Control de velocidad del ventilador AP...

Страница 15: ...warm air off the ceiling area as shown in illustration B This allows you to set your heating unit on a lower setting without affecting your comfort NOTE Turn off and wait for fan to stop before changi...

Страница 16: ...scendente aleja el aire caliente del rea del ventilador de techo como lo indica la ilustraci n B Esto le permite ajustar la calefacci n a un nivel m s bajo sin que afecte su comodidad NOTA Apague el v...

Страница 17: ...fied electrician Do not attempt to troubleshoot internal electrical connections yourself 1 Check to make sure all screws in motor housing are snug not over tightened 2 Check to make sure the screws wh...

Страница 18: ...el ctricas internas 1 Compruebe para asegurarse de que todos los tornillos del alojamiento del motor est n ajustados no los apriete demasiado 2 Compruebe para asegurarse de que los tornillos que fijan...

Страница 19: ...S GW IndustrialWC WH17 1 2 3 Description 1 Mounting Bracket 2 Blade 3 Wall Control 4 Hardware Pack No Descripci n 1 Soporte de montaje 2 Aleta 3 Control de pared 4 Torniller a 4 PARTS LIST LISTA DE RE...

Страница 20: ...hting Philadelphia PA 19154 1029 U S A www westinghouselighting com WESTINGHOUSE and INNOVATION YOU CAN BE SURE OF are trademarks of Westinghouse Electric Corporation Used under license by Westinghous...

Отзывы: