background image

70

NL

BEOOGD GEBRUIK

Gebruik dit apparaat uitsluitend waarvoor het is bestemd. Elk ander gebruik kan 

leiden tot schade aan het apparaat of letsel aan personen.

BELANGRIJKE VOORZORGSMAATREGELEN

Algemeen

1.  Lees deze gebruiksaanwijzing grondig door voor ingebruikname. Deze 

bevat zowel belangrijke informatie voor uw veiligheid als gebruik- en 

onderhoudsadvies. Bewaar deze gebruiksaanwijzing voor toekomstige 

raadpleging. Als u dit product aan een derde geeft, doe dan tevens deze 

gebruiksaanwijzing erbij.

2.  Gebruik dit apparaat uitsluitend waarvoor het is bestemd. Een verkeerd gebruik 

kan gevaar opleveren.

3.  Dit apparaat is alleen bestemd voor normaal huishoudelijk gebruik. Het is niet 

bestemd voor commercieel gebruik of gebruik buitenshuis.

4.  Gebruik het apparaat uitsluitend zoals beschreven in deze gebruiksaanwijzing.

5.  Wij zijn niet aansprakelijk voor schade door verkeerd gebruik of een verkeerde 

werking.

6.  Dit apparaat mag niet worden gebruikt door personen (waaronder kinderen 

jonger dan 8 jaar) met beperkte fysische, visuele of mentale mogelijkheden, of 

die een gebrek hebben aan ervaring en kennis, tenzij ze supervisie of instructies 

hebben gekregen omtrent het gebruik van het apparaat door een persoon die 

verantwoordelijk is voor hun veiligheid.

7.  Houd het apparaat en het snoer buiten het bereik van kinderen jonger dan 8 jaar.

8.  Houd altijd toezicht op kinderen zodat ze niet met het apparaat spelen.

9.  Gebruik het apparaat nooit zonder toezicht.

10.  Dek het apparaat tijdens de werking niet af. Plaats niets op het apparaat.

11.  Gebruik het apparaat niet als het leeg is.

12.  Voor elk gebruik, zorg dat de afdichtingsring, de drukregelaar en de drijver 

schoon en juist in het deksel van de snelkookpan zijn aangebracht.

13.  Open het deksel nooit tijdens het snelkoken.

14.  Verplaats het apparaat niet tijdens het kookproces.

15. 

Waarschuwing:

 Om brandwonden te vermijden, raak het deksel van de 

snelkookpan tijdens gebruik niet aan en houd uw handen en gezicht uit de buurt 

van de uilaat en de drijver.

16. 

Waarschuwing:

 Dit elektrisch apparaat bevat een verwarmingsfunctie. 

Oppervlakken (waaronder niet-functionele oppervlakken) kunnen tijdens 

de werking zeer heet worden. Het apparaat geeft hete stoom via de 

luchtuitlaatopeningen vrij. Houd altijd uw handen en gezicht op een veilige 

afstand van het apparaat. Houd het apparaat alleen bij de voorziene handvatten 

en knoppen vast.

17.  Om uw handen tegen brandwonden te beschermen, gebruik altijd ovenwanten, 

pannenlappen of ander gepast keukengerei wanneer u de hete oppervlakken 

van het apparaat of hete accessoires wilt aanraken.

18.  Plaats het deksel van de snelkookpan of de halogeenoven altijd op een 

hittebestendige mat om het aanrecht te beschermen.

19.  Tijdens het vullen van de kookpan, overschrijd nooit het MAX niveau dat op de 

binnenpan is aangegeven.

20. 

Waarschuwing:

 Vul de binnenpan nooit met olie. Gebruik het apparaat niet 

als een friteuse. Gebruik het vooraf ingesteld programma 

Fry

 (Frituren) alleen 

zonder deksel om zachtjes te frituren.

Содержание 4895218312474

Страница 1: ...PRESSURE COOKER AND HALOGEN BAKER WKCPPC100 Instructions Bedienungsanweisungen Instructions Instrucciones Gebruiksaanwijzing P 2 P 18 P 35 P 53 P 70 EN DE FR ES NL ...

Страница 2: ...ppliance 9 Never operate the appliance unattended 10 Do not cover the appliance during use Do not place anything on top of the appliance 11 Do not operate the appliance when it is empty 12 Before each use ensure that the sealing ring pressure regulator and float valve are clean and properly installed in the lid of the pressure cooker 13 Never attempt to open the lid during pressure cooking 14 Do n...

Страница 3: ...not recommended by the appliance manufacturer may cause injuries 30 Do not use the inner pot 8 on a stovetop or burner as it is made specifically for the base unit 7 31 Do not put frozen substances into the appliance or wash the inner pot with cold water when it is very hot 32 The outer surfaces and inner pot of the appliance may become hot during use Wear oven mitts or use fetch tools when handli...

Страница 4: ...ich is out of reach of children Do not let children near the appliance when in use Close supervision is necessary when there are children and pets around 4 Warning Do not let the cord hang over the edge of a table or counter Ensure that the cord is not in a position where it can be pulled by children or pets or tripped over accidentally 5 Do not operate this appliance near flammable materials e g ...

Страница 5: ...3 Control panel 4 Control knob 5 Pressure regulator 6 Base handle 7 Base unit 8 Inner pot 9 Steamer basket 10 Measuring cup 11 Meal spoon 12 Support ring for halogen lid 13 Halogen lid 14 Timer 15 Temperature dial 16 Handle and safety ON OFF 1 2 3 4 5 6 7 13 8 9 10 11 12 14 15 16 ...

Страница 6: ...tart and or the cooking time Active buttons and icons light up for easy guidance CONTROL BUTTONS Button Function START CANCEL Press and hold the Start button for 5 seconds to Wake the cooker from Standby Mode activated if no buttons are pressed for 30 seconds after the power supply is connected START a cooking program CANCEL a cooking program ...

Страница 7: ...alert sounds 1 4 The default alert volume will flash on the display Rotate the Control knob to adjust the volume Temperature Press the Temperature button to adjust the cooking temperature The button and 180 C will flash Rotate the Control knob to adjust the temperature Delay After choosing a preset program or Chef mode press the Delay button to delay the start of the cooking time Rotate the Contro...

Страница 8: ...5 minutes 1 59 minutes 1 24 hours N A Not adjustable Yes Vegetables Yes 10 minutes 1 59 minutes 1 24 hours N A Not adjustable Yes Braise Yes 45 minutes 1 59 minutes 1 24 hours N A Not adjustable Yes Porridge Yes 10 minutes 1 59 minutes 1 24 hours N A Not adjustable Yes Steam Fish Yes 10 minutes 1 59 minutes 1 24 hours N A Not adjustable Yes Meat Yes 20 minutes 1 59 minutes 1 24 hours N A Not adjus...

Страница 9: ...ng contact your local authority 2 Make sure the product is not damaged and that there are no missing accessories Return the product to the retailer if there are any missing or damaged parts 3 Clean the product and all accessories see Care and Maintenance section Halogen baker Before first use heat up the empty pot 8 in the halogen baker at the maximum temperature of 250 C for 5 10 minutes see USIN...

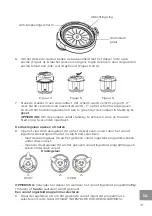
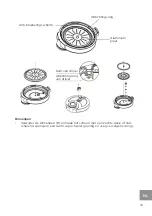
Страница 10: ...ner pot is dry and clean Closing the lid 5 Before closing the lid check that the sealing ring is properly in place CAUTION Do not use the product without the sealing ring Anti block shield Sealing ring Aluminum plate 6 To close the lid cover the base unit with the lid in the open position Figure 4 Then turn the lid anti clockwise to the close position until you hear a click Figure 5 and 6 Figure 4...

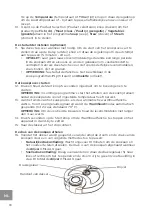
Страница 11: ...ll not spoil easily such as beans rice and grains NOTE The delay start function is not available in the Fry and Omelette cooking programs Start the cooking process 12 Press and hold the Start button for 5 seconds to confirm and start NOTE In some programs the cooking time countdown starts only after the cooker reaches the preset temperature 13 Once cooking is complete if the Auto Keep Warm functio...

Страница 12: ...emperature dial 15 to set the cooking temperature 0 C 250 C 7 Turn the Timer 14 to set the cooking time 0 60 minutes Once the temperature and time have been set the appliance will turn ON 8 If you need to turn the food halfway through cooking for an even browning Lift the handle 16 and remove the halogen lid The appliance switches OFF pauses when the handle is up Close the lid and push down the ha...

Страница 13: ...metallic or sharp objects for cleaning Solvents are harmful to health and may attack the plastic parts Abrasive cleaners and tools may scratch the surface 4 Never immerse the base unit 7 halogen lid 13 or any electrical parts in water or other liquids Do not place them under running water CLEANING Base unit Halogen lid Wipe the external surfaces of the base unit 7 and halogen lid 13 with a soft cl...

Страница 14: ... shield Sealing ring Aluminum plate Float valve core Float valve sealing washer Inner pot Remove the inner pot 8 and wash it with a soft cloth or a non abrasive sponge in warm soapy water Rinse well and dry thoroughly ...

Страница 15: ...the lid The sealing ring is not installed in the lid Install the sealing ring in the lid DO NOT operate the appliance without the sealing ring Food residue is obstructing the sealing ring Clean the sealing ring The sealing ring is broken or worn Replace the sealing ring Steam leaks from the float valve Food residue is obstructing the sealing washer of the float valve Clean the sealing washer of th...

Страница 16: ... service for maintenance Mild electric shocks or tingling sensation when touching the lid Electricity leakage DO NOT use the appliance Contact customer service for maintenance Display is showing error code E1 Open circuit of the sensor Unplug the power cord from the wall socket for 10 minutes and then plug it again If the error code persists contact customer service for maintenance E2 Short circui...

Страница 17: ...ur municipality or contact the retailer where you purchased this product INFORMATION AND SERVICE If you have questions or concerns about your product please visit our website www westinghousehomeware com or contact our overseas offices agents In line with our policy of continuous product development we reserve the right to change product packaging and documentation specifications without prior not...

Страница 18: ...Gebrauch des Geräts erhalten 7 Das Gerät und das Netzkabel müssen außerhalb der Reichweite von Kindern aufbewahrt werden die jünger als 8 Jahre sind 8 Um dafür zu sorgen dass Kinder nicht mit dem Gerät spielen müssen diese beaufsichtigt werden 9 Das Gerät nie unbeaufsichtigt in Betrieb lassen 10 Das Gerät während des Gebrauchs nicht abdecken Nichts auf dem Gerät abstellen 11 Das Gerät nicht leer b...

Страница 19: ...nte enthalten Nicht unter dem Wasserhahn abspülen 27 Das Gerät unter keinen Umständen versuchen selbst zu reparieren Im Wartungs und Reparaturfall unseren Kundendienst kontaktieren um eine Reparatur oder einen Austausch zu vereinbaren 28 Das Gerät nie an eine externe Zeitschaltvorrichtung oder ein separates Fernbediensystem anschließen 29 Durch die Verwendung von externem Zubehör das vom Geräteher...

Страница 20: ...kenen und hitzefesten Fläche aufstellen 2 Das Gerät immer auf einer waagerechten Fläche benutzen die lotrecht stabil und nicht brennbar ist 3 Das Gerät an einem Ort aufstellen der für Kinder nicht erreichbar ist Keine Kinder in die Nähe des Geräts lassen wenn es in Gebrauch ist Wenn Kinder und Haustiere anwesend sind ist eine engmaschige Beaufsichtigung notwendig 4 Warnung Das Netzkabel nicht über...

Страница 21: ...ckel 3 Bedienfeld 4 Regler 5 Druckregler 6 Griff am Unterteil 7 Unterteil 8 Innentopf 9 Korbeinsatz 10 Messbecher 11 Zutatenlöffel 12 Stützring für Halogendeckel 13 Halogendeckel 14 Timer 15 Temperaturwählschalter 16 EIN AUS Schutzbügel 1 2 3 4 5 6 7 13 8 9 10 11 12 14 15 16 ...

Страница 22: ...gemeldet Die aktiven Tasten und Symbole leuchten als einfache Anhaltspunkte auf BEDIENTASTEN Taste Funktion START CANCEL Start Abbruch Die Taste Start 5 Sekunden drücken um Den Garer aus dem Standby Modus zu reaktivieren wird aktiviert wenn 30 Sekunden nach dem Anschließen an eine Steckdose keine Tasten gedrückt wurden ein Garprogramm zu starten ein Garprogramm abzubrechen ...

Страница 23: ...en Im Display blinkt die Standardlautstärke für die Warnmeldung Den Bedienregler drehen um die Lautstärke zu ändern Temperature Die Taste Temperature Temperatur drücken um die Gartem peratur zu ändern Die Taste und 180 C blinken Den Regler drehen um die Temperatur zu ändern Delay Wartezeit Nach Auswahl eines vordefinierten Garprogramms oder des Chef Modus die Taste Delay Wartezeit drücken um den S...

Страница 24: ... n v Nicht ein stellbar Ja Poultry Geflügel Ja 25 Minuten 1 59 Minuten 1 24 Stunden n v Nicht ein stellbar Ja Vegetables Gemüse Ja 10 Minuten 1 59 Minuten 1 24 Stunden n v Nicht ein stellbar Ja Braise Sch moren Ja 45 Minuten 1 59 Minuten 1 24 Stunden n v Nicht ein stellbar Ja Porridge Brei Ja 10 Minuten 1 59 Minuten 1 24 Stunden n v Nicht ein stellbar Ja Steam Dampf Fish Fisch Ja 10 Minuten 1 59 M...

Страница 25: ...chtig auspacken Die Verpackung für spätere Zwecke oder den späteren Gebrauch aufbewahren Auskünfte über die Entsorgung oder Verwertung des Verpackungsmaterials erteilt die zuständige Gemeindestelle 2 Sicherstellen dass das Gerät nicht beschädigt ist und kein Zubehör fehlt Sollte etwas fehlen oder beschädigt sein das Produkt wieder an den Händler zurückgeben 3 Das Gerät und sämtliches Zubehör reini...

Страница 26: ...Sie die erforderliche Mindestmenge an Flüssigkeit beachten Bei Porridge Brei wird ein Verhältnis aus Wasser zu Reis von 8 1 vorgeschlagen Die Einstellungen können nach persönlichen Vorlieben verändert werden Den Reis nicht im Innentopf waschen da hierdurch die Anti Haft Beschichtung zerkratzt werden kann 4 Den Innentopf 8 wieder in das Unterteil 7 einsetzen und darauf achten dass die Unterseite de...

Страница 27: ... Auswahl eines vordefinierten Programms 9 Am Bedienregler 4 drehen um das gewünschte Garprogramm auszuwählen siehe die Tabelle VOREINGESTELLTE GARPROGRAMME Die Taste Temperature oder Time drücken und am Regler drehen um die Gartemperatur oder die Garzeit je nach Vorlieben oder Rezept bei Bedarf zu verändern 10 Um eine bestimmte Zutatenart Fish Fisch Meat Fleisch Poultry Geflügel Vegetables Gemüse ...

Страница 28: ...r dem Öffnen des Deckels immer den Dampf und Druck aus dem Gerät ablassen Dafür gibt es folgende Möglichkeiten Natürliches drucklos machen 10 Minuten lang warten bis der Garer und die Zutaten kühl sind Wenn das Schwimmerventil sinkt ist der Garer drucklos Schnelles drucklos machen Ofenhandschuhe anziehen und den Druckregler 5 nach links oder rechts drehen um ihn zu öffnen und den Dampf entweichen ...

Страница 29: ...rwählschalter 15 auf 0 stellen WARNUNG Während und nach dem Garen werden der Halogendeckel der Stützring und der Innentopf 8 heiß Zum Schutz der Arbeitsplatte und zum Brandschutz den Halogenofen nie ohne eine hochgradig hitzefeste Unterlage unter dem Innentopf benutzen Immer Ofenhandschuhe Topfhalter oder Hilfsmittel für den Transport für das Handhaben des Deckels Innentopfs oder des erhitzten Zub...

Страница 30: ...der Seifenlauge befeuchtet ist Sauber auswischen und gründlich trocknen lassen Nach jedem Gebrauch den Kondenswasserbehälter aus dem Unterteil nehmen entleeren und ausspülen Deckel des Dampfgarers Den Deckel 2 vom Dampfgarer abnehmen Den Dichtring die Aluplatte den Druckregler 5 und das Schwimmerventil zum Reinigen vom Deckel abmontieren Mit einem Schwamm in warmer Seifenlauge auswaschen gut aussp...

Страница 31: ...rventilkopf Dichtscheibe des Schwimmerventils Innentopf Den Innentopf 8 entnehmen und mit einem weichen Tuch oder einem nicht scheuernden Schwamm in warmer Seifenlauge abspülen Gut ausspülen und sorgfältig abtrocknen ...

Страница 32: ... montiert Darauf achten dass der Dichtring kor rekt am Deckel montiert ist Der Dichtring ist nicht am Deckel montiert Den Dichtring am Deckel anbringen Das Gerät darf ohne Dichtring NICHT benutzt werden Garrückstände behindern den Dichtring Den Dichtring reinigen Der Dichtring ist defekt oder verschlissen Dichtring austauschen Dampf tritt aus dem Schwimmerventil aus Garrückstände behindern den Dic...

Страница 33: ...Die Heizplatte funktioniert nicht richtig Zur Wartung den Kundendienst anrufen Die Warmhaltefunk tion hat sich nach Ablauf des Gar programms nicht eingeschaltet Die Keep Warm Warm halten wurde gedrückt während eine Wartezeit Funktion Delay ablief oder während ein Garvorgang lief Dadurch wird die automa tische Warmhaltefunktion deaktiviert Die Taste Keep Warm Warmhalten drücken um die automatische ...

Страница 34: ...mpfgarer füllen Überhitzung Der Innentopf sitzt schief auf dem Unterteil Darauf achten dass der Innentopf waagerecht aufliegt und korrekt im Unterteil sitzt E4 Signalschalterstörung Netzstecker ziehen und 10 Minuten lang stehen lassen Danach wieder anschließen Wird der Fehlercode weiterhin an gezeigt einen Kundendienst mit der Wartung beauftragen ENTSORGUNG Ordnungsgemäße Entsorgung dieses Produkt...

Страница 35: ... L appareil et son câble d alimentation doivent toujours rester hors de portée des enfants de moins de 8 ans 8 Il convient de surveiller les enfants afin de s assurer qu ils ne jouent pas avec l appareil 9 Ne laissez en aucun cas l appareil fonctionner sans surveillance 10 Ne couvrez pas l appareil pendant qu il fonctionne Ne placez rien sur l appareil 11 Ne faites pas fonctionner l appareil à vid...

Страница 36: ...age Protégez vous impérativement les mains avec des maniques des gants de cuisine ou autres ustensiles de préhension pour toucher les surfaces brûlantes ou pour manipuler des accessoires brûlants 26 Ne plongez en aucun cas l unité de base 7 et le couvercle halogène 13 dans l eau car ils contiennent des composants électriques ainsi que des résistances Ne rincez pas l appareil sous le robinet 27 Ne ...

Страница 37: ...ctement la fiche dans la prise de courant Emplacement d installation 1 Placez l appareil sur une surface plane sèche et résistante à la chaleur 2 L appareil doit impérativement être installé sur une surface horizontale plane stable et non combustible 3 Placez l appareil dans un endroit hors de portée des enfants Ne laissez pas des enfants s approcher de l appareil lorsqu il est en marche Une surve...

Страница 38: ...égulateur de pression 6 Poignées de l unité de base 7 Unité de base 8 Cuve intérieure 9 Panier de cuisson à la vapeur 10 Verre doseur 11 Cuillère à riz 12 Cercle de support du couvercle halogène 13 Couvercle halogène 14 Minuterie 15 Bouton de température 16 Poignée avec fonction marche arrêt de sécurité 1 2 3 4 5 6 7 13 8 9 10 11 12 14 15 16 ...

Страница 39: ...et les icônes s allument pour plus de facilité d utilisation BOUTONS DE CONTRÔLE Bouton Fonction DÉMARRAGE ANNULATION Appuyez sur le bouton Start et gardez le enfoncé pendant 5 secondes pour Réveiller l autocuiseur lorsqu il est en mode veille l appareil se met en veille si aucun bouton n est actionné dans les 30 secondes suivant sa mise sous tension DÉMARRER un programme de cuisson ANNULER un pro...

Страница 40: ...me par défaut clignote à l écran Réglez le volume avec le bouton de contrôle Température Utilisez la touche Temperature pour modifier la température de cuisson Le bouton clignote ainsi que l indication 180 C à l écran Réglez la température avec le bouton de contrôle Démarrage différé Après avoir sélectionné un programme préenregistré ou le mode Chef appuyez sur Delay pour différer le démarrage du ...

Страница 41: ... Viande Oui 30 minutes 1 59 minutes 1 24 heures s o Non modifiable Oui Volaille Oui 25 minutes 1 59 minutes 1 24 heures s o Non modifiable Oui Légumes Oui 10 minutes 1 59 minutes 1 24 heures s o Non modifiable Oui Stew ragoût Poisson Oui 15 minutes 1 59 minutes 1 24 heures s o Non modifiable Oui Viande Oui 30 minutes 1 59 minutes 1 24 heures s o Non modifiable Oui Volaille Oui 25 minutes 1 59 minu...

Страница 42: ... modifiable Oui Fry cuisson à l huile Non ôter le couvercle 45 minutes 1 59 minutes 1 24 heures 170 C 30 180 C Non Slow Cook cuisson lente Non 2 heures 1 59 minutes 1 24 heures 95 C Non modifiable Oui Vegetable légumes Oui 15 minutes 1 59 minutes 1 24 heures s o Non modifiable Oui Cake gâteau Oui 40 minutes 1 59 minutes 1 24 heures 140 C 30 180 C Oui Crisp croustillant Oui 1 heure 1 59 minutes 1 2...

Страница 43: ... plus d informations sur le recyclage et l élimination des éléments d emballage contactez les autorités locales de votre commune 2 Assurez vous que le produit est en parfait état et qu aucun des accessoires ne manque Retournez le produit au magasin d achat si des pièces sont manquantes ou endommagées 3 Nettoyez le produit et l ensemble des accessoires voir section Nettoyage et entretien Four halog...

Страница 44: ...haricots pâtes etc le niveau ne doit pas dépasser le repère 1 5 sur la paroi de la cuve intérieure Pour la cuisson sous pression mettez au moins 35 cl d eau ou autre liquide dans la cuve intérieure Les proportions eau aliments recommandées sont de 1 1 mais peuvent être ajustées à condition que la quantité minimale de liquide soit respectée Dans le cas du porridge les proportions eau riz recommandé...

Страница 45: ...né à l étape 9 Fermez le régulateur de pression 5 si le programme de cuisson préenregistré nécessite une cuisson sous pression Ouvrez le régulateur de pression 5 si le programme de cuisson préenregistré ne nécessite pas de cuisson sous pression FERMÉ OUVERT Régulateur de pression REMARQUE Enlevez le couvercle 2 avant d utiliser les programmes préenregistrés Fry et Saute Sélectionner un programme p...

Страница 46: ...u chaud max 24 heures température par défaut 70 C REMARQUE Afin de préserver la fraîcheur des aliments évitez de les garder au chaud pendant plus de 4 heures 14 Appuyez sur la touche Start pendant 5 secondes pour arrêter la fonction de maintien au chaud et quitter le mode veille 15 Débranchez l autocuiseur Dépressurisation de l autocuiseur 16 Avant d ouvrir le couvercle laissez toujours s échapper...

Страница 47: ... et enlevez le couvercle halogène L appareil s éteint ou plus exactement se met en pause lorsque la poignée est relevée Pour reprendre la cuisson il vous suffit de fermer le couvercle et de rabaisser la poignée Lorsque la minuterie 14 arrive à la fin l appareil émet un signal sonore puis s éteint 9 Débranchez l appareil quand vous avez fini de l utiliser REMARQUE Si vous souhaitez arrêter la cuiss...

Страница 48: ...ongez en aucun cas l unité de base 7 le couvercle halogène 13 ou tout autre composant électrique dans l eau ni dans tout autre liquide Ne les mettez en aucun cas sous l eau courante NETTOYAGE Unité de base couvercle halogène Frottez les surfaces extérieures de l unité de base 7 et du couvercle halogène 13 avec un chiffon doux légèrement imbibé d un mélange d eau chaude et d eau savonneuse Rincez l...

Страница 49: ... aluminium Cœur de la valve à flotteur Rondelle d étanchéité de la valve à flotteur Cuve intérieure Sortez la cuve intérieure 8 et lavez la dans de l eau chaude savonneuse avec un chiffon doux ou une éponge non abrasive Rincez la bien et faites la sécher ...

Страница 50: ...ns le couvercle Installez le joint d étanchéité dans le couvercle Ne faites pas fonctionner l appareil sans le joint d étanchéité Le joint d étanchéité est obstrué par des résidus alimentaires Nettoyez le joint d étanchéité Le joint d étanchéité est cassé ou usé Remplacez le joint d étanchéité De la vapeur fuit au niveau de la valve à flotteur La rondelle d étanchéité de la valve à flotteur est ob...

Страница 51: ...s programmes Fry et Yoghurt Dysfonctionnement des composants de maintien au chaud Prenez contact avec le service client pour maintenance Sensation de chatouillement ou de léger choc électrique au contact du couvercle Fuite électrique N UTILISEZ PAS l appareil Prenez contact avec le service client pour maintenance L écran indique un code d erreur E1 Le circuit du capteur est ouvert Débranchez l app...

Страница 52: ... ou contactez le magasin où vous avez acheté ce produit INFORMATIONS ET SERVICE Si vous avez des questions ou des préoccupations concernant votre produit veuillez consulter notre site Web www westinghousehomeware com ou contacter nos bureaux agents internationaux Conformément à notre politique de développement continu des produits nous nous réservons le droit de modifier les spécifications du prod...

Страница 53: ... vigilancia cuando lo esté utilizando 10 No cubra el aparato durante su uso No coloque nada encima del aparato 11 No ponga el aparato en funcionamiento en vacío 12 Antes de cada uso verifique que el aro de sellado el regulador de presión y la válvula flotante están limpios y correctamente instalados en la tapa de la olla de presión 13 No trate nunca de abrir la tapa durante el cocinado a presión 1...

Страница 54: ...externo con temporizador ni a un sistema de mando a distancia separado 29 El uso de accesorios no recomendados por el fabricante del aparato puede provocar lesiones 30 No use la olla interna 8 sobre una cocina u hornilla ya que está hecha específicamente para la unidad base 7 31 No ponga sustancias congeladas en el aparato y no lave la olla interna con agua fría cuando esté muy caliente 32 Las sup...

Страница 55: ...no combustible 3 Ponga el aparato en un lugar que esté fuera del alcance de los niños No deje que los niños se acerquen al aparato cuando está en funcionamiento Es necesario vigilar de cerca el aparato cuando hay niños y mascotas en la cercanía 4 Advertencia No permita que el cable cuelgue sobre el borde de una mesa o encimera Compruebe que el cable de alimentación está colocado de manera que no p...

Страница 56: ...lla de control 5 Regulador de presión 6 Asa de la base 7 Unidad base 8 Olla interna 9 Cesto de vapor 10 Vaso medidor 11 Cuchara de metal 12 Aro de apoyo de la tapa halógena 13 Tapa halógena 14 Temporizador 15 Botón de temperatura 16 Asa y encendido apagado de seguridad 1 2 3 4 5 6 7 13 8 9 10 11 12 14 15 16 ...

Страница 57: ...es e iconos activos se iluminan para facilitar las instrucciones BOTONES DE CONTROL Botón Función EMPEZAR CANCELAR Mantenga presionado el botón de empezar por 5 segundos para Sacar la olla del modo de standby este modo se activa cuando no se presiona ningún botón por 30 segundos después de conectarla a la toma de corriente EMPEZAR un programa de cocción CANCELAR un programa de cocción ...

Страница 58: ...men de alerta por defecto parpadeará en la pantalla Gire el botón de control para ajustar el volumen Temperatura Presione el botón de temperatura para ajustar la temperatura de cocción El botón de 180 C parpadeará Gire la perilla de control para ajustar la temperatura Programar Después de seleccionar un programa predefinido o el modo de Chef presione el botón de programar para retrasar el inicio d...

Страница 59: ...N A No ajust able Sí Carne Sí 30 minutos 1 59 minutos 1 24 horas N A No ajust able Sí Aves Sí 25 minutos 1 59 minutos 1 24 horas N A No ajust able Sí Verduras Sí 10 minutos 1 59 minutos 1 24 horas N A No ajust able Sí Estofado Pescado Sí 15 minutos 1 59 minutos 1 24 horas N A No ajust able Sí Carne Sí 30 minutos 1 59 minutos 1 24 horas N A No ajust able Sí Aves Sí 25 minutos 1 59 minutos 1 24 hora...

Страница 60: ... ajust able Sí Freír No retirar tapa 45 minutos 1 59 minutos 1 24 horas 170 C 30 180 C No Cocción lenta No 2 horas 1 59 minutos 1 24 horas 95 C No ajust able Sí Verduras Sí 15 minutos 1 59 minutos 1 24 horas N A No ajust able Sí Pastel Sí 40 minutos 1 59 minutos 1 24 horas 140 C 30 180 C Sí Crujiente Sí 1 hora 1 59 minutos 1 24 horas 160 C 30 180 C Sí Cereales Sí 35 minutos 1 59 minutos 1 24 horas...

Страница 61: ...é dañado y de que no falte ningún accesorio Devuelva el producto a su distribuidor si alguna pieza falta o está dañada 3 Limpie el producto y todos los accesorios consulte el apartado Cuidado y mantenimiento Horno halógeno Antes de usar por primera vez caliente la olla vacía 8 del horno halógeno hasta una temperatura máxima de 250 C por 5 10 minutos consulte el apartado USO DEL HORNO HALÓGENO Esto...

Страница 62: ...olla interna ya que podría rayarse el revestimiento antiadherente 4 Inserte la olla interna 8 de nuevo en la unidad base 7 comprobando que la base de la olla interna está limpia y seca Cierre de la tapa 5 Antes de cerrar la tapa compruebe que el aro de sellado está bien colocado en su lugar PRECAUCIÓN No use este aparato sin el aro de sellado Protección antibloqueo Aro de sellado Placa de aluminio...

Страница 63: ...este paso si no lo necesita Para demorar el inicio del proceso de cocción presione el botón de programar y gire la perilla de control para ajustar la demora 5 minutos 24 horas PRECAUCIÓN No deje alimentos crudos dentro de la olla por un largo periodo de tiempo antes de cocinarlos ya que podrían deteriorarse Use esta función para cocinar alimentos que no se deterioran con facilidad tales como alubi...

Страница 64: ...esta función para sofreír USO DEL HORNO HALÓGENO Use el horno halógeno para hornear dorar y asar a la parrilla Funcionamiento 1 Coloque la ola interna 8 en un tapete resistente al calor 2 Coloque los alimentos preparados y condimentados en la olla interna 8 3 Coloque el aro de soporte 12 y luego la tapa halógena 13 en la olla interna 8 4 Enchufe el cable de alimentación de la tapa halógena 13 en l...

Страница 65: ...jilla inferior Para dorar coloque la bandeja o los alimentos directamente en la rejilla superior Para asar hacer a la parrilla o freír con aire coloque los alimentos directamente en la rejilla inferior para que el aire pueda circular a su alrededor NOTA La bandeja u olla de horno no deberá tocar los laterales de la olla interna 8 Asegúrese de que los alimentos no están en contacto con la resistenc...

Страница 66: ...te montadas en la tapa Limpie la tapa con un paño o esponja suaves humedecidos con agua Deje secar Compruebe que todas las piezas están correctamente colocadas en la tapa antes de usar el aparato No use la tapa si falta alguna de sus piezas Protección antibloqueo Aro de sellado Placa de aluminio Centro de la válvula flotante Arandela de sellado de la válvula flotante Olla interna Retire la olla in...

Страница 67: ...pa El aro de sellado no está instalado en la tapa Instale el aro de sellado en la tapa NO ponga el aparato en funcionamiento sin el aro de sellado Hay restos de comida obstruyendo el aro de sellado Limpie el aro de sellado El aro de sellado está roto o desgastado Reemplace el aro de sellado Escapa vapor por la válvula flotante Hay restos de comida obstruyendo la arandela de sellado o la válvula fl...

Страница 68: ... calentamiento no funciona correctamente Póngase en contacto con el servicio al cliente para que le asistan La función automática de mantener caliente no se activó al finalizar el programa de cocción El botón de mantener caliente se presionó durante la cuenta atrás de la demora o durante el proceso de cocción y esto desactiva la función automática de mantener caliente Presione el botón de mantener...

Страница 69: ...l 1 taza de agua o líquido a la olla de presión Sobrecalentamiento La olla interna no está bien colocada en la unidad base Verifique que la olla interna está nivelada y correctamente colocada en la unidad base E4 Señal de interruptor defectuoso Desenchufe el cable de alimentación de la toma de corriente por 10 minutos y luego vuelva a enchufarlo Si el código de error persiste póngase en contacto c...

Страница 70: ...t apparaat spelen 9 Gebruik het apparaat nooit zonder toezicht 10 Dek het apparaat tijdens de werking niet af Plaats niets op het apparaat 11 Gebruik het apparaat niet als het leeg is 12 Voor elk gebruik zorg dat de afdichtingsring de drukregelaar en de drijver schoon en juist in het deksel van de snelkookpan zijn aangebracht 13 Open het deksel nooit tijdens het snelkoken 14 Verplaats het apparaat...

Страница 71: ...tandsbedieningssysteem 29 Het gebruik van accessoires die niet worden aanbevolen door de fabrikant kan letsel veroorzaken 30 Gebruik de binnenpan 8 niet op een kookplaat of brander deze is speciaal ontworpen voor gebruik met de basiseenheid 7 31 Doe geen bevroren levensmiddelen in het apparaat en was de binnenpan niet in koud water wanneer het zeer heet is 32 De buitenkant en de binnenpan van het ...

Страница 72: ...ervlak 3 Plaats het apparaat buiten het bereik van kinderen Houd kinderen uit de buurt van het apparaat wanneer in werking Toezicht is nodig wanneer kinderen en huisdieren aanwezig zijn 4 Waarschuwing Laat het snoer niet hangen over de rand van de tafel of aanrecht Zorg dat het snoer zich niet in een positie bevindt waar kinderen of huisdieren er aan kunnen trekken of per ongeluk over kunnen strui...

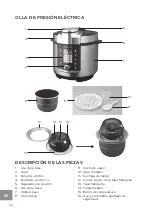
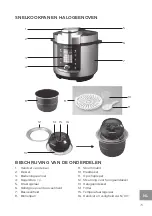
Страница 73: ...3 Bedieningspaneel 4 Regelknop 5 Drukregelaar 6 Handgreep van basiseenheid 7 Basiseenheid 8 Binnenpan 9 Stoommand 10 Maatbeker 11 Opscheplepel 12 Steunring voor halogeendeksel 13 Halogeendeksel 14 Timer 15 Temperatuurregelaar 16 Handvat en veiligheid AAN UIT 1 2 3 4 5 6 7 13 8 9 10 11 12 14 15 16 ...

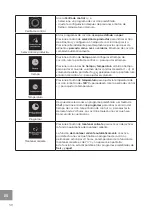
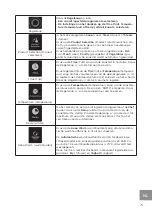
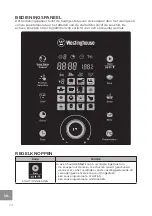
Страница 74: ... actieve knoppen en pictogrammen zijn verlicht voor een eenvoudig gebruik REGELKNOPPEN Knop Functie START ANNULEREN Druk en houd de Start knop 5 seconden ingedrukt om De kookpan uit stand by te activeren wordt geactiveerd wanneer er na het verbinden van de voeding gedurende 30 seconden geen enkele knop wordt ingedrukt Een kookprogramma te STARTEN Een kookprogramma te ANNULEREN ...

Страница 75: ...veau van de geluidssignalen 1 4 te regelen Het standaard volume knippert op het scherm Draai de Regelknop om het volume te regelen Temperature temperatuur Druk op de Temperature temperatuur knop om de kooktem peratuur aan te passen De knop en 180 C knipperen Draai de Regelknop om de temperatuur aan te passen Delay uitstel Na het kiezen van een vooraf ingesteld programma of deChef modus druk op de ...

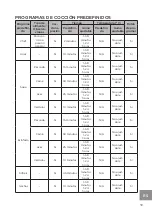
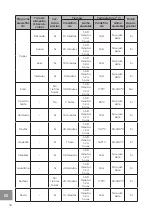
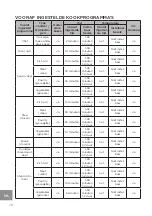
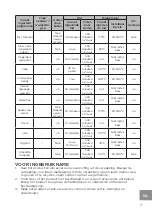
Страница 76: ...0 minuten 1 59 minuten 1 24 uur n v t Niet instel baar Ja Stew stoven Fish vis Ja 15 minuten 1 59 minuten 1 24 uur n v t Niet instel baar Ja Meat vlees Ja 30 minuten 1 59 minuten 1 24 uur n v t Niet instel baar Ja Poultry gevogelte Ja 25 minuten 1 59 minuten 1 24 uur n v t Niet instel baar Ja Vegetables groente Ja 10 minuten 1 59 minuten 1 24 uur n v t Niet instel baar Ja Braise smoren Ja 45 minut...

Страница 77: ... 1 24 uur n v t Niet instel baar Ja Saute sau teren Nee deksel verwij deren 20 minuten 1 59 minuten 1 24 uur 170 C 30 180 C Ja Pasta Ja 10 minuten 1 59 minuten 1 24 uur n v t Niet instel baar Ja Jam Ja 10 minuten 1 59 minuten 1 24 uur 100 C Niet instel baar Ja Yoghurt Nee 5 uur 5 9 uur 1 59 minuten 1 24 uur 40 C Niet instel baar Ja Omelette omelet Nee 10 minuten 1 59 minuten 1 24 uur 140 C 30 180 ...

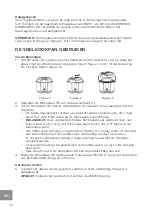
Страница 78: ... Houd rekening met het volgende De totale hoeveelheid voedsel en vloeistof water bouillon wijn etc mag nooit het 4 5 MAX teken op de binnenpan overschrijden BELANGRIJK Voor voedsel dat tijdens het kookproces uitbreidt bijv rijst bonen pasta etc zorg dat het niveau nooit boven het 1 5 teken op de binnenpan komt Om onder druk te koken voeg minstens 350 ml 1 kopje water of vloeistof aan de binnenpan ...

Страница 79: ...pan vanaf stand by te activeren druk en houd de Start knop 5 seconden ingedrukt De drukregelaar openen of sluiten 8 Open of sluit de drukregelaar 5 op het deksel zoals vereist door het vooraf ingesteld kookprogramma dat in stap 9 zult selecteren Sluit de drukregelaar 5 als het gekozen vooraf ingesteld programma koken onder druk vereist Open de drukregelaar 5 als het gekozen vooraf ingesteld progra...

Страница 80: ...k en houd de Start knop 5 seconden ingedrukt om te bevestigen en te starten OPMERKING In sommige programma s start het aftellen van de kooktijd alleen nadat de kookpan de vooraf ingestelde temperatuur heeft bereikt 13 Aan het einde van het kookproces als de Automatische warmhoudfunctie AAN is hoort u een geluidssignaal en wordt de Warmhoudmodus automatisch geopende tot 24 uur standaard 70 C OPMERK...

Страница 81: ...aat ingeschakeld 8 Als u de levensmiddelen aan de helft van de baktijd wilt omdraaien voor een gelijkmatige gaarheid Til de hendel 16 op en verwijder het halogeendeksel Het apparaat wordt uitgeschakeld pauzeert wanneer de hendel omhoog is Sluit het deksel en duw de hendel omlaag om het bakproces te hervatten Aan het einde van de Timer 14 hoort u een geluidssignaal en wordt het apparaat uitgeschake...

Страница 82: ...p het oppervlak achterlaten 4 Dompel de basiseenheid 7 het halogeendeksel 13 of andere elektrische onderdelen niet in water of een andere vloeistof Was deze onderdelen nooit onder stromend water REINIGING Basiseenheid Halogeendeksel Veeg de buitenkant van de basiseenheid 7 en het halogeendeksel 13 schoon met een zachte doek bevochtigd in warm water of in een warm sopje Veeg vervolgens schoon en la...

Страница 83: ...fdichtingsring Aluminium plaat Kern van drijver Afdichtingsring van drijver Binnenpan Verwijder de binnenpan 8 en maak het schoon met een zachte doek of niet schurend sponsje in een warm sopje Spoel grondig en veeg vervolgens droog ...

Страница 84: ... afdichtingsring is niet in het deksel geplaatst Installeer de afdichtingsring in het deksel Gebruik het apparaat NIET zonder de afdichtingsring Etensresten blokkeren de afdichtingsring Maak de afdichtingsring schoon De afdichtingsring is besch adigd of versleten Vervang de afdichtingsring Stoom lekt uit de drijver Etensresten blokkeren de afdichtingssluitring van de drijver Reinig de afdichtingss...

Страница 85: ...ingsplaat werkt niet juist Neem contact op met de klantenservice voor onderhoud De automatische warmhoudfunctie wordt aan het einde van het kookpro gramma niet inge schakeld De Keep Warm warm houden knop werd tijdens het aftellen van de startuits tel of tijdens het kookproces ingedrukt dit schakelt de automatische warmhoud functie uit Druk op de Keep Warm warmhouden knop om de Automatische warmhou...

Страница 86: ...e Oververhitting De binnenpan is verkeerd in de basiseen heid geplaatst Zorg dat de binnenpan vlak en juist in de basiseenheid wordt geplaatst E4 Storing van signaalschake laar Haal de stekker 10 minuten uit het stop contact en sluit opnieuw aan Als de foutcode aanhoudt neem contact op met de klantenservice voor onderhoud VERWIJDERING Juiste verwijdering van dit product Dit etiket geeft aan dat el...

Страница 87: ......
Страница 88: ... WESTINGHOUSE and INNOVATION YOU CAN BE SURE OF are trademarks of Westinghouse Electric Corporation a USA company Used under license by Westinghouse Homeware HK Co All Rights Reserved WKCPPC100 11 19 ...

Отзывы: