background image

13

These guidelines will help you to plan your exercise

program. For detailed exercise information, obtain a

reputable book or consult your physician. Remember,

proper nutrition and adequate rest are essential for

successful results.

EXERCISE INTENSITY

Whether your goal is to burn fat or to strengthen your

cardiovascular system, exercising at the proper inten-

sity is the key to achieving results. You can use your

heart rate as a guide to find the proper intensity level.

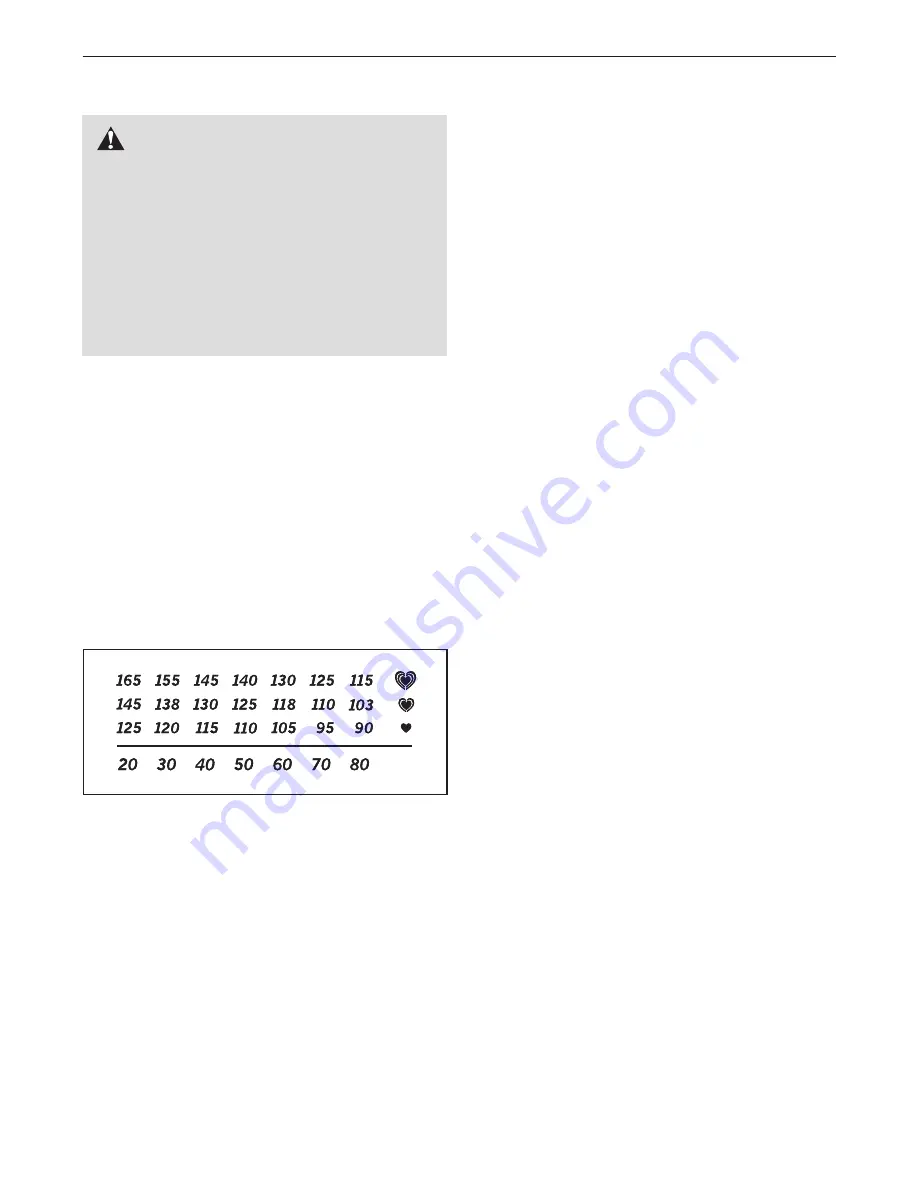
The chart below shows recommended heart rates for

fat burning and aerobic exercise.

To find the proper intensity level, find your age at the

bottom of the chart (ages are rounded off to the near-

est ten years). The three numbers listed above your

age define your “training zone.” The lowest number is

the heart rate for fat burning, the middle number is the

heart rate for maximum fat burning, and the highest

number is the heart rate for aerobic exercise.

Burning Fat

—To burn fat effectively, you must exer-

cise at a low intensity level for a sustained period of

time. During the first few minutes of exercise, your

body uses

carbohydrate calories

for energy. Only after

the first few minutes of exercise does your body begin

to use stored

fat calories

for energy. If your goal is to

burn fat, adjust the intensity of your exercise until your

heart rate is near the lowest number in your training

zone. For maximum fat burning, exercise with your

heart rate near the middle number in your training

zone.

Aerobic Exercise

—If your goal is to strengthen your

cardiovascular system, you must perform aerobic

exercise, which is activity that requires large amounts

of oxygen for prolonged periods of time. For aerobic

exercise, adjust the intensity of your exercise until

your heart rate is near the highest number in your

training zone.

WORKOUT GUIDELINES

Warming Up

—Start with 5 to 10 minutes of stretching

and light exercise. A warm-up increases your body

temperature, heart rate, and circulation in preparation

for exercise.

Training Zone Exercise

—Exercise for 20 to 30 min-

utes with your heart rate in your training zone. (During

the first few weeks of your exercise program, do not

keep your heart rate in your training zone for longer

than 20 minutes.) Breathe regularly and deeply as you

exercise–never hold your breath.

Cooling Down

—Finish with 5 to 10 minutes of

stretching. Stretching increases the flexibility of your

muscles and helps to prevent post-exercise problems.

EXERCISE FREQUENCY

To maintain or improve your condition, complete three

workouts each week, with at least one day of rest

between workouts. After a few months of regular exer-

cise, you may complete up to five workouts each

week, if desired. Remember, the key to success is to

make exercise a regular and enjoyable part of your

everyday life.

EXERCISE GUIDELINES

WARNING:

Before beginning this

or any exercise program, consult your physi-

cian. This is especially important for persons

over age 35 or persons with pre-existing

health problems.

The pulse sensor is not a medical device.

Various factors may affect the accuracy of

heart rate readings. The pulse sensor is

intended only as an exercise aid in determin-

ing heart rate trends in general.

Содержание Momentum 620 Elliptical

Страница 1: ...his manual before contacting Customer Care CALL TOLL FREE 1 866 699 3756 Mon Fri 6 a m 6 p m MT Sat 8 a m 4 p m MT ON THE WEB www wesloservice com CAUTION Read all precautions and instruc tions in this manual before using this equipment Keep this manual for future reference USERʼS MANUAL www weslo com Model No WLEL1406 2 Serial No Write the serial number in the space above for reference Serial Num...

Страница 2: ...EXPLODED DRAWING 15 ORDERING REPLACEMENT PARTS Back Cover LIMITED WARRANTY Back Cover 2 WESLO is a registered trademark of ICON IP Inc WARNING DECAL PLACEMENT This drawing shows the location s of the warning decal s If a decal is missing or illegible see the front cover of this manual and request a free replacement decal Apply the decal in the location shown Note The decal s may not be shown at ac...

Страница 3: ...e floor or carpet Make sure that there is at least 3 ft 0 9 m of clearance in the front and rear of your ellipti cal exerciser and 2 ft 0 6 m on each side 6 Inspect and properly tighten all parts regu larly Replace any worn parts immediately 7 Keep children under age 12 and pets away from the elliptical exerciser at all times 8 The elliptical exerciser should not be used by persons weighing more t...

Страница 4: ...e you use the elliptical exerciser If you have ques tions after reading this manual please see the front cover of this manual To help us assist you note the product model number and serial number before con tacting us The model number and the location of the serial number decal are shown on the front cover of this manual Before reading further please familiarize yourself with the parts that are la...

Страница 5: ...f this page ASSEMBLY To hire an authorized service technician to assemble the elliptical exerciser call 1 800 445 2480 Assembly requires two persons Place all parts of the elliptical exerciser in a cleared area and remove the packing materials do not dispose of the packing materials until assembly is completed In addition to the included tool s assembly requires a Phillips screwdriver an adjustabl...

Страница 6: ...s the tab on the battery door and remove the battery door Insert four batteries into the Console 23 as shown Make sure that the batteries are oriented as shown by the dia gram on the battery door Then reattach the battery door 4 Have a second person hold the Console 23 near the Upright 2 Connect the console wire to the Upper Wire Harness 44 Insert the console wire and the Upper Wire Harness downwa...

Страница 7: ...ebar Spacer onto the left axle on the Upright Next slide the Left Handlebar 6 onto the left axle on the Upright 2 Then tap an Axle Cap 14 onto the axle Repeat this step on the other side of the elliptical exerciser Grease 6 47 14 5 2 6 Hexagonal Holes Hexagonal Holes 5 1 2 33 Avoid pinching the Upper Wire Harness 44 and the Lower Wire Harness 53 44 53 48 59 5 Have a second person hold the Upright ...

Страница 8: ...ld the left Handlebar Arm 5 inside the brack et on the Left Pedal Arm 11 Attach the Handlebar Arm to the Left Pedal Arm with the Pedal Arm Bolt Set 40 Do not overtighten the Pedal Arm Bolt Set the Handlebar Arm must pivot freely Repeat this step on the other side of the elliptical exerciser See step 5 Tighten the M10 x 68mm Button Bolts 48 See step 6 Tighten the M6 x 38mm Button Bolts 50 Grease Gr...

Страница 9: ...SOLE DIAGRAM FEATURES OF THE CONSOLE The console offers a selection of features designed to make your workouts more effective When you use the manual mode of the console you can change the resistance of the pedals with the touch of a button As you pedal the console will provide continuous exer cise feedback You can even measure your heart rate using the built in thumb pulse sensor The console also...

Страница 10: ...ned see BURNING FAT on page 13 Pulse This mode shows your heart rate when you use the thumb pulse sensor Scan This mode shows the speed time dis tance calories fat calories and pulse modes for a few seconds each in a repeating cycle Note The pulse mode will be displayed only while you are using the pulse sensor When you turn the power on the scan mode will be selected One indicator will appear bel...

Страница 11: ...rammed for each segment Whenever the resistance is about to change the resistance level will flash in the display for a few seconds The resistance of the pedals will then automatically change to the resistance level that is programmed for the next segment Note You can manually override the programmed resistance level by pressing the Resistance Increase and Decrease buttons However when the current...

Страница 12: ...p IMPORTANT Keep liq uids away from the console and keep the console out of direct sunlight Before storing the elliptical exerciser remove the batteries from the console BATTERY REPLACEMENT If the console display becomes dim the batteries should be replaced most console problems are the result of low batteries To replace the batteries see step 3 on page 6 MAINTENANCE AND TROUBLESHOOTING ...

Страница 13: ...f your goal is to strengthen your cardiovascular system you must perform aerobic exercise which is activity that requires large amounts of oxygen for prolonged periods of time For aerobic exercise adjust the intensity of your exercise until your heart rate is near the highest number in your training zone WORKOUT GUIDELINES Warming Up Start with 5 to 10 minutes of stretching and light exercise A wa...

Страница 14: ...zer 29 2 Flywheel Bearing 30 2 Large Snap Ring 31 2 Large Bearing 32 1 Pedal Axle 33 7 M10 Locknut 34 4 M10 x 75mm Carriage Bolt 35 2 M10 Washer 36 4 M6 x 45mm Flat Head Screw 37 2 Pedal Arm Bushing 38 1 M8 Locknut 39 2 M10 Small Washer 40 2 Pedal Arm Bolt Set 41 1 M8 x 22mm Flat Head Screw 42 9 M4 x 16mm Screw 43 4 M6 x 18mm Screw 44 1 Upper Wire Harness 45 1 Resistance Cable 46 2 Handlebar Cap 4...

Страница 15: ... 57 10 39 12 35 65 51 15 19 16 61 61 16 62 1 30 31 32 38 33 56 15 13 65 35 11 40 40 33 7 52 59 59 58 27 50 50 27 60 60 2 49 49 49 49 42 42 42 42 42 21 51 51 41 54 42 53 33 64 37 40 40 13 28 21 21 33 33 34 30 31 46 46 14 14 36 36 29 29 9 18 20 26 22 22 66 39 25 37 64 27 56 51 51 51 45 55 63 42 36 60 60 ...

Страница 16: ...damage to a product caused by or attributable to freight damage abuse misuse improper or abnormal usage or repairs not provided by an ICON authorized service center to products used for commercial or rental purposes or as store display models or to products transported or purchased outside the US No other warranty beyond that specifically set forth above is authorized by ICON ICON is not responsib...

Отзывы: