

ELECTRONIC MONITOR
The simple-to-operate electronic moni-
tor features five different modes to
provide you with instant exercise feed-
back. The five modes are described
below:
Speed—Displays your speed, in repeti-
tions per minute.
Time—Displays the length of time you
have exercised. Note: If you stop exercis-
ing for ten seconds or longer, the time
mode will pause until you resume.
Distance—Displays the total number of
repetitions you have completed, up to
“999.” The display will then reset to “0”
and continue counting.
Calories—Displays the approximate num-
ber of Calories you have burned. Note: If
the resistance is near the highest or low-
est setting, the actual number of Calories
you have burned will be slightly higher or
lower than the number displayed.
Scan—Displays the speed, time, distance
and calories modes, for approximately 5
seconds each, in a repeating cycle.
OPERATING THE ELECTRONIC
MONITOR
1. To turn on the power, press the
on/reset button or simply begin exer-
cising on the CARDIO GLIDE PLUS.
(Note: On some monitors, the on/reset
button may be labeled on/clear.) The
entire display will appear for two sec-
onds. The monitor will then be ready
for operation. You can reset the con-
sole by pressing the on/reset button.
2. Select one of the five modes:
Scan mode—When the power is
turned on, the scan mode will be
selected automatically. The scan mode
can also be selected by repeatedly
pressing the mode button. One mode
indicator will show that the scan mode
has been selected, and a second
mode indicator will show which mode
is currently displayed.
Speed, time, distance or calories
mode—These modes can be selected
by repeatedly pressing the mode but-
ton. The mode indicators will show
which mode has been selected. (Make
sure that the scan mode is not select-
ed.) The modes will be selected in the
following order: speed, time, distance,
calories.
3. To turn off the power, simply wait
about four minutes. The monitor has
an “auto-off” feature; if the pedals are
not moved and the monitor buttons are
not pressed for four minutes, the
power will turn off automatically.
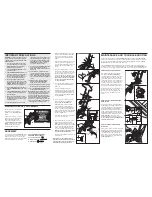
ELECTRONIC MONITOR DIAGRAM
1. LCD display—Displays all modes.
2. Mode indicators—Show which mode
has been selected.
3. Mode button—Selects all modes
except the scan mode.
4. On/reset button—Turns the power
on and resets the monitor. Note: On
some monitors, this button may be
labeled on/clear.
HOW TO USE THE CARDIO GLIDE PLUS
Sit on the seat, place your feet on the pedals,
and hold the handlebar with an overhand grip.
If necessary, adjust the position of the seat. To
begin exercising, push the handlebar away with
your arms while pushing the pedals away with
your legs. Return to the starting position. This
completes one repetition. Repeat, moving with
a smooth, continuous motion. For the best
results, move through the full range of motion
and maintain a steady pace.
CAUTION: To
avoid injury, keep your back straight. Do
not arch your back.
HOW TO USE THE PULL MODE
To convert the CARDIO GLIDE PLUS to the
pull mode, hold the Handlebar Frame (7) with
one hand and hold the Handle (20) with the
other hand. Lift the Handle to disconnect the
Link Arms (4) from the Handlebar Frame.
Pivot the Handlebar Frame away from the
seat and hook the Link Arms onto the lower
Rollers (33) on the Handlebar Frame.
CAU-
TION: Make sure that the Link Arms are
securely connected to the lower Rollers.
Sit on the seat, place your feet on the pedals,
and hold the handlebar. Your hands can be
positioned on the top, sides or bottom of the
handlebar, close together or far apart, or in an
overhand or underhand grip. If necessary,
adjust the position of the seat. To begin exer-
cising, pull the handlebar toward your waist
while pushing the pedals away with your legs.
Return to the starting position. This completes
one repetition. Repeat, moving with a smooth,
continuous motion. For the best results, move
through the full range of motion and maintain
a steady pace.
CAUTION: To avoid injury,
keep your back straight. Do not arch your
back.
To focus on the muscles of the lower body,
rest your hands on the indicated bar as you
exercise. To focus on your calf muscles, point
your toes as you push the pedals away. As
you return to the starting position, raise your
toes and rotate your heels downward.
CAUTION: To avoid injury, keep you feet
firmly on the pedals to prevent them from
slipping.
To exercise your abdominal mus-
cles, keep your arms straight and bend back
at the waist as you exercise.
Remember to
keep your back straight.
4
20
7
33
Bar
SPEED
TIME
DIST.
SCAN
CAL.
MODE
ON/RESET
- AUTO-OFF -
S
1
2
4
3
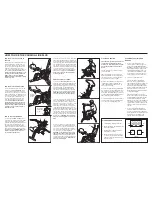
HOW TO ADJUST THE POSITION OF
THE SEAT
Before you begin exercising, the Seat (3)
should be adjusted to the most comfort-
able position. Turn the Seat Knob (38) to
loosen it. Pull down the Seat Knob, slide
the Seat to the desired position, and
release the Seat Knob. Retighten the Seat
Knob.
Push on the Seat to make sure
that the Seat Knob is engaged in one of
the holes in the underside of the Seat
Frame (5). Do not use the CARDIO
GLIDE PLUS unless the seat is securely
locked in position.
HOW TO ADJUST THE RESISTANCE
To vary the intensity of your exercise, the
resistance of the CARDIO GLIDE PLUS
can be adjusted. There are 9 resistance
levels. Level 1 is the easiest, and level 9 is
the most challenging. To change the resis-
tance, turn the resistance adjustment col-
lar on the Resistance Cylinder (9). The
arrow on the Resistance Cylinder will
show which resistance level you have
selected.
CAUTION: The Resistance
Cylinder becomes very hot during use.
Allow the Resistance Cylinder to cool
before touching it. When adjusting the
resistance, touch only the resistance
adjustment collar.
HOW TO USE THE PUSH MODE
To convert the CARDIO GLIDE PLUS to
the push mode, hold the Handlebar Frame
(7) with one hand and hold the Handle
(20) with the other hand. Lift the Handle to
disconnect the Link Arms (4) from the
Handlebar Frame. Pivot the Handlebar
Frame toward the seat and hook the Link
Arms onto the upper Rollers (33) on the
Handlebar Frame.
CAUTION: Make sure
that the Link Arms are securely con-
nected to the upper Rollers.
Resistance
Adjustment
Collar
5
9
3
5
38
Resistance
Adjustment
Collar
9
33
4
7