4
15. DO NOT OVERREACH. Keep proper footing and balance at all times. Wear oil-resistant rubber-soled foot-
wear. Keep the floor clear of oil, scrap, and other debris.
16. MAINTAIN TOOLS PROPERLY. ALWAYS keep tools clean and in good working order. Follow instruc-
tions for lubricating and changing accessories.
17. CHECK FOR DAMAGED PARTS. Check for alignment of moving parts, jamming, breakage, improper
mounting, or any other conditions that may affect the tool’s operation. Any part that is damaged should be properly
repaired or replaced before use.
18. CHILDPROOF THE WORKSHOP. Use padlocks and master switches and ALWAYS remove starter keys.
19. DO NOT operate the tool if you are under the influence of drugs, alcohol, or medication that may affect your
ability to properly use the tool.
20. USE SAFETY GOGGLES AT ALL TIMES that comply with ANSI Z87.1. Normal safety glasses only have
impact resistant lenses and are not designed for safety. Wear a face or dust mask when working in a dusty environ-
ment. Use ear protection such as plugs or muffs during extended periods of operation.
GENERAL SAFETY RULES
WARNING: Do not operate this tool until it is completely
assembled and installed according to the instructions.
1. This equipment should never be used in surroundings in an explosive or flammable atmosphere.
2. Do not let the cable touch any parts of your body.
3. Do not force the machine to do a job that is not intended such as rough grinding, brushing, etc.
4. Only use identical replacement parts when servicing the drywall sander.
5. Accessories need to be rated at a minimum of 1500 RPM. Do not use accessories rated at speeds below the ma-
chine’s maximum RPM.
6. Never use damaged accessories. Always check whether accessories are nicked or cracked prior to operation; in
particular, the grinding pad support plate. Run the machine at maximum speed for one minute in order to test ac-
cessories before using them to sand anything. Make sure bystanders stand clear during this testing phase.
7. Do not put down the machine until the pad’s rotation has completely stopped.
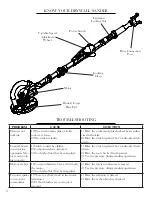
8. Regularly clean your machine’s exhaust/dust port.
9. Do not use sanding disks larger than the recommended size (9 inches).
10. Only use one extension tube at a time.
11. Always allow for reaction torque.
SPECIFIC RULES FOR THE DRYWALL SANDER
Содержание 6369
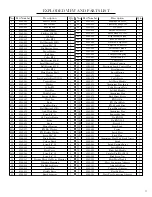
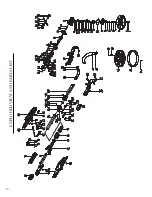
Страница 10: ...10 EXPLODED VIEW AND PARTS LIST...
Страница 12: ...Thanks for remembering...


