Weldclass WeldForce WF-135s stick Скачать руководство пользователя страница 12

by

12

C. Vertical Welds 

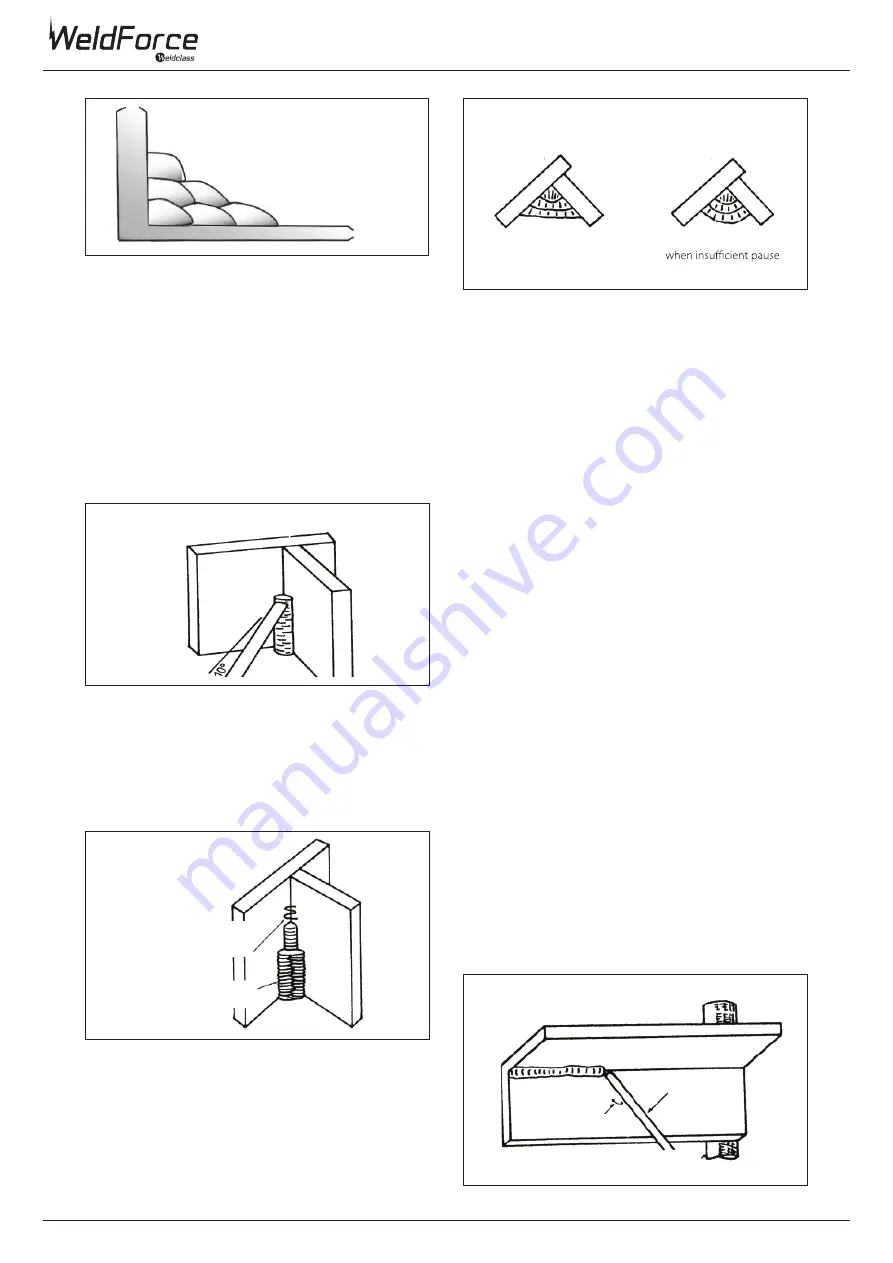
1. Vertical Up

Tack weld a three feet length of angle iron to your 

work bench in an upright position. Use a 3.2mm 

E7014 Stick electrode and set the current at 100 

amps. Make yourself comfortable on a seat in front 

of the job and strike the arc in the corner of the 

fillet. The electrode needs to be about 10º from the 

horizontal to enable a good bead to be deposited. 

Refer Fig. 1-25.

Use a short arc, and do not attempt to weave on 

the first run. When the first run has been completed 

deslag the weld deposit and begin the second run 

at the bottom. This time a slight weaving motion 

is necessary to cover the first run and obtain good 

fusion at the edges.

At the completion of each side motion, pause for a

moment to allow weld metal to build up at the 

edges, otherwise undercut will form and too much 

metal will accumulate in the centre of the weld. 

Figure 1-26 illustrates multi-run technique and 

Figure 1-27 shows the effects of pausing at the 

edge of weave and of weaving too rapidly.

Multi-Runs in HV Fillet Weld 

(Fig 1-24)

Single Run Vertical Fillet Weld 

(Fig 1-25)

Weaving motion for 
second and subsequent 
runs

Pause at edge
of weave

Multi Run Vertical Fillet Weld 

(Fig 1-26)

Examples of Vertical Fillet Welds 

(Fig 1-27)

Pause at edge of weave 

allows weld metal to build 

up and eliminates undercut

Note:  Weld contour

at edge of weave

CORRECT

INCORRECT

Tilted 10

o

 in

line of travel

Overhead Fillet Weld 

(Fig 1-28)

Angle tacked to pipe

45

o

 to plate

2. Vertical Down

The E7014 Stick electrode makes welding in this 

position particularly easy. Use a 3.2mm electrode 

at 100 amps. The tip of the electrode is held in light 

contact with the work and the speed of downward 

travel is regulated so that the tip of the electrode 

just keeps ahead of the slag. The electrode should 

point upwards at an angle of about 45º.

3. Overhead Welds

Apart from the rather awkward position necessary,

overhead welding is not much more difficult 

that down hand welding. Set up a specimen for 

overhead welding by first tacking a length of angle 

iron at right angles to another piece of waste pipe. 

Then tack this to the work bench or hold in a vice 

so that the specimen is positioned in the overhead 

position as shown in the sketch.

The electrode is held at 45º to the horizontal and 

tilted 10º in the line of travel (Figure 1-28). The tip 

of the electrode may be touched lightly on the 

metal, which helps to give a steady run. A weave 

technique is not advisable for overhead fillet welds.

Use a 3.2mm E6013 Stick electrode at 100 amps, 

and deposit the first run by simply drawing the 

electrode along at a steady rate. You will notice 

that the weld deposit is rather convex, due to the 

effect of gravity before the metal freezes.

Содержание WeldForce WF-135s stick

Страница 1: ...OPERATING INSTRUCTIONS by To qualify for full 12 month warranty you must register within 30 days of purchase See inside for details IMPORTANT...

Страница 2: ...thin 30 days of purchase Please register your warranty now by going to www weldclass com au weldforcewarranty You will need a A copy of your purchase invoice receipt b Your machine serial number which...

Страница 3: ...6 6 6 7 7 13 14 14 19 Contents Know Your Machine Power Supply Operating Environment Tips Tricks Care Maintenance MMA Stick Basic Welding Guide MMA Stick Troubleshooting Knowledge Resources Safety Warr...

Страница 4: ...o to www Weldclass com au WF 135S Output Power 30 140A Duty Cycle 100A 60 Input Power 240V 10A Max Input Current 21A Electrode Size 1 6 3 2mm Weight 3 8kg Dimensions L x W x H 290 x 132 x 275mm A Inpu...

Страница 5: ...socket 6 240V AC mains power input lead 7 Mains power switch 8 Cooling fan inlet 1 2 3 4 5 6 7 8 Overload indicator lamp Lights when duty cycle is exceeded and thermal protection is activated When th...

Страница 6: ...r to the negative welding power output socket 4 Connect the earth clamp to the work piece Contact with the work piece must be a firm contact with clean bare metal with no corrosion paint or scale at t...

Страница 7: ...cables connections make sure the welding machine is switched off and disconnected from the power supply When not in use the welder should be stored in the dry and frost free environment Storing the We...

Страница 8: ...with in this publication will cover the vast majority of applications likely to be encountered are all easy to use Flat Position Down Hand Butt Weld Fig 1 11 Flat Position Gravity Fillet Weld Fig 1 1...

Страница 9: ...lean and free of rust scale dirt grease etc Slag should be removed from oxy cut surfaces Typical joint designs are shown in Figure 1 19 Open Square Butt Joint Fig 1 19a Gap varies from1 6mm 1 16 to 4...

Страница 10: ...making too heavy a contact with the work and failing to withdraw the electrode quickly enough A low amperage will accentuate it This freezing on of the tip may be overcome by scratching the electrode...

Страница 11: ...runs are then deposited using either a weave technique or single beads laid down in the sequence shown in Figure 1 22 The width of weave should not be more than three times the core wire diameter of...

Страница 12: ...eave allows weld metal to build up and eliminates undercut Note Weld contour at edge of weave CORRECT INCORRECT Tilted 10o in line of travel Overhead Fillet Weld Fig 1 28 Angle tacked to pipe 45o to p...

Страница 13: ...13 MMA Stick Troubleshooting...

Страница 14: ...ss practices not related to personal injury GENERAL SAFETY WARNINGS 1 Maintain labels and nameplates on the welder These carry important information If unreadable or missing contact Weldclass for a re...

Страница 15: ...strictly observe all safety rules and take precautionary actions welding products and welding processes can cause serious injury or death or damage to other equipment or property Safepracticeshavedeve...

Страница 16: ...iminating the hazard 6 After welding make a thorough examination for evidence of fire Be aware that visible smoke or flame may not be present for some time after the fire has started Do not weld or cu...

Страница 17: ...r damp locations do not use a welder with AC output unless equipped with a voltage reducer 1 Use a Welding Helmet or Welding Face Shield fitted with a proper shade of filter see AS 60974 1 AS NZS 1337...

Страница 18: ...ing these elements can give off toxic fumes if welded WARNING Gascylinderscontaingasunderhighpressure If damaged a cylinder can explode Since gas cylinders are normally part of the welding process be...

Страница 19: ...ly replacement of such parts 6 Warranty claims made where the owner operator of the machine is not willing or not able to provide any information required by Weldclass Welding Products to process the...

Страница 20: ...by www Weldclass com au WF 135S...

Отзывы: