WEISS ROBOTICS GRIPKIT CR EASY Скачать руководство пользователя страница 38

16

EN

GL

ISH

TM

12  

Uninstalling

Follow the steps below to uninstall GRIPKIT CR EASY from your robot:

1

2

3

4

5


Содержание GRIPKIT CR EASY

Страница 1: ...BETRIEBSANLEITUNG GRIPKIT CR EASY INSTRUCTION MANUAL GRIPKIT CR EASY DEUTSCH ENGLISH TM TM 1 ENGLISH...

Страница 2: ...er Funktionsbausteine 11 11 Programmierung 15 12 Deinstallation 18 13 EG Einbauerkl rung 19 English 1 Introduction 1 2 Basic safety instructions 1 3 Warranty 3 4 Accessories kit contains 4 5 Technical...

Страница 3: ...Zielgruppe dieser Anleitung sind Anlagenhersteller und betreiber die dieses und wei tere mitgelieferte Dokumente dem Personal jederzeit zug nglich halten und dar ber hinaus zum Lesen und Beachten ins...

Страница 4: ...dass das Greifmodul und die Finger entsprechend dem Anwendungsfall ausreichend dimensioniert sind dass die Umgebung sauber ist und die Umgebungstemperatur den Angaben in der Betriebsanleitung entspric...

Страница 5: ...Montage Erstinbetriebnahme Wartung und Instandsetzung des GRIPKIT CR EASY darf nur von geschultem Fachpersonal durchgef hrt werden Jede Person die vom Be treiber mit Arbeiten am GRIPKIT CR EASY beauf...

Страница 6: ...5090009 Optionales Zubeh r GRIPKIT CR EASY enth lt keine Greiffinger da diese in der Regel stark anwendungsab h ngig sind Bestellen Sie passende Finger aus unserem Standardsortiment 5 Technische Date...

Страница 7: ...05 A 0 25 A 6 1 1 Eingangsschaltung Die Eing nge des Greifmoduls unterst tzen sowohl NPN als auch PNP Signal Der Pas siv Zustand wird erkannt wenn der Eingang offen ist inaktiv Der Aktiv Zustand wird...

Страница 8: ...V Werkst ck gegriffen HOLDING 7 Montage Anleitung 1 Stecken Sie das beiliegende Kabel passend zu ihrer Roboter Marke in den Flansch ein 2 Stecken Sie den 6 mm Zylinderstift in den Flansch und positio...

Страница 9: ...genden USB Stick F hren Sie die Instal lation auf einem Desktop Ger t durch und ffnen Sie das Programm Schlie en Sie den Greifer mit dem beiliegenden USB Kabel an Ihren Computer an Starten Sie das Pro...

Страница 10: ...muss Blockieren die Finger beim Greifen innerhalb dieses Fensters er kennt das Greifmodul dies als g ltigen Griff und wechselt auf den Greifzustand HOL DING halten Erreichen die Finger hingegen den v...

Страница 11: ...ein Innengriff ausgef hrt wenn der Grenzwert Release Limit hingegen gr er als No Part Limit ist wird ein Au engreifen ausgef hrt Beim Greifen und Freigeben stoppen elektrische Greifmodule bei den Posi...

Страница 12: ...ollten Sie ein Problem an Ihrem Greifmodul feststellen schlie en Sie die ses als Erstes an einen Rechner an und lesen Sie die Diagnose Daten ber den GRIPKIT Easy Configurator aus 9 Systemvoraussetzung...

Страница 13: ...en tigte Verzeichnisstruktur au tomatisch erstellt Weitere Informationen zum Export von Projekten entnehmen Sie bitte der Dokumentation des Robotersystems Der USB Stick sollte nun ber folgende Verzeic...

Страница 14: ...W hlen Sie in den Systemeinstellungen Importieren Exportieren aus um die Funk tionsbausteine vom USB Stick auf das Robotersystem zu Importieren und f hren Sie anschlie end f r den Import folgende Sch...

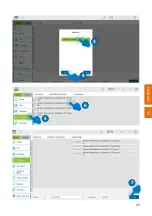
Страница 15: ...13 DEUTSCH TM 3 4 5 6 7...

Страница 16: ...ortierten Funktionsbausteine ak tiviert werden ffnen Sie hierf r unter dem Men punkt Einst die Robotereinstel lungen Aktivieren Sie unter dem Reiter Komponente die Funktionsbausteine durch einen Klick...

Страница 17: ...Enable Disable Grip und Release 11 1 Enable Ziehen Sie per Drag Drop den Baustein Enable an den Anfang Ihres Programms Diese Funktion aktiviert den Greifer sie ist notwendig um Griffe durchzuf hren 1...

Страница 18: ...ck konfigurierten Befehle ausgef hrt Im Fall eines Timeouts oder Fehlers werden die entsprechenden Programmzweige aus gef hrt 11 3 Teil freigeben Release Zum Freigeben des gegriffenen Werkst cks zieh...

Страница 19: ...17 DEUTSCH TM 11 4 Disable Diese Funktion deaktiviert den Greifer er spricht dadurch nicht mehr auf Grip oder Release an...

Страница 20: ...18 DEUTSCH TM 12 Deinstallation F hren Sie folgenden Schritte aus um GRIPKIT CR EASY von Ihrem Roboter zu deinstal lieren 1 2 3 4 5...

Страница 21: ...htlinie Maschinen 2006 42 EG entspricht Angewandte harmonisierte Normen insbesondere EN ISO 12100 1 Sicherheit von Maschinen Grundbegriffe allgemeine Gestal tungsleits tze Teil 1 Grunds tzliche Termin...

Страница 22: ...INSTRUCTION MANUAL GRIPKIT CR EASY...

Страница 23: ...nts available to the staff at all times Please read this document carefully and observe in particular the safety and warning notices in this document 1 3 Notation and symbols For a better understandin...

Страница 24: ...duction GRIPKIT CR EASY represents the state of the art and the recognized safety rules at the time of delivery However it can present risks if for example GRIPKIT CR EASY is not used in accordance wi...

Страница 25: ...applies particularly to oc casional personnel such as maintenance personnel 2 5 Safety conscious working Observe the safety and accident prevention regulations valid at the usage site Do not reach int...

Страница 26: ...ions USB stick with software Part Nr 5090009 Optional accessories GRIPKIT CR EASY does not include gripping fingers as these are usually very applicati on dependent Order matching fingers from our sta...

Страница 27: ...t 100 GRIPKIT CR EASY 0 05 A 0 25 A 6 1 1 Input circuit The gripper module inputs support both NPN and PNP signals The passive state is de tected when the input is open inactive The active state is de...

Страница 28: ...detected NO PART 24 V 24 V Holding workpiece HOLDING 7 Assembly instruction 1 Insert the supplied cable into the flange matching your robot brand 2 Insert the 6 mm cylindrical pin into the flange and...

Страница 29: ...an find this on the enclosed USB stick Perform the installation on a desktop de vice and open the program Connect the gripper to your computer with the included USB cable Start the GRIPKIT Easy Config...

Страница 30: ...pping state changes to HOLDING If the fingers reach the specified No Part Limit during gripping the gripping state will change to NO PART to indicate that no part has been gripped When releasing a par...

Страница 31: ...ipping modules stop at the No Part Limit and the Release Limit External and internal gripping example 8 1 2 Gripping force GRIPKIT CR EASY has an integrated gripping force control The gripping force c...

Страница 32: ...10 ENGLISH TM 8 2 Diagnostics Under the Diagnostics tab you will find the firmware version used a temperature display and warnings about the condition of the gripping module 2 3...

Страница 33: ...is required 10 1 Preparation of the USB flash drive Since the directory structure of the USB flash drive depends on the individual serial number of the robot it makes sense to export an existing proje...

Страница 34: ...item System in the user interface of the robot system to access the system settings To import the function blocks from the USB flash drive tp the robot system select import export in the system setti...

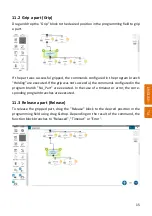
Страница 35: ...13 ENGLISH TM 3 4 5 6 7...

Страница 36: ...n blocks un der the Component tab by clicking on the Enable field Then save the component list 1 11 Programming After the installation you will find under Project the three new function blocks Grip an...

Страница 37: ...uted If the grip was not successful the commands configured in the program branch No_Part are executed In the case of a timeout or error the corre sponding program branches are executed 11 3 Release a...

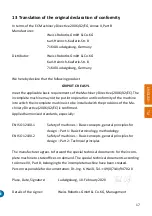
Страница 38: ...16 ENGLISH TM 12 Uninstalling Follow the steps below to uninstall GRIPKIT CR EASY from your robot 1 2 3 4 5...

Страница 39: ...chine is to be installed with the provisions of the Ma chinery Directive 2006 42 EC is confirmed Applied harmonized standards especially EN ISO 12100 1 Safety of machines Basic concepts general princi...

Страница 40: ...Rahmen der Produktverbes serung ohne Vorank ndigung ge ndert werden Alle genannten Marken sind Eigentum ihrer jeweiligen Inhaber The specification in this document are subject to change without prior...

Отзывы: