background image

Setup 


54 


1449820000/1.4/04.17 

4.14


Installing the network version of the M-Print® PRO software 


Important information 

Installation should be carried out by a specialist. Administrator rights are required for this 
process.


4.14.1


Description 

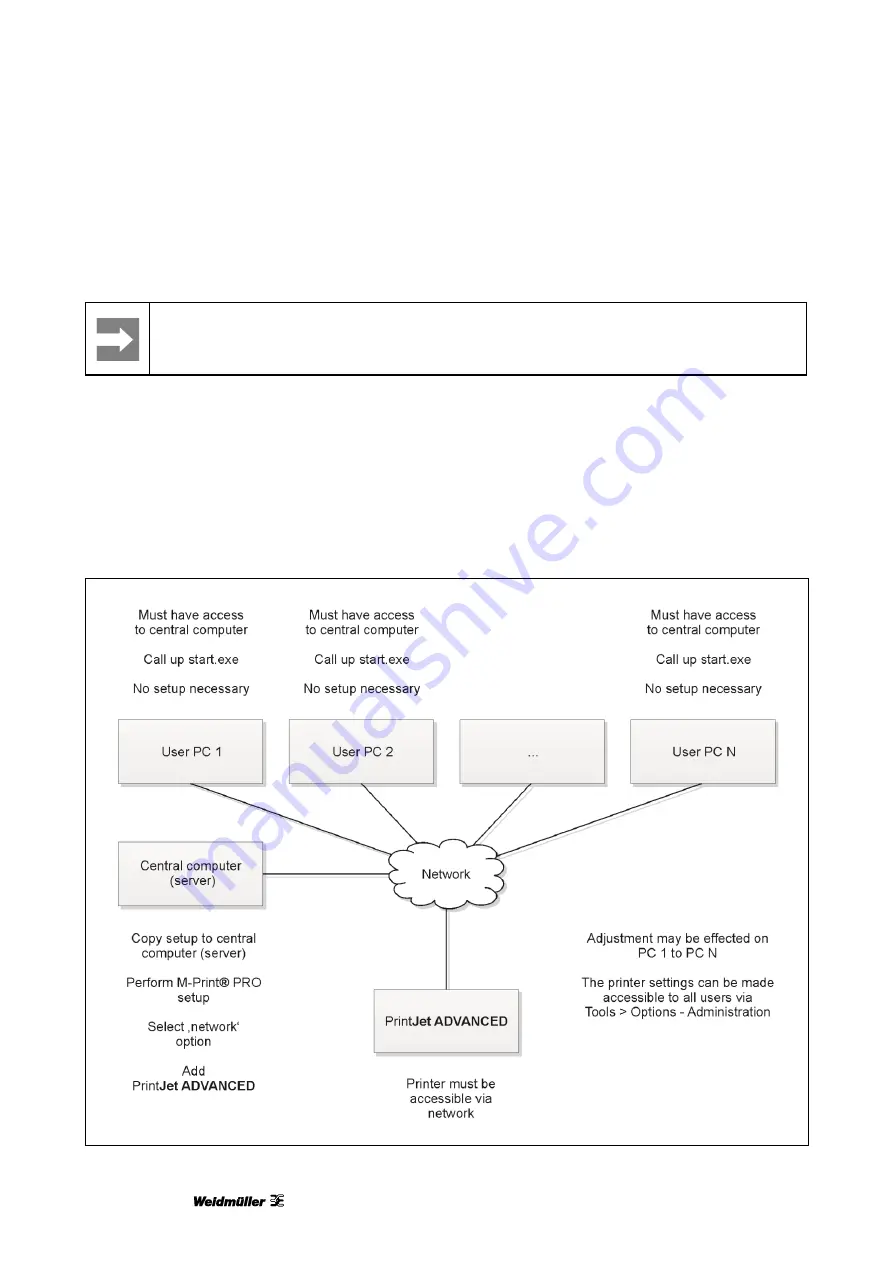
The network version of M-Print® PRO is used when multiple users need to work with the software in a 
network. Instead of installing M-Print® PRO on each of their computers, here it is only necessary to install 
the software centrally (Setup.exe on a server or central PC). The client PCs (or users) access M-Print® PRO 
via shared network paths. 


Example scenario: 


Figure 53 

Example scenario for network installation 

Содержание 1324380000

Страница 1: ...PrintJet ADVANCED User Manual...

Страница 2: ...dition 1 2 06 15 Second revised edition 1 3 04 16 Third revised edition 1 4 04 17 Fourth revised edition Contact address Weidm ller Interface GmbH Co KG Postfach 3030 D 32720 Detmold Klingenbergstra e...

Страница 3: ...6 1 Hazards due to electricity 16 2 6 2 Hazards due to hot surfaces 17 2 6 3 Hazards due to incorrect spare parts 17 2 7 Safety devices and guards 17 2 8 Obligations of the plant operator 17 2 9 Perso...

Страница 4: ...5 4 14 3 Tasks to be done on the clients 69 4 15 Activating M Print PRO 71 4 16 Setting up and adjusting a MultiCard for the printer 73 4 17 Running a print test 74 5 Operation 77 5 1 General operatio...

Страница 5: ...thead cleaning 117 6 1 2 Printhead flushing 118 6 1 3 Executing a sensor check 120 6 1 4 Executing a nozzle check 122 6 2 Replacing ink cartridges 124 6 3 Replacing the wastepad 130 6 4 Replacing the...

Страница 6: ...nsporting the printer 151 8 1 Decommissioning the printer 152 8 2 Packing the printer 152 8 3 Disposing of the printer 153 9 Annex 155 9 1 Technical data 156 9 2 Ordering data 157 9 3 Declaration of c...

Страница 7: ...Introduction 1449820000 1 4 04 17 7 1 Introduction 1 1 Notational conventions 8 1 2 Warranty and liability 9 1 3 Copyright 9 1 4 Guarantee terms 9...

Страница 8: ...llows DANGER Electrical hazard warning This warning sign indicates an electrical hazard Only qualified and authorized electrical specialists are allowed to work on electrical equipment WARNING This wa...

Страница 9: ...ion commissioning operation maintenance or cleaning of the printer Operation of the printer with defective or incorrectly fitted printer enclosure Failure to heed information in the user manual regard...

Страница 10: ......

Страница 11: ...sed on the device 14 2 5 Intended use 15 2 6 Residual risks when using the device 15 2 6 1 Hazards due to electricity 16 2 6 2 Hazards due to hot surfaces 17 2 6 3 Hazards due to incorrect spare parts...

Страница 12: ...re has been damaged The performance of the PrintJet ADVANCED is not up to the required standard e g poor print quality or insufficient resistance to smearing and scratching CAUTION Never remove the pr...

Страница 13: ...t suitable for human consumption No not allow ink to come into contact with the mucous membranes If you accidentally swallow any ink rinse out your mouth and drink plenty of water Do not induce vomiti...

Страница 14: ...ess to business sector B to B manufacturers of electrical equipment have been obligated since August 13 2005 to take back and recycle free of charge all electrical equipment sold after that date After...

Страница 15: ...e ruled out The plant operator alone is liable for any injury or damage attributable to unintended use Intended use also includes Heeding all information from the operating manual Complying with the o...

Страница 16: ...of the devices connected to the extension cable does not exceed the ampere rating for that extension cable Also ensure that the total nominal current of all the devices plugged into the wall mounted s...

Страница 17: ...in an office environment in the commercial sector The device operator is therefore subject to the legal requirements concerning occupational health and safety In addition to the safety information in...

Страница 18: ...and warnings in this user manual and to confirm with their signature that they have understood the issues 2 9 3 Responsibilities The responsibilities of personnel for installation commissioning operat...

Страница 19: ...Printer description 1449820000 1 4 04 17 19 3 Printer description 3 1 Printer 21 3 1 1 Overview 21 3 1 2 Connectors 23 3 1 3 Rating plate 23 3 2 MultiCards and MetalliCards 24...

Страница 20: ...ted as stack of up to 30 MultiCards into the loader MetalliCards should only be inserted individually Stack processing is not intended for MetalliCards The MetalliCard is inserted into an inlay for pr...

Страница 21: ...Printer description 1449820000 1 4 04 17 21 3 1 Printer 3 1 1 Overview Figure 1 Front view of the printer A Touch panel B Service cover C Ink tank lid D Output rail...

Страница 22: ...ription 22 1449820000 1 4 04 17 Figure 2 Rear view of the printer A Filter cover B Connectors C MultiCard MetalliCard input D Stack input loader E Interface USB master for connecting a USB stick F Cle...

Страница 23: ...4 Connectors A Left hand fuse 2 5 ampere B Right hand fuse 10 ampere C Mains power supply connection D Network interface RJ45 connector E USB slave for connecting the PC 3 1 3 Rating plate Figure 5 Ra...

Страница 24: ...printer The marking system consisting of the PrintJet ADVANCED printer and the M Print PRO software has been designed by Weidm ller for MultiCards or MetalliCards Figure 6 MultiCards MetalliCard A Exa...

Страница 25: ...iCard in the middle and break in half Complete and half MultiCards should not be mixed in a stack It is however possible to process different MultiCard types in a stack e g DEK 5 5 and SM 27 27 Descri...

Страница 26: ......

Страница 27: ...tion via USB 34 4 9 Turning the printer on off 35 4 10 Choosing the language for the touch panel 36 4 11 Installing the standard version of the M Print PRO software 39 4 12 Connection via network cabl...

Страница 28: ...nter with the polystyrene packaging material out of the box 4 Remove the polystyrene packaging material Important information Keep the original packaging for any future transport 4 2 Scope of supply W...

Страница 29: ...s Do not use a table joined to other tables in order to avoid the transmission of vibration Avoid installation sites that are subject to a large amount of dust 1 Pay attention to the information given...

Страница 30: ...spaces A 250 mm B 200 mm output rail C 100 mm D 250 mm E 100 mm Weight approx 37 2 kg 4 4 Removing the transport restraints Figure 9 Transport restraints 1 Remove the transport restraints from the to...

Страница 31: ...nto place 4 6 Positioning the touch panel The touch panel can be raised up to three rest positions A click sound indicates that the touch panel is engaged in one of the rest positions After a fourth c...

Страница 32: ...socket already being used by devices that are turned on and off at regular intervals such as photocopiers or fans Do not connect the printer to either a switch operated or a timer controlled power ou...

Страница 33: ...objects on the power cable Do not pull hard on the power cable and do not bend it any more than necessary Failure to comply with these instructions can cause an electric shock or a fire Insert the plu...

Страница 34: ...r the methods are described separately 4 8 1 Connection via the network interface Figure 15 Connection network cable A Network cable B Network interface RJ45 connector 1 Connect the network cable A to...

Страница 35: ...Do not switch off the printer The printer automatically goes into standby mode The operating parameters are only retained while the printer is turned on These parameters ensure for example that the p...

Страница 36: ...e 18 Touch panel language choice 1 Choose the required language by touching the corresponding button Touch this button to scroll forward to the next page and additional options Touch this button to sc...

Страница 37: ...449820000 1 4 04 17 37 Figure 19 Touch panel main menu 2 Choose the System Info button on the touch panel s main menu Figure 20 Touch panel System Info 3 Select the LANGUAGE button in the System Info...

Страница 38: ...Setup 38 1449820000 1 4 04 17 Figure 21 Touch panel language selection 4 Select the desired language and touch the SAVE button to confirm your choice...

Страница 39: ...Important information Installation should be carried out by a specialist Administrator rights are required for this process You can find information about the application software in the M Print PRO...

Страница 40: ...Setup 40 1449820000 1 4 04 17 Figure 23 M PRINT PRO Installation Start menu 4 Touch the SOFTWARE button Figure 24 M PRINT PRO Installation software 5 Touch M PRINT PRO...

Страница 41: ...17 41 Figure 25 M PRINT PRO Installation Language selection 6 Touch the desired language The installation process starts automatically and the setup wizard appears Figure 26 M Print PRO setup wizard...

Страница 42: ...ting the license terms 8 Accept the terms in the license agreement and press the Next button 9 Choose the setup type in the next window Figure 28 M Print PRO choosing the setup type Typical The M Prin...

Страница 43: ...RO program is installed on a shared drive on the network and can be used by multiple users 10 Press the Typical button Important information If you want to install the network version read section 4 1...

Страница 44: ...Figure 30 M Print PRO status of the installation process The installation status is shown by the progress bar Figure 31 M Print PRO finishing the installation process 12 When installation has been com...

Страница 45: ...4 12 Connection via network cable Figure 32 PrintJet ADVANCED Explorer 1 To add the PrintJet ADVANCED click the Add button The following dialog box appears Figure 33 Choosing printer connection 2 Cli...

Страница 46: ...Setup 46 1449820000 1 4 04 17 The following dialog box appears Figure 34 Adding the printer 3 When you click on the button Browse network the search process is started Figure 35 Browsing network...

Страница 47: ...e 36 Search result Browsing network 4 Use the Add selected printers button to add the printer The following dialog box appears Figure 37 PrintJet ADVANCED Explorer 5 If you want to change the printer...

Страница 48: ...rinter name 6 Enter the printer name required for M Print PRO for example PrintJet ADVANCED 7 Confirm your inputs with OK Figure 39 Changed printer name The changed name PrintJet ADVANCED is displayed...

Страница 49: ...eck whether the printer highlighted in the list is connected and accessible with the Test button If so the following dialog box appears Figure 41 Dialog box connection test successful You see the foll...

Страница 50: ...u have installed the M Print PRO application software connect the USB cable to the printer The printer control software is installed automatically Figure 43 Connection USB cable C USB cable D USB port...

Страница 51: ...on The printer search starts Figure 46 Printer search The search result is displayed in the following dialog box Figure 47 Printer search result If no printer was found you may start a new search proc...

Страница 52: ...equired for M Print PRO for example PJA Workplace 1 USB1 5 Confirm your inputs with OK The changed name PJA Workplace 1 USB1 is displayed in the Explorer Figure 50 Changed printer name You can remove...

Страница 53: ...Figure 51 Dialog box connection test successful You see the following message if the printer cannot be found because for example it is turned off Figure 52 Dialog box printer not found 6 Next you have...

Страница 54: ...14 1 Description The network version of M Print PRO is used when multiple users need to work with the software in a network Instead of installing M Print PRO on each of their computers here it is onl...

Страница 55: ...cted to the network via the network cable It is not possible to install the network version via the USB port 4 14 2 Tasks to be done on the central computer server 1 Insert the DVD in the server centr...

Страница 56: ...Setup 56 1449820000 1 4 04 17 Figure 55 M PRINT PRO Installation Start menu 4 Touch the SOFTWARE button Figure 56 M PRINT PRO Installation software 5 Touch M PRINT PRO...

Страница 57: ...17 57 Figure 57 M PRINT PRO Installation Language selection 6 Touch the desired language The installation process starts automatically and the setup wizard appears Figure 58 M Print PRO setup wizard...

Страница 58: ...ure 59 M Print PRO accepting the license terms 8 Accept the terms in the license agreement and press the Next button 9 Choose the setup type in the next window Figure 60 M Print PRO choosing the setup...

Страница 59: ...an check how much storage space is free on the available drives with the Disk Usage button 11 Click the Browse button 12 Select the target directory for example C software Important information The us...

Страница 60: ...e the catalog in C data catalog Important information The target directories must be on a local drive of the server network drives and UNC paths such as ServerName ShareName Path are not allowed All f...

Страница 61: ...ation 16 Click the Install button Microsoft Windows User Account Control UAC might appear 17 If so confirm here that changes are allowed to be made to Windows After your confirmation the target direct...

Страница 62: ...820000 1 4 04 17 Figure 64 M Print PRO status of the network installation The progress is indicated by a bar Figure 65 Finishing network installation 18 When installation has been completed press the...

Страница 63: ...dialog box appears Figure 66 PrintJet ADVANCED Explorer 19 To add the PrintJet ADVANCED click the Add button The following dialog box appears Figure 67 Adding the printer When you click on the button...

Страница 64: ...the printer You can also add the printer via its serial number or its network name or its IP address Important information If you specified Activate DHCP under SYSTEM INFO on the touch panel you must...

Страница 65: ...e serial number or the network name or the IP address If you click on the question mark you will receive more information 22 Click the respective Add button The entered printer is displayed in the Pri...

Страница 66: ...Jet ADVANCED Explorer Figure 73 PrintJet ADVANCED Explorer You can remove the highlighted printer from the list with the Delete button You can add this printer again at any time You exit the dialog bo...

Страница 67: ...r there is a network problem Figure 75 Dialog box printer not found 26 Next you have to activate the M Print PRO software see 4 15 Activating M Print PRO Sharing folders M Print PRO uses the following...

Страница 68: ...e user specific settings defined via Tools Options printer mappings etc M Print PRO reads settings in this folder and writes them here X shared This folder and its subfolders contain the M Print PRO p...

Страница 69: ...ure 77 Network installation client No Windows administrator rights are needed for these functions Open M Print PRO 6 Clicking this button starts the M Print PRO program Create Desktop Link By clicking...

Страница 70: ...ttings at just one PC for example client PC 1 then you must also make them available to client PC 2 to client PC N With the following function you can share these settings with the other client PCs au...

Страница 71: ...RO via the program icon on the desktop or via Start Programs Weidm ller M Print PRO Figure 79 M Print PRO program icon on the desktop The first time you start M Print PRO a window appears in which you...

Страница 72: ...1 4 04 17 Figure 81 M Print PRO key type 3 Choose the license key type and click the Next button Figure 82 M Print PRO registration 4 Enter the 11 digit license key shown on the case of the DVD that c...

Страница 73: ...u do not want registration click the Next button Figure 83 M Print PRO finishing the installation process 7 To complete activation press the Finish button 4 16 Setting up and adjusting a MultiCard for...

Страница 74: ...g a print test When you have turned on the printer run a print test Follow these steps Figure 84 Touch panel main menu 1 Touch the TEMPLATES button on the touch panel s main menu 2 Choose a template t...

Страница 75: ...Setup 1449820000 1 4 04 17 75 Figure 85 Touch panel templates 3 Insert the MultiCard 4 Touch the PRINT button to run the print test...

Страница 76: ......

Страница 77: ...g material dependent slip 89 5 2 5 Adjusting MultiCards 91 5 2 6 Printing MultiCards MetalliCards 95 5 2 7 Curing settings Heating level 95 5 2 8 Selecting the print quality 95 5 3 Touch panel 96 5 3...

Страница 78: ...le that the printhead is cleaned optimally If the printer is turned off or is not used this can lead to blockage of the ink nozzles after some time Print some MultiCards MetalliCards every week This i...

Страница 79: ...1 Before inserting the MetalliCard in the inlay remove the protective plastic film that is attached to the MetalliCard 2 Clean the MetalliCard with a moist cloth Primer CC M 1341200000 3 Hold the Meta...

Страница 80: ...MetalliCard inlay A One at a time 5 1 4 Processing a stack of MultiCards Important information Only MultiCards are allowed to be inserted in stacks not MetalliCards You can insert a stack of up to 30...

Страница 81: ...e printed MultiCard can be cleaned with cold water and used again Important information The MultiCard is not cured in this process The ink can be wiped off easily Make sure that you do not get your cl...

Страница 82: ...type e g DEK 5 5 Calibration must be carried out once for the printer as this is a printer specific zero point Assigning a printer Figure 93 Selecting a MultiCard 1 Choose e g MultiCard Terminal Marke...

Страница 83: ...3 Figure 94 Selecting the printer 5 Select the PrintJet ADVANCED printer that has been added 6 Press the Map button Figure 95 Mapping the printer 7 In the dialog box that follows choose As Printer and...

Страница 84: ...of the DEK 5 5 MultiCard to this printer If you press the Yes button all versions of the MultiCard type DEK 5 5 are assigned to the PrintJet ADVANCED and are always output on this printer unless this...

Страница 85: ...iCard in the printer also see section 5 1 2 Inserting MultiCards MetalliCards 11 Click the Print Coordinate Plane button 12 Measure the X and Y values as shown below and enter them in the correspondin...

Страница 86: ...is in the following position on the printed MultiCard Figure 100 Position of the coordinate plane 14 Check this by printing a coordinate plane with the corrected values 15 Save the settings by clicki...

Страница 87: ...nter Settings Set Printer Correction 2 Insert for example a DEK 5 5 MC 10 NEUTRAL WS MultiCard in the printer also see section 5 1 2 Inserting MultiCards MetalliCards Figure 101 Setting the printer co...

Страница 88: ...rinter must output the rectangle 0 22 larger in order to reach the required output size 7 To check the dimensions insert a DEK 5 5 MC 10 NEUTRAL WS MultiCard in the printer again 8 Press the Print Adj...

Страница 89: ...hoose Tools Printer Settings Set Material Dependent Slip 2 Insert for example a DEK 5 5 MC 10 NEUTRAL WS MultiCard in the printer also see section 5 1 2 Inserting MultiCards MetalliCards Figure 103 Se...

Страница 90: ...fields In the example above the measured values are 227 x 46 The printer must output the rectangle 0 44 larger in order to reach the required output size 7 To check the dimensions insert a DEK 5 5 MC...

Страница 91: ...nges The adjustment must be set for every MultiCard type 1 From the menu bar choose File Adjust Marker Type Figure 105 Adjusting the marker type 2 Measure the width X from the beginning of the first p...

Страница 92: ...set Figure 106 Adjusting the offset 5 Insert for example a DEK 5 5 MC 10 NEUTRAL WS MultiCard in the printer also see section 5 1 2 Inserting MultiCards MetalliCards 6 Click the printer icon The print...

Страница 93: ...n this example the squares have to be shifted to the right Consequently a positive value must be entered 1 mm in this example Example of an incorrect zero point in the Y direction offset b Figure 109...

Страница 94: ...If printing is increasingly shifting from marker to marker from the center to the left it is necessary to add the measured value to the current value for Width X in the Adjust Marker Type window see...

Страница 95: ...t to print 4 Insert the MultiCard MetalliCard or the MultiCard stack 5 Start printing via M Print PRO It is also possible to store the print job on a USB stick and insert this stick directly in the pr...

Страница 96: ...artridges view and delete print jobs and carry out maintenance You can also set the required language for the touch panel and print out sample templates The touch panel displays prompts to change the...

Страница 97: ...int USB Edit Print SYSTEM INFO Page 1 Printer name IP address Language USB port Change printer name Change IP address Change subnet mask Activate Deactivate DHCP Select language Select USB port SYSTEM...

Страница 98: ...le above the printer is Ready Pressing one of the four buttons TEMPLATES PRINT JOBS TOOLS and SYSTEM INFO takes you to the corresponding submenu The bottom part of the main menu shows the ink level of...

Страница 99: ...the next page Touching this arrow button displays the previous page Touching this button takes you back to the main menu The currently selected menu for example System Info is shown at the top of the...

Страница 100: ...nu items 5 3 5 Changing the printer name The preset printer name is always the serial number You can assign a self explanatory name to the printer to be able to identify it better Follow these steps 1...

Страница 101: ...ace character with the Space key You can switch to numeric keys with the 123 key Figure 116 Touch panel System Info 1 printer name 3 In this window you can enter the required data via the numeric keys...

Страница 102: ...ess and subnet mask In the case of dynamic IP address assignment via DHCP the printer might have a different IP address when it is restarted If you choose DHCP the IP address and its subnet mask are a...

Страница 103: ...Subnet mask 3 Change the network parameters and touch the SAVE button to confirm the changes You can delete the entire entry with the X key The following window appears Figure 118 Touch panel System...

Страница 104: ...TEM INFO button on the main menu 2 In the first System Info window touch the IP ADDRESS button The following window appears Figure 119 Touch panel System Info 1 IP address subnet mask DHCP 3 Touch the...

Страница 105: ...utton The following window appears Figure 120 Touch panel language 2 Choose the required language by touching the corresponding button Touch this button to scroll forward to the next page and addition...

Страница 106: ...automatically assigned to this printer too A different USB port must therefore be assigned manually to the second printer e g USB 002 or USB 003 Proceed as follows to make this change 1 In the first...

Страница 107: ...k cartridge 1 In the second System Info window touch the INK LEVEL button The following window appears Figure 122 Touch panel System Info ink level 2 If you enter the respective color a window opens w...

Страница 108: ...tem Info window touch the PROTOCOL button The following window appears Figure 124 Touch panel System Info protocol 2 If you touch the DETAILS button detailed information about the message and if neces...

Страница 109: ...Info window touch the INFORMATION button The following window appears Figure 126 Touch panel System Info information Information about the PrintJet ADVANCED is displayed here e g which firmware versi...

Страница 110: ...12 Tools If you touch the TOOLS button on the main menu you can carry out the following maintenance tasks Figure 127 Touch panel Tools You will find a description of the individual maintenance tasks...

Страница 111: ...elete print jobs if for example the wrong file was sent to the printer Figure 128 Touch panel Print Jobs This window shows all pending print jobs 1 Select the print job that you want to delete by touc...

Страница 112: ...n on the touch panel s main menu Figure 129 Touch panel templates Under TEMPLATES you will find sample templates e g for printing tests 2 Touch the template that you want to print 3 Insert the corresp...

Страница 113: ...print data on a USB stick and output it on the PrintJet ADVANCED 1 Touch the TEMPLATES button on the touch panel s main menu Figure 130 Touch panel templates Figure 131 Connection USB stick 2 Insert t...

Страница 114: ...Touch panel templates The print files on the USB stick are displayed You create print files in M Print PRO by choosing PJA File Output as the printer for details see the M Print PRO user manual 4 Tou...

Страница 115: ...s 124 6 3 Replacing the wastepad 130 6 4 Replacing the dust filter 132 6 5 Cleaning the printer enclosure 133 6 6 Cleaning the touch panel 133 6 7 Updating the printer software 134 6 8 Replacing the c...

Страница 116: ...ng and maintenance 116 1449820000 1 4 04 17 6 1 Tools menu Figure 133 Touch panel main menu 1 Touch the TOOLS button in the main menu The following screen is then displayed Figure 134 Touch panel tool...

Страница 117: ...int quality correct Print quality insufficient 1 Touch the TOOLS button in the main menu 2 Touch the HEAD CLEANING button in the Tools menu The following window appears Figure 135 Touch panel printhea...

Страница 118: ...4 Print out a MultiCard If the printing result is still not satisfactory execute printhead flushing 6 1 2 Printhead flushing If you have carried out printhead cleaning and the printing result is stil...

Страница 119: ...nel printhead flushing Touch the NO button if printhead flushing should not be executed 3 Touch the YES button if printhead flushing should be executed Printhead flushing takes approx 5 minutes The fo...

Страница 120: ...etalliCard passes through 1 Insert a MultiCard in the printer 2 Touch the TOOLS button in the main menu 3 Touch the SENSOR CHECK button in the Tools menu The following window appears Figure 139 Touch...

Страница 121: ...9820000 1 4 04 17 121 Figure 140 Touch panel sensor check in progress A status page is subsequently displayed which presents the sensors and shows whether they are correct or not Contact a service tec...

Страница 122: ...To see if this is the case execute a nozzle check 1 Touch the TOOLS button in the main menu 2 Touch the NOZZLE CHECK button in the Tools menu The following window appears Figure 141 Touch panel select...

Страница 123: ...el inserting a MultiCard for the nozzle check Touch the CANCEL button to cancel the process 5 Insert the selected MultiCard into the loader 6 Touch the PRINT button The following screen is displayed d...

Страница 124: ...a faulty ink feed system Never use out of date ink cartridges When the use by date of the ink approaches printed on the packaging a message is displayed at the touch panel Replace the specified ink ca...

Страница 125: ...an be displayed at the touch panel if necessary replace the ink cartridges 1 Select the SYSTEM INFO button in the main menu 2 Change to the second page of the System info 3 Touch the INK LEVEL button...

Страница 126: ...f date Important components can become blocked and the printer may be damaged if you touch the Yes button and continue to print with the out of date ink cartridge Damages due to the use of out of date...

Страница 127: ...Cleaning and maintenance 1449820000 1 4 04 17 127 The following information is displayed after touching the INFORMATION button Figure 146 Touch Panel note ink expired...

Страница 128: ...d by pressing the finger recess A Figure 148 Removing the ink cartridge 2 Remove the ink cartridge which must be replaced by extracting it horizontally Information on inserting ink cartridges The ink...

Страница 129: ...s A Black ink cartridge K B Cyan ink cartridge C C Magenta ink cartridge M D Yellow ink cartridge Y 3 Remove the ink cartridge from its packaging Figure 151 Inserting an ink cartridge 4 Insert the ink...

Страница 130: ...that it is full Proceed as follows for more information 1 Touch the SYSTEM INFO button on the main menu 2 Change to the second page of the System Info 3 Touch the PROTOCOL button Figure 152 Touch pane...

Страница 131: ...ad The complete tray must be replaced Dispose of the wastepad through an authorized dealer or at a suitable hazardous materials disposal center Check local regulations before attempting to dispose of...

Страница 132: ...horizontally 6 4 Replacing the dust filter Replace the dust filter if it is soiled Figure 157 Removing the filter cover 1 Remove the filter cover A by e g inserting a slotted screwdriver into the rece...

Страница 133: ...outside of the printer enclosure using a soft dry or slightly moistened cloth NOTE Do not use volatile chemicals such as benzene thinning fluid or insecticide on the printer The use of such chemicals...

Страница 134: ...Jet ADVANCED and then Administration Figure 159 M Print PRO updating the printer software 7 Select the update file in the example above it is the update zip file 8 Click on the Start printer update bu...

Страница 135: ...able gloves User manual DANGER Electrical hazard warning Touching live parts is a direct risk to life Disconnect the printer from the grid prior to maintenance work 1 Turn the printer off see section...

Страница 136: ...mechanism Figure 165 Unlocking the cleaning unit 6 Insert a screwdriver in the printhead unlocker B and turn the printhead A 90 counterclockwise so that it reaches the unlocking position see Figure 1...

Страница 137: ...ntains two cloths to clean the two printheads To clean the printheads properly use a separate new cloth for each printhead Figure 169 Cleaning printhead A 10 Clean printhead A with one of the cloths p...

Страница 138: ...aning unit with the screws A and B Figure 173 Fastening the hose 14 Reattach the hose A to the mechanical connector B Figure 174 Reconnecting the connectors 15 Reconnect the connectors A and B 6 8 5 C...

Страница 139: ...rinter back on see section 4 9 Turning the printer on off 6 9 Replacing the cleaning fluid bottle Replace cleaning fluid bottle PrintJet Cleaner 100ML part number 25182100000 if it is empty Figure 177...

Страница 140: ...Cleaning and maintenance 140 1449820000 1 4 04 17 Figure 180 Reattaching the hood 4 Reattach the hood A over the cleaning fluid bottle B...

Страница 141: ...Troubleshooting 1449820000 1 4 04 17 141 7 Troubleshooting 7 1 General information 142 7 2 General troubleshooting 142 7 3 List of events 144...

Страница 142: ...tus Has the printer not been used for a long time The ink might have dried up or the printhead nozzles are blocked 1 Execute a nozzle check see section 6 1 4 Executing a nozzle check 2 If necessary cl...

Страница 143: ...ing an original Weidm ller ink cartridge or if you are using a refilled cartridge Opening the ink tank lid during the print process Printing is canceled if the ink tank lid is opened during the printi...

Страница 144: ...n therefore only be replaced by a service technician If the internal ink collector unit is full the printer stops the operation in order to prevent print system malfunctions Only qualified service tec...

Страница 145: ...tem malfunctions 10075 The YELLOW ink cartridge Y is nearly empty The ink cartridge is nearly used up Make sure that a new ink cartridge is available The order number is 1338650000 If the ink cartridg...

Страница 146: ...cept any responsibility for the quality or reliability of expired ink cartridges Servicing or repairs to the device that are necessary as a result of expired ink cartridges are excluded from the warra...

Страница 147: ...338680000 Only use original PrintJet ADVANCED ink cartridges Please contact your Weidm ller representative if the error persists 40004 Faulty MAGENTA ink cartridge M Restart the printer Replace the MA...

Страница 148: ...ease contact your Weidm ller representative if the error persists 40174 Faulty MAGENTA ink cartridge M Restart the printer Replace the MAGENTA ink cartridge M The order number is 1338670000 Only use o...

Страница 149: ...11 The ink collector unit is full Replace the ink collector unit The order number is 1338710000 If the ink collector unit is full you can no longer continue to print Do not open the wastepad The compl...

Страница 150: ...f the error persists Only use original PrintJet ADVANCED ink cartridges Printer faults and damage caused by the use of unapproved and unsuitable accessories and consumables are excluded from the warra...

Страница 151: ...Transporting the printer 1449820000 1 4 04 17 151 8 Transporting the printer 8 1 Decommissioning the printer 152 8 2 Packing the printer 152 8 3 Disposing of the printer 153...

Страница 152: ...the output rail 8 2 Packing the printer Important information Only use the original packaging when transporting or dispatching the printer over long distances e g relocating Only then can the best pr...

Страница 153: ...ck the printer in the original packaging see section 8 2 Packing the printer 3 Send the printer to your Weidm ller sales agent through a parcel service Weidm ller will then professionally recycle and...

Страница 154: ......

Страница 155: ...Annex 1449820000 1 4 04 17 155 9 Annex 9 1 Technical data 156 9 2 Ordering data 157 9 3 Declaration of conformity 158 9 4 List of figures 159 9 5 List of tables 164...

Страница 156: ...t hand fuse 10 AHT 240 120 V Left hand fuse 2 5 AHT 240 120 V Operating location Office conditions Ambient temperature 10 C 35 C 50 F 95 F Dimensions L x W x H Length including output rail Length with...

Страница 157: ...NTK INK K Black ink cartridge 1338690000 PJ ADV TNTK INK C Cyan ink cartridge 1338680000 PJ ADV TNTK INK M Magenta ink cartridge 1338670000 PJ ADV TNTK INK Y Yellow ink cartridge 1338650000 PJ ADV TNT...

Страница 158: ...ntal principles for the health and safety of machinery as stipulated by the following EU directives 2014 35 EU Low Voltage Directive 2014 30 EU Electromagnetic Compatibility EMC The Declaration of Con...

Страница 159: ...igure 21 Touch panel language selection 38 Figure 22 M PRINT PRO Installation Language setting 39 Figure 23 M PRINT PRO Installation Start menu 40 Figure 24 M PRINT PRO Installation software 40 Figure...

Страница 160: ...arget directory 59 Figure 62 Network installation choosing directories 60 Figure 63 Starting network installation 61 Figure 64 M Print PRO status of the network installation 62 Figure 65 Finishing net...

Страница 161: ...the X direction 93 Figure 109 Adjusting the zero point in the Y direction 93 Figure 110 Adjusting the centering in the X direction 94 Figure 111 Adjusting the centering in the Y direction 94 Figure 11...

Страница 162: ...s of the ink cartridges 129 Figure 151 Inserting an ink cartridge 129 Figure 152 Touch panel System Info protocol 130 Figure 153 Touch panel System Info protocol 131 Figure 154 Opening the ink tank li...

Страница 163: ...04 17 163 Figure 177 Removing the hood 139 Figure 178 Unscrewing the bottle out of the top 139 Figure 179 Screwing the bottle into the top 139 Figure 180 Reattaching the hood 140 Figure 181 Switching...

Страница 164: ...Annex 164 1449820000 1 4 04 17 9 5 List of tables Table Page Table 1 Folder structure and meaning 68 Table 2 Technical data 156 Table 3 Ordering data 157...

Страница 165: ......

Страница 166: ...ntenegro Singapore Slovakia Slovenia Spain South Africa South Korea Syria Taiwan Thailand Czech Republic Turkey Ukraine Hungary Uruguay USA UAE Venezuela Vietnam Belarus Weidm ller is the leading manu...

Отзывы: