Wegener Nielsen NAVE IIc Скачать руководство пользователя страница 2

NAVE


II

Q

UICK 

S

TART 

G

UIDE


800026-02 Rev. A 

2


www.wegener.com


f. 

The 

Alarm

 port (

G

Figure 1

) on the rear panel may be used to provide 

a contact closure during alarm conditions or power failure. See the 

NAVE IIc


User’s Manual

 for complete connector and signal details.  

CAUTION:


Do not connect devices to the mouse, keyboard, or other 
connectors not 
described here. They are for factory use only.


5. 

Next, start the


NAVE IIc


as follows:


a. Press 

and hold the 

ENTER/POWER

 button on the front panel for two 

seconds. The 

NAVE IIc

 will power up and begin the boot process.  

Six of the nine LED indicators flash on and off as the unit begins 
initialization; 

Tx

Rx

 and 

System Bypass

 will not flash. The boot 

process will take approximately 

50 seconds

 to complete.


Note: 

To easily restart the 

NAVE IIc

 any time after a normal power down, 

simply press the 

ENTER/POWER

 button on the 

NAVE IIc

’s front panel. 

(Refer to the 

User's Manua

l for details.) If power is lost to the 

NAVE IIc


because of an interruption of service, the 

NAVE IIc

 will automatically 

power itself back on. 
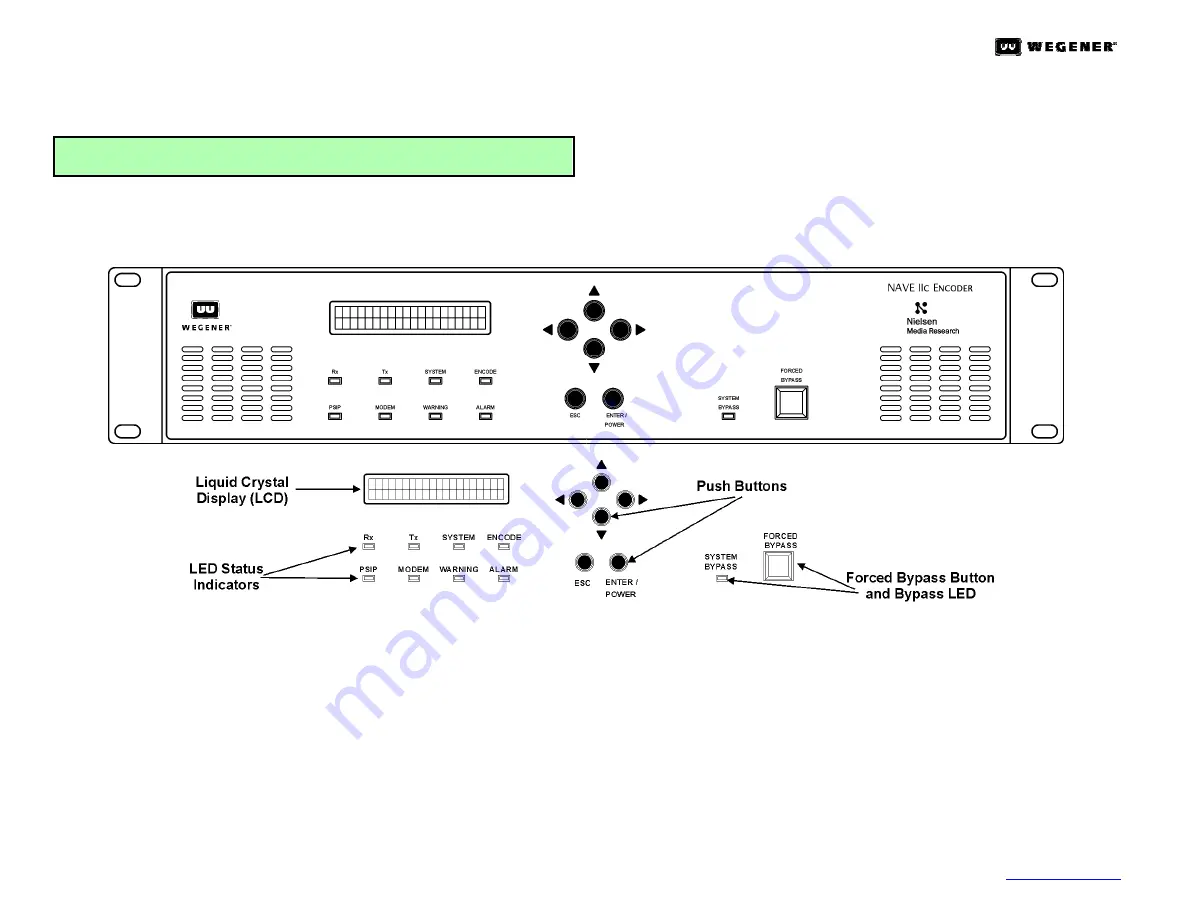
Figure 2: 

NAVE IIc

 Front-Panel Controls and Indicators


6.  Get to know the NAVE IIc's front panel. 

a. 

The 

Liquid Crystal Display

 (

LCD

) provides 

menu

data

, and 

input 

screens

 to the user. 

Menu screens

 are entry points to additional 

screens. These may be 

data screens

 that display signal or unit status 

information, or 

input screens

 where settings can be changed by the 

user.


b. 

The 

NAVE IIc

’s "

Home

" screen displays the unit's input/output stream 

type (

ASI

 or 

SMPTE310M

), the 

TSID

 number (in hex) as read from the 

input source, and a scrolling line that displays the current SID 
configuration(s) (once the unit is configured). This "

Home

" screen may 

be reached at any time by repeatedly pressing the 

ESC

 button.


7. Menu 

Navigation 

a. 

Six pushbuttons allow you to move through the various screens, select 
characters for input, and accept or reject changes. To move down or up 
through the menu screens, use the 

ENTER/ POWER

 and 

ESC

 buttons. 


b. 

To enter or change data in editable fields (indicated by 

<>)

, press the 

ENTER/ POWER

 button and use the up 

U

 and down 

V

 arrow buttons to 

increment the underlined character or digit. Use the right 

Z

 and left 

Y


arrow buttons to move to adjacent digits and press 

ENTER/POWER


again to accept your input. Pressing 

ESC

 will cancel any changes.


c. 

Figure 3

 is a summary of the top-level menus available through the 

Front Panel Interface

 of the 

Encoder

. See the 

NAVE IIc

 User’s Manual


for complete Front Panel menu description and operation.


Содержание Nielsen NAVE IIc

Страница 1: ... com 1 Remove the NAVE IIc ac power cord and CD ROM Manual from the shipping carton Call your shipping carrier immediately if any damage is discovered 2 Remove the clear plastic covering from around the bottom of the unit and over the LCD window on the front panel 3 Place the NAVE IIc indoors on a well supported flat table or desktop or mount it in a standard equipment rack If rack mounting your N...

Страница 2: ...l a The Liquid Crystal Display LCD provides menu data and input screens to the user Menu screens are entry points to additional screens These may be data screens that display signal or unit status information or input screens where settings can be changed by the user b The NAVE IIc s Home screen displays the unit s input output stream type ASI or SMPTE310M the TSID number in hex as read from the i...

Страница 3: ...d Constant A warning has been issued recently See error log for details Warning Yellow Off No current Warning condition exists Table 1 Front Panel LED Indicator Descriptions Continued LED Label LED Color LED STATE Meaning Constant An error has occurred See error log for details Alarm Red Off No current Alarm condition exists Constant The encoder is in firmware bypass mode System Bypass Red Off No ...

Страница 4: ...essage APPLYING IP SETTINGS PLEASE WAIT and then display the new DHCP assigned IP address g If you need a Static IP address but a different IP address or Subnet Mask than the default settings then use Z to move one screen to the right until you see the screen with IP ADDRESS with the default address below it NOTE For IP addresses that include subfields with leading zeros you must enter those zeros...

Страница 5: ... entered as capital letters If your transmission has more than one program in it you must assign the correct SID for the correct program content NOTE The Nielsen Encoder Support Group will supply this information to you b Next select how you want to assign the SID you can choose Major Minor Program Number or Audio PID from a drop down selection box c Depending on the Selection Mode chosen in Step ...

Страница 6: ...asswords Page Name User Name Password SID Assignment config config Configuration config config Service service service The Service User Name and Password provide access to all password protected pages Users with config privileges have access to the SID Assignment and Configuration pages which handle the normal unit and data stream configuration processes 11 Completing the NAVE IIc Encoder Configur...

Страница 7: ...eral purpose input 3 General purpose input 4 General purpose input 5 General purpose input 6 User Relay N C contact User Relay COM contact User Relay N O contact GND Alarm N O contact OK COM closes here when unit OK Alarm COM contact Alarm N C contact Alarm COM closes here on alarm or if power is off GND Table 5 NAVE IIc Encoder Interconnect Descriptions Continued Connector Label Connector Type Pi...

Страница 8: ... Network window in order to install the adapter TCP IP or Client for Microsoft Networks A 2 2 If you need the Ethernet Network Adapter a Click Add b Select Adapter then click Add again c Select the manufacturer and model of your Ethernet adapter and click OK A 2 3 If you need TCP IP a Click Add b Select Protocol then click Add again c Select Microsoft d Select TCP IP and click OK A 2 4 If you need...

Страница 9: ...sh to configure Select Properties e The LAN Properties dialog window appears A 4 2 Setting the Encoder s TCP IP Address a Select Internet Protocol TCP IP b Click Properties The Internet Protocol Properties dialog window appears c Select the Use the following IP address radio button d Enter the static IP address 10 61 62 62 in the first field e Enter the Subnet Mask 255 255 255 0 in the second fiel...

Страница 10: ...riod of one year after shipment to customer WEGENER s obligation under this warranty is limited to repairing or at WEGENER s option replacing parts subassemblies or entire assemblies WEGENER shall not be liable for any special indirect or consequential damages This warranty does not cover parts or equipment which have been subject to misuse negligence or accident by the customer during use All shi...

Отзывы: