Wegener Nielsen NAVE IIc Скачать руководство пользователя страница 1

www.wegwner.com


800026-02 Rev. A 

 NAVE 

IIc 


Nielsen Audio Video Encoder 

Compressed  


Quick Start Guide


Welcome to your 

NAVE IIc Nielsen Compressed Audio Video Encoder

! The 

WEGENER NAVE IIc

 Nielsen encoder expands upon Nielsen’s audio-coding 

capabilities by supporting the ability to code a pre-compressed MPEG-2 
transport stream. The 

WEGENER NAVE IIc

 encoder will insert Nielsen data into 

MPEG-2 Multi-Program Transport Streams compliant with the US ATSC 
standards. This 

Quick Start Guide 

will help you quickly set up and start 

operating your 

NAVE IIc using the Web Interface

. For a full description of the 

NAVE IIc

's abilities and detailed installation and operation instructions, please 

consult the 

NAVE IIc User's Reference Manual

 available on CD or on the 

worldwide web at 

www.wegener.com

For additional help, contact us by phone at (770) 814-4057, by fax at 
(678) 624-0294, or by email at 

[email protected]

For questions about SID support, please contact the Nielsen Encoder Support 
by phone at (800) 437-4872, or by email at 

[email protected]

1. 

Remove the


NAVE IIc

, ac power cord, and CD-ROM (Manual) from the 

shipping carton. Call your shipping carrier immediately if any damage is 
discovered. 

2. 

Remove the clear plastic covering

 from around the bottom of the unit and 

over the LCD window on the front panel.


3. 

Place the NAVE IIc

 indoors on a well-supported, flat table or desktop or 

mount it in a standard equipment rack. If rack-mounting your 

NAVE IIc

please consult the 

NAVE IIc User's Reference Manual

 for detailed 

instructions and specific cautions.
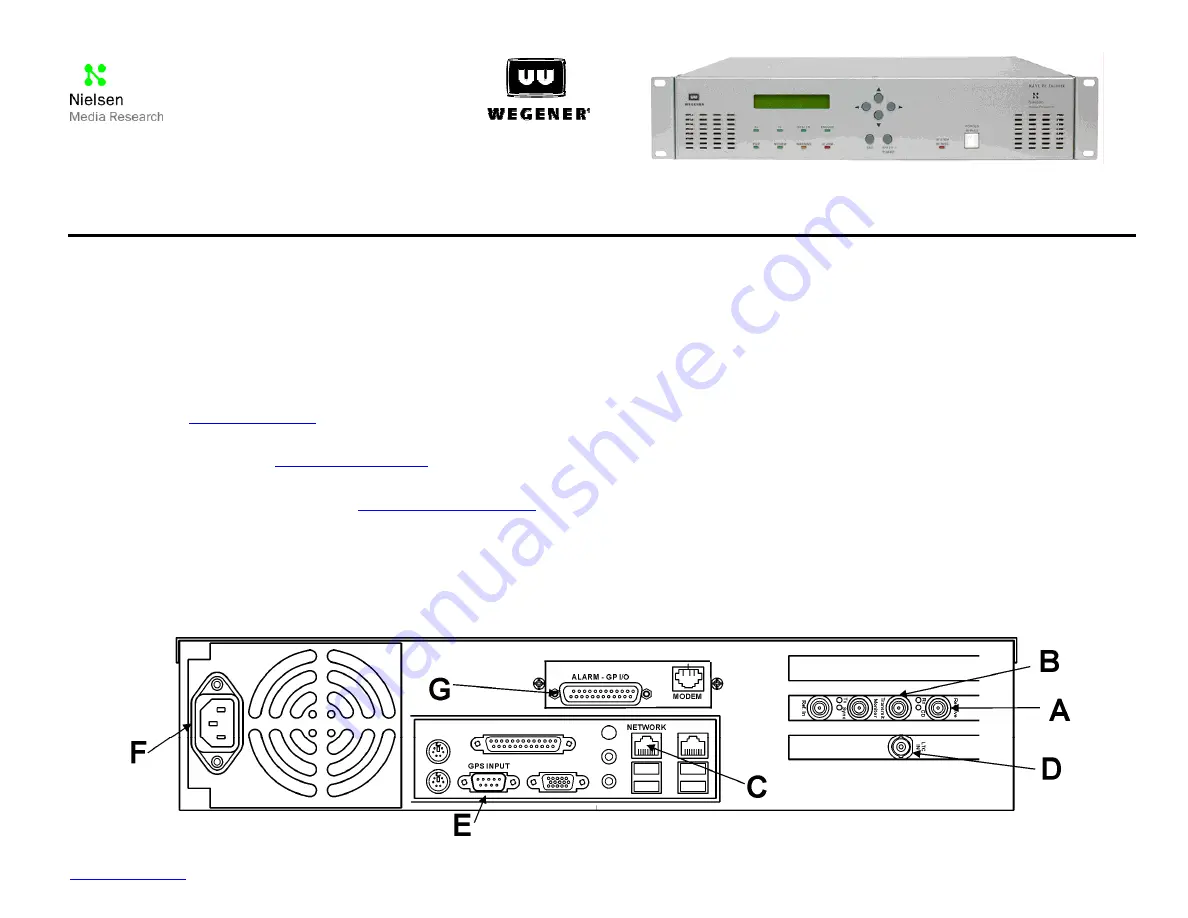
 

4. C

onnect the following items:

 (Refer to Figure 1.)


a. 

The output from your DTV Encoder or Stream Splicer to the Receive 
input female BNC connector (

A

). 

b. 

The output from the NAVE IIc, Transmit out female BNC connector (

B

), 

to your DTV transmitter or modulator.   

c. 

Your LAN line to the 

NAVE IIc

 's Network port (

C

), 10/100/1000baseT; 

female RJ-45 connector. See step 8 for Network port configuration. 

d. 

Your time reference source, of your chose, to one of the following 
ports; NTP (

C

), SMPTE LTC (

D

)  or GPS (

E

e. 

Connect the ac power cord to the 

NAVE IIc

 's IEC receptacle (

F

) and 

to a 100-to-120-Vac or 200-to-240-Vac source. We strongly 
recommend that you connect the NAVE IIc unit to an 

un-interruptible 

power supply.


Figure 1: 

NAVE IIc

 Rear-Panel Connectors 


Содержание Nielsen NAVE IIc

Страница 1: ... com 1 Remove the NAVE IIc ac power cord and CD ROM Manual from the shipping carton Call your shipping carrier immediately if any damage is discovered 2 Remove the clear plastic covering from around the bottom of the unit and over the LCD window on the front panel 3 Place the NAVE IIc indoors on a well supported flat table or desktop or mount it in a standard equipment rack If rack mounting your N...

Страница 2: ...l a The Liquid Crystal Display LCD provides menu data and input screens to the user Menu screens are entry points to additional screens These may be data screens that display signal or unit status information or input screens where settings can be changed by the user b The NAVE IIc s Home screen displays the unit s input output stream type ASI or SMPTE310M the TSID number in hex as read from the i...

Страница 3: ...d Constant A warning has been issued recently See error log for details Warning Yellow Off No current Warning condition exists Table 1 Front Panel LED Indicator Descriptions Continued LED Label LED Color LED STATE Meaning Constant An error has occurred See error log for details Alarm Red Off No current Alarm condition exists Constant The encoder is in firmware bypass mode System Bypass Red Off No ...

Страница 4: ...essage APPLYING IP SETTINGS PLEASE WAIT and then display the new DHCP assigned IP address g If you need a Static IP address but a different IP address or Subnet Mask than the default settings then use Z to move one screen to the right until you see the screen with IP ADDRESS with the default address below it NOTE For IP addresses that include subfields with leading zeros you must enter those zeros...

Страница 5: ... entered as capital letters If your transmission has more than one program in it you must assign the correct SID for the correct program content NOTE The Nielsen Encoder Support Group will supply this information to you b Next select how you want to assign the SID you can choose Major Minor Program Number or Audio PID from a drop down selection box c Depending on the Selection Mode chosen in Step ...

Страница 6: ...asswords Page Name User Name Password SID Assignment config config Configuration config config Service service service The Service User Name and Password provide access to all password protected pages Users with config privileges have access to the SID Assignment and Configuration pages which handle the normal unit and data stream configuration processes 11 Completing the NAVE IIc Encoder Configur...

Страница 7: ...eral purpose input 3 General purpose input 4 General purpose input 5 General purpose input 6 User Relay N C contact User Relay COM contact User Relay N O contact GND Alarm N O contact OK COM closes here when unit OK Alarm COM contact Alarm N C contact Alarm COM closes here on alarm or if power is off GND Table 5 NAVE IIc Encoder Interconnect Descriptions Continued Connector Label Connector Type Pi...

Страница 8: ... Network window in order to install the adapter TCP IP or Client for Microsoft Networks A 2 2 If you need the Ethernet Network Adapter a Click Add b Select Adapter then click Add again c Select the manufacturer and model of your Ethernet adapter and click OK A 2 3 If you need TCP IP a Click Add b Select Protocol then click Add again c Select Microsoft d Select TCP IP and click OK A 2 4 If you need...

Страница 9: ...sh to configure Select Properties e The LAN Properties dialog window appears A 4 2 Setting the Encoder s TCP IP Address a Select Internet Protocol TCP IP b Click Properties The Internet Protocol Properties dialog window appears c Select the Use the following IP address radio button d Enter the static IP address 10 61 62 62 in the first field e Enter the Subnet Mask 255 255 255 0 in the second fiel...

Страница 10: ...riod of one year after shipment to customer WEGENER s obligation under this warranty is limited to repairing or at WEGENER s option replacing parts subassemblies or entire assemblies WEGENER shall not be liable for any special indirect or consequential damages This warranty does not cover parts or equipment which have been subject to misuse negligence or accident by the customer during use All shi...

Отзывы: