background image

Installaction & User Manual   


38 


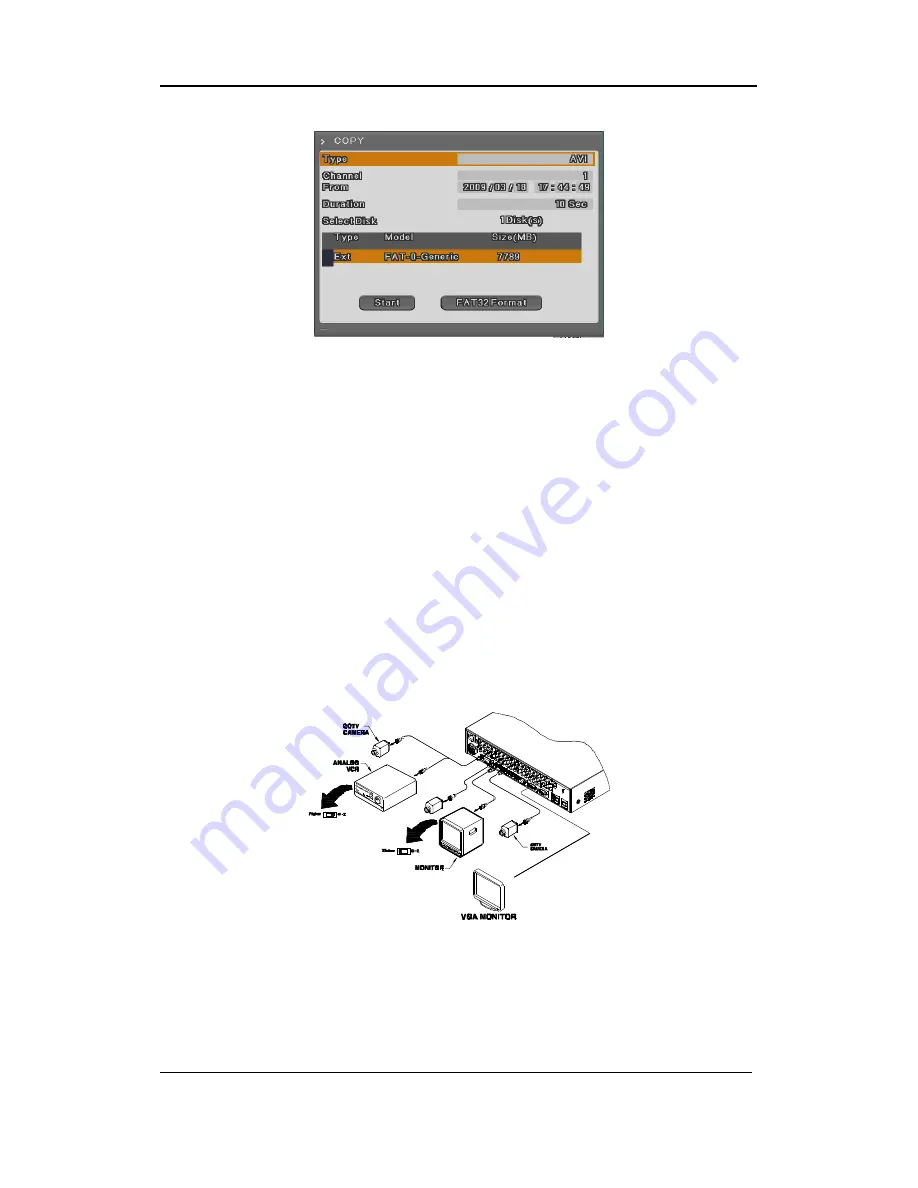
[AVI Copy] 


<Reference> 

A  USB  Flash  memory which  should install  additional program  on  Windows OS,  can not 

be recognized. 


2.3.3.6 Video In/Out connection 

Video  Input/Output is  Loop  through  and check the  connectivity  automatically  and  set  end 

resistance. 

For instance, if connected by Video input, end resistance is configured by75Ω and if 

Video  in/output  is  same,  it  will  be  Hi-z  mode.  Therefore,  in  case  that  Input/Outut  are 

connected  at  the  same  time,  end  resistance  of  device  receving  output  should  be 

configured by 75Ω. 


2.3.3.7 Audio In/Out connection 

There are 4 RCA Auido Input and and 12 D-sub Audio input and 1 RCA output. 


Содержание MH1600H

Страница 1: ...Video Recorder Installation User Manual We sincerely appreciate purchasing Digital Video Recorder For product connection and initial configuration please refer to the installation guide and for the p...

Страница 2: ...ranty and Limits of Responsibility The manufacturer does not assume any responsibility concerning the sale of this product and does not delegate any right to any third party to take any responsibility...

Страница 3: ...and used in accordance with the instruction manual may cause harmful interference to radio communications Operation of this equipment in a residential area is likely to cause harmful interference in...

Страница 4: ...metal Therefore you can hurt human beings if you throw it to them or hit on them When installing product be cautious to locate on safe places where children are unreachable 7 If Product does not oper...

Страница 5: ...overcurrent protection and supply wiring Appropriate consideration of equipment nameplate ratings should be used when addressing this concern E Reliable Earthing Reliable earthing of rack mounted equi...

Страница 6: ...2 INSTALLATION 19 2 1 Installation and Connection 19 2 1 1 Connecting Running 19 2 2 Running OSD menu 20 2 2 1 OSD menu configuration 20 2 2 2 Setting remote controller 22 2 2 3 Installation examples...

Страница 7: ...o Switch Mode 52 4 5 1 System Standard Mode 52 4 5 2 User Sequence Mode 52 4 6 Event Screen 53 4 7 Zoom Screen Mode 54 4 8 Pause Live Screen 54 4 9 PTZ Control 55 4 9 1 Pan Tilt 56 4 9 2 Zoom Focus 56...

Страница 8: ...N 65 6 1 Recording Structure 65 6 2 System Setup 65 6 2 1 Date Time 65 6 2 2 Disk 68 6 2 3 User Setup 70 6 2 4 Utility 72 6 3 Network 75 6 3 2 xDSL 77 6 3 3 WRS 77 6 4 Device Setup 78 6 4 2 Camera Set...

Страница 9: ...Sensor Indication 101 7 5 5 Relay operation 101 7 5 6 Using Microphone 101 7 5 7 Event Data 102 7 5 8 Video Recording Save Saving 102 7 5 9 Using PTZ 103 7 5 10 Using Audio 104 7 5 11 Closing Video Ch...

Страница 10: ...n User Manual 9 8 1 Log In page 109 8 2 Monitoring page 109 TROUBLE SHOOTING 111 THE WAY TO CHECK THE MANUFACTURING DATE 113 AVAILABLE HDD 114 COMPATITABLE CD DVD LIST 114 SPECIFICATION 114 PRODUCT DI...

Страница 11: ...ilable Input 4ch RCA 12ch D SUB Output 1ch Rear Simultaneous audio recording and playback available Recording It supports 480ips recording at H 264 High Resolution 4CIF and available to record max 5 s...

Страница 12: ...back up device DVD R CD R USB 1394b HDD external unit recordin unit for external capacity expension Network It supports variable network like LAN XDSL and easily control from remote site using PC clie...

Страница 13: ...n User Manual 12 Supports User friendly GUI and mouse function Easy and simple firmware upgrade thru USB memory PTZ Control SPEED DOME PRESET fucntion Available to control up to 16 DVRs with one remot...

Страница 14: ...Installaction User Manual 13 Install Manual 1 Feature 1 1 Supplied Accessories Unpack and check all the items as below AC Cord Remocon Setup CD HDD Fixing Clamp SATA Cable HDD Fixing Screw Rack Mount...

Страница 15: ...run copy mode Sequence To run or stop user sequence Multi To change DVISION in live or playback mode Select To run PTZ control panel Zoom To run digital zoom in live screen upto x2 Ack Stop buzz of ev...

Страница 16: ...To move or select in menu and change replay speed to reverse direction in playback mode 14 FWD To move or select in menu and change replay speed to forward direction in playback mode 15 Pause To move...

Страница 17: ...A connection for Audio input 6 Audio output Speaker output terminal 7 Ground Ground between DVR external device 8 Ethernet For network connection RJ 45 9 Storage For external HDD connection 10 eSATA p...

Страница 18: ...ntroller it is necessary to set ID first which want use Keep pressing ID button repetedely Up to Max 16 times and use it matching DVR ID No Iten Description 1 ID To select Remote Controller ID 2 LOCK...

Страница 19: ...e setting menu to bottom direction STOP 22 ENTER PLAY Menu selection Playback 23 ENTER To select menu 24 EXIT To cancel setting escape from menu 25 FAST REWIND Speedy replay to reverse direction 26 RE...

Страница 20: ...al s impedance 75 automatically Impedence is set as 75 basically If connecting a dvice to video output impedance will be Hi z status Video Type NTSC PAL should be changed after booting DVR The order o...

Страница 21: ...ts booting automatically In order to cut off power press power switch on DVR front during 5 seconds then select YES after appearing a pop up window For supplying power again push the Power button 2 2...

Страница 22: ...he selected tab is shown as orange To move to the previous next tab use the or arrow button and press Enter key for value setting Whn setting value is a word a dialogue box to edit the word will be op...

Страница 23: ...r button 4 Select Remote Control ID and press Enter 5 Select a value using arrow buttons and press ESC 6 Press the ESC button to return to the monitor mode Reference Up to 16DVRs can be controlled wit...

Страница 24: ...equired two AAA type batteries Please refer the following installation step 1 Remove the batter cover 2 Taking care the poles are correctly positioned 3 Replace the batter cover 2 2 3 Installation exa...

Страница 25: ...Installaction User Manual 24 2 2 3 3 External storage back up configuration Use USB for back up 2 2 3 4 Internet Intranet configuration 2 2 4 Basic Setting...

Страница 26: ...ed as not responding keypad on DVR front It is not from factory default 2 2 4 2 Setting Date Time Press MENU button and select System when OSD menu is appeared Select Date Time and press Enter button...

Страница 27: ...selecting a month week and day to define the start and end times of DST NTP 1 Select yes or no of using NTP 2 Select NTP mode among Client server Both using directional key or 3 Select Public or Both...

Страница 28: ...e Time settings confirm with Apply Date Time buttons 1 Select Apply Date Time using or arrow button and press Enter Then a warning message will be appeared as below image 2 Select using or arrow butto...

Страница 29: ...eference If recodrding setting is finished correctly REC LED in front is flickering In addition it is marked S indicating that all channels are recroding 2 3 Connecting and configuring DIO ports 2 3 1...

Страница 30: ...e in Terminal Block use a screw driver in the diagram like below 2 3 3 Conneting and configuaring sensor 2 3 3 1 Specification In order to run sensor input DVR normally the following conditions are re...

Страница 31: ...Press Menu button and select Event when OSD menu is appeared 2 Move to sub menu pressing Enter or using button and select Enter All Sensor It is used when setting for all sensors and set Off or Norma...

Страница 32: ...wire to terminal block Perfromance DC 30V 1A AC 125V 0 5A Connecting relay out Connect R1 R4 with referring to the following images it shows to connect a warning light Please refer the Wire Handling...

Страница 33: ...to connect PTZ camera and control it For a list of supported protocols please refer to the list on the OSD configuration menu The following figure shows how to connect PTZ camera to RS485 COM2 When u...

Страница 34: ...anufacturer Keyboard KBD300A WGI SPD1800 2600 Webgate WKC 100 keyboard Webgate BOSCH AutoDome TC8560X 4 Bosch PELCO P PELCO D Pelco Honeywell 755 655 HRX 2000 ScanDome2 Honeywell Sony EVI D3x Sony VT...

Страница 35: ...VT Elbex Elbex VIDO VIDO VICON Vicon Hunt Hunt ORX 1000 Sysmenia Fine CRR 1600 LiveEye Tokina Tokina Kodicom KRE Kodicom Nuvico Nuvico Serial Setting You can set up both serial port and PTZ from remot...

Страница 36: ...M1 RS232 TEXT DATA can be recorded with synchronizing POS ATM Like above picture connect COM1 RS232 9pin D Sub in Device menu and configure Serial and Text Serial COM1 Setup 1 OSD Select Device in OSD...

Страница 37: ...he shop 2 3 3 5 USB Device Connection USB port is for the simple video copy within 1 hour on USB Flash memory Its recommended specification is same as below USB Spec Ver 2 0 Device USB Memory Stick Vo...

Страница 38: ...Installaction User Manual 37 CD DVD Copy RE4 Copy Select the channel to copy...

Страница 39: ...he connectivity automatically and set end resistance 4 For instance if connected by Video input end resistance is configured by75 and if 5 Video in output is same it will be Hi z mode Therefore in cas...

Страница 40: ...vity of HDD 1 Press Enter button in Disk Manager 2 Using Key select new HDD Displayed No on Enabled item and press Enter 3 If you see the message for format select Yes 4 Press ESC and escape from Disk...

Страница 41: ...case you do not need to do format and delete the data How to use it Please install previous HDD in the DVR and go to Disk Manager menu and select the HDD that you wish to re use which is you just inst...

Страница 42: ...key or mouse wheel PPPoE Set type xDSL and move to xDSL menu First change Ethernet Port Please input ID and Password for PPPoE WRS After changing interval over 1 min register WRS address and product a...

Страница 43: ...cally eSATA is connected to DVR while DVR is running works properly However it depends on eSATA manufacturer Therefore we recommend below order for making connection 1 Power on DVR Connect external HD...

Страница 44: ...back This ID is used as IP Address of NVS04R and the form of IP address is 10 10 20 XXX when the user connect more than 2 units of NVS04R each ID should be set differently Set the ID using driver The...

Страница 45: ...e device starts booting Note 1 It takes around 1 minute to connect NVS04R and DVR after connecting power Four LEDs at the front starts blinking and they are fully on when connection is completed The H...

Страница 46: ...6 3 2 Function Menu To run Fucntion menu please click the right button of mouse or push Help button on the front panel The Function menu can be controlled by mouse Each function can be executed by cl...

Страница 47: ...Reset then the warning message will be appear click Yes to reset the DVR value to factory Default Value from Factory System Date Time Time Zone UTC 00 00 Dublin Daylight Saving Off NTP Function Korean...

Страница 48: ...yboard ID 1 Remote Controller ID All Language English Firmware Update System Log Factory Reset Network Network Type Ethernet DHCP Off IP addr Default IP Net Mask Default Net Mask Gateway Default Gatew...

Страница 49: ...Z Port None PTZ Address 0 Monitor Monitor Alarm Pop up Sec Off User Sequence Configuration SEQ Time Sec 5 Covert Multi Moce 4E VGA Moce 800x600 56Hz Infor Level Audio Audio Channel Audio Recording Aud...

Страница 50: ...ration 10 Sec Normal Event Source System Event Source Motion MD All Sensivity 2 Area Set All Sensor Sensor All N O Preset Channel Mumber Ch1 Preset Sensor1 Preset1 Record Record Record Mode Manual Eve...

Страница 51: ...ode Normal Event List Res Fps Q Res Fps Q Program A D1 30 Q5 D1 30 Q5 B D1 15 Q5 D1 15 Q5 C D1 7 Q5 D1 7 Q5 D Half 30 Q5 Half 30 Q5 E Half 15 Q5 Half 15 Q5 F Half 7 Q5 Half 7 Q5 G CIF 30 Q5 CIF 30 Q5...

Страница 52: ...ndow will be displayed 4 2 Single Fll Screen Mode Press the channel number wanted or click mouse button Press MULTI button to return to divisional screen 4 3 Multi Screen Mode Press MULTI for multi ch...

Страница 53: ...ng switching term or using mouse click menu icon from function menu Move to Device Monitor from OSD menu Select Seq Switching sec and set value from 1 sec to 60 sec At OFF set auto switch mode does no...

Страница 54: ...d the green color M and red color S will be display from status bar In case of M displayed the camera name will be turned to green color and it will turn to yellow when Motion Detection event finish I...

Страница 55: ...t to Off Alarm Pop up will not operate 2 If Alarm Pop up Hold sec set to Keep it does not return to previous screen before press any button 4 7 Zoom Screen Mode From single full screen mode press FUNC...

Страница 56: ...oDome TC8560X 4 Bosch PELCO P PELCO D Pelco Sony EVI D3x Sony VT VPT 4x VT AD SpeedDome AD SungJin SJ372R1 SungJin Samsung SCC641 Samsung Electric Panasonic WV CS850 Panasonic SDZ160 330 Samsung SPD K...

Страница 57: ...trol Pan Tilt through directional key at front part 4 9 3 Load Preset This menu is used to shift to Preset Set at real time monitoring mode Using up down button or mouse wheel to select the Preset Num...

Страница 58: ...ction of PTZ device Using up down button or mouse wheel to select the Aux Number Select Off and press Enter button or click from mouse 4 9 7 Menu It is to go into connected PTZ s menu using up down le...

Страница 59: ...mouse click Stop button in Function menu FWD Playback speed will be changed x1 x2 x4 x8 x16 x32 x64 x1 2 x1 x2 x4 in order If pushing FWD button in live view it plays back video 1 minute ago Playback...

Страница 60: ...d to the selected point Start REC Time The date and time of start recording End REC Time The latest date and time of the recording Search Time Select the range of date and time for Search Search Execu...

Страница 61: ...Time The latest date and time of the recording Search Start Time Input start date and time for search with direction button and push Enter and change the value by Up and Down button With mouse click...

Страница 62: ...ime Press Func to return to the search or use mouse wheel Select video Play back from the selected video of thumbnail search result With pressing Enter or clicking mouse use can play back 5 3 Copy Thi...

Страница 63: ...use wheel Select Disk Select the media to copy using Enter buttonr on Select Disk Start Start Copy Press Start button with Enter or click the left button of the mouse FAT32 format Format USB memory or...

Страница 64: ...or click mouse left button Start time Set start date or time to copy After selecting part for change and set the vaule using up down key or mouse wheel End time Set End date or time to copy After sel...

Страница 65: ...ime by up down button With mouse click left button first and use wheel Duration Set copy length Copy as selected time length from the start using up down key or mouse wheel Select disk Select media to...

Страница 66: ...he below each item for detailed recording configuration 6 2 System Setup Time and Disk and authority can be configured 6 2 1 Date Time Time set should be configured prior to the recording Time configu...

Страница 67: ...ht direction key or mouse wheel To return to previous menu press ESC or click right mouse button It is same as OSD menu Daylight saving This menu is synchronized with time zone configuration menu It m...

Страница 68: ...omatically To apply the changed value user must press apply button 6 2 1 2 NTP Setup NTP Network Time Protocol make time of connected devices synchronized There are NTP server and client which get tim...

Страница 69: ...e sync Caution If use NTP client mode user must set NTP on 6 2 2 Disk 7 It explains how to add or remove or format internal or external HDD Over Write Auto Deletion If there is no space in HDD old dat...

Страница 70: ...of disk Int A Internal A HDD Int B Internal B HDD Ext External HDD Model HDD model name Bad Blk display bad block In HDD If no proble 0 will be displayed Others are Not shown anything at all Size Disp...

Страница 71: ...emoved on the bottom and Enable status will be No HDD is not used If No keep previous HDD without change 6 2 2 2 Disk Status Temperature and status of HDD will be shown 6 2 3 User Setup There are admi...

Страница 72: ...el DVR user press 0 for figure 0 in case of 16 channel press button 10 Password change Select user Input password and press change Press Yes Password input box is displayed Password can be input with...

Страница 73: ...hority check Password error 6 2 4 Utility Configure the name of DVR remote controller ID Language DVR Alias Set the name of DVR DVR Keyboard ID This menu is to set the address of keyboard when using a...

Страница 74: ...controller Make remote controller direction to DVR Press ID button and figure in accordance with configured remote controller ID If IDs are matached correctly DVR buzzes Use Remote controller Language...

Страница 75: ...on User Manual 74 Factory Reset Change all configuration value by factory default Caution This function is allowed only for system administrator Encording Policy Recording Prior Networking Prior avail...

Страница 76: ...recording resolution Caution 1 The DVR will be re booting when user select Encording Policy 2 Recording performance will be reduce when user set the Recording Speed Quality andafter select the Networ...

Страница 77: ...should be configured Net Mask Net Mask makes range of IP address available It should be received from network administrator Gateway Gateway is necessary to communicate IP it should be received from n...

Страница 78: ...nected to Cable modem or xDSL modem IP address is changed at every connection to ISP In this case changed IP address can not be known If DVR using static IP register into WRS server changed IP address...

Страница 79: ...era connected to DVR There are name Status Color balck or white Brightness Contrast PTZ etc Caution NTSC and PAL camera can not be used at the same time If changing the camera from NTSC to PAL system...

Страница 80: ...l If user wants to enhance the recording or network monitoring speed please set the channel disable 6 4 2 3 AGC Auto Gain Control AGC is the function to control the range of video signal input from ca...

Страница 81: ...channels 10A 10 channels The way to composing The way to conpose screen is selecting the target and after selecting right window and press Enter button or use mouse If channel selection is down press...

Страница 82: ...cording Configure yes or no of using audio recording If no audio will be out only in live view and if yes Audio will be out in both view modes Volume Configure volume by direction Synchronize Video Ch...

Страница 83: ...ync Text with Select channel to synchronize with text Header check It has the various type of data input from the external device Access Control POS ATM etc Like VSI Pro VSI Pro Hydra and Star Finger...

Страница 84: ...ized data there can be a short and long data For example there are 3 lines to write names on ATM But some may need only First name Last name to register Which it means requires only 1 shorter than oth...

Страница 85: ...vice 6 4 6 1 PTZ Setup Additional configuration for PTZ Address PoirtPTZ PTZ Home Shift to Preset assigned if it has no movement in certain time while PTZ control PTZ Idle Time If it has no movement d...

Страница 86: ...day Time Delete delete INDEX How to configure If configuring INDEX weekday time they are displayed on the table If clicking and selecting start time and end time of recording on the table Index weekda...

Страница 87: ...ronization Event Action There are 6 actions relay 1 to 4 buzz E Mail Action Duration Action Duration runs if relay and buzz are configured and goes on during the configured time E mail works by config...

Страница 88: ...dress Input E mail address to get event alarm by E Mail Sender Address Not mandatory but necessary for receiver to find out which DVR sends event Including Picture In general event when sensor MD V lo...

Страница 89: ...User can select all or certain channel User Area When selecting per channel it can be configured 1 grid size is 22x15 and factory default value is All If pushing user area configuration window for det...

Страница 90: ...input Sensor has 2 types Normal Open N O and Normal Close N C 6 5 6 Preset In PTZ function make configured preset work according to sensor input Please configure preset per PTZ After selecing channel...

Страница 91: ...ecording one channel can record up to its max frame rate and if setting 2 channels as event recording their recording frame rate will be adjusted automatically Program There are 26 programs from Ato Z...

Страница 92: ...IF 30fps It is because the channel configured as 0 fps needs 2 3fps at least for network Reference the relation in between general recording and event recording When Event is triggered records event r...

Страница 93: ...Recording Only in manual event recording manual recording runs and when pressing REC button recording starts If you want schedule recording recording mode should be Schedule Event 6 6 3 2 Schedule Se...

Страница 94: ...Program Set recording program A Z Time Set time applicable Cancel Cancel per INDEX Configuration Configure INDEX weekday program time If selecting recording start time and end time on the table by mou...

Страница 95: ...In On status screen vibration of paused Full D1 video will be redcued 6 6 3 3 Event recording setup Select resolution and frame rate and quality for event recording There are 4 trigers Sensor Motion d...

Страница 96: ...me applicable Deletion Delete per INDEX Configuration Configured INDEX weekday time will be shown at once Select recording start time and end time in order and its INDEX weekday time will be shown Del...

Страница 97: ...Installaction User Manual 96...

Страница 98: ...e images Playback to replay reocorded images 7 1 System requirement Minimum Recommendation CPU Intel Pentium 4 3 0GHz Core2duo E6750 or higher Main Memory 1GB 2GB or higher Video Memory 128MB 512MB or...

Страница 99: ...r ID and Password will be admin 12345 ID can not be changed 7 3 User Setup To access WebViewer user authority and password can be changed in DVR or Control Center configuration In account menu user pa...

Страница 100: ...mooth installation program needs to download from Login Page and install manually Caution When install WebViewer Installer it must close all program related to Control Center It might not be efficient...

Страница 101: ...annel image Double click on one of the playback screen to convert in 1 channel mode After conversion to 1channel mode double click on screen to return to previous division channels At division screen...

Страница 102: ...mes to Red and indicates sensor number of video 7 5 5 Relay operation It can On or Off Relay of the unit Click the number button to activate Ralay On then the incon changes from Blue to Orange color D...

Страница 103: ...0 minutes of video by click Quick Recording button During Quick Recording recording time is indicated on video During video recording if click Quick Recording button to stop recording and open the dia...

Страница 104: ...click image to operate Pan Tilt At the middle click Left Right direction to control Pan and Click Up Down direction to control Tilt Click as far from the middle to activate Pan Tilt faster Zoom Focus...

Страница 105: ...ten or activate Audio listen button First default is Mute In case of listening Audio select pop up menu or button After cancelling mute control audio volume It can mix several channels of audio 7 5 11...

Страница 106: ...mp file 7 6 1 Video Division Changing Channel Playback supports 1 4 9 and 16 divisional screens It can select division using menu on tip of page as above picture 32ch DVR can call the channel using Gr...

Страница 107: ...ith mouse for the channel to print image saved and then click Print button Window comes to input Memo and click OK button to print the image through the printer connected Print material includes Print...

Страница 108: ...pport and relate to this unit 7 6 7 Saving time Checking Rec Capacity It indicates total capacity of HDD remains and shows Starting date Last date of recording Also it shows percentage for HDD capacit...

Страница 109: ...backward Stop Play Move a frame forward It is the function to set play speed After click the button it can set the play speed 0 5x 1x 2x 4x 16x 32x 64x and All It is the function to set play area Aft...

Страница 110: ...Below picture is Mobile viewer log in page To access log in page via mobile viewer please type the address like http IP mvmenu html Below image is accessed login page to http 211 53 133 187 mvmenu ht...

Страница 111: ...og In page 1 CH Move to the previous channel 2 UP Move to upside of Pan Tilt movement 3 WIDE Zoom Out action 4 Move to left side of Pan Tile movement 6 Move to right side of Pan Tile movement 7 CH Mov...

Страница 112: ...heck On Off of Activity configuration of Screen 12 Check Covert configuration of Monitor 4 No recording 13 Check Disk Manager if HDD is mounted or not 14 Check recording configuration 5 No playback 15...

Страница 113: ...n 10 The cases necessary to contact the shop 30 In case of extraordinary working ex noise smell or fume 31 Connetor breakage of power cable 32 In case that rain or water is in the product 33 In case t...

Страница 114: ...Serial Number Structure Year month Internal check number internal check number Model number 1 1 2 digits Identify Model name of product 2 3 8 8 12 digits Hunt internal number 3 5 6 digits Manufacturin...

Страница 115: ...Video input standard NTSC or PAL auto detect Connectors 16ch analog video inputs BNC connector Loop out Auto terminated loop out Main Video output Vout 1 2 output via BNC DVI VGA 1 4 9 10 16 mode User...

Страница 116: ...DNS fail Alarm action Warning message buzzer e mail relay Audio Input output 4 RCA input 12 D Sub input 1R CA output Compression 16KHz 16bit sampling ADPCM Direction Both PTZ Protocols 32 models inclu...

Страница 117: ...ture and Health Serial I O Serial port 1 RS 232C 2 RS 485 Sensor input 16 dry contact Relay output 4 relay Controller Device Front panel IR remote Joystick KBD Mouse Software WebViewer Monitoring Play...

Страница 118: ...Installaction User Manual 117 Product Dimention...

Страница 119: ...Installaction User Manual 118...

Отзывы: