background image

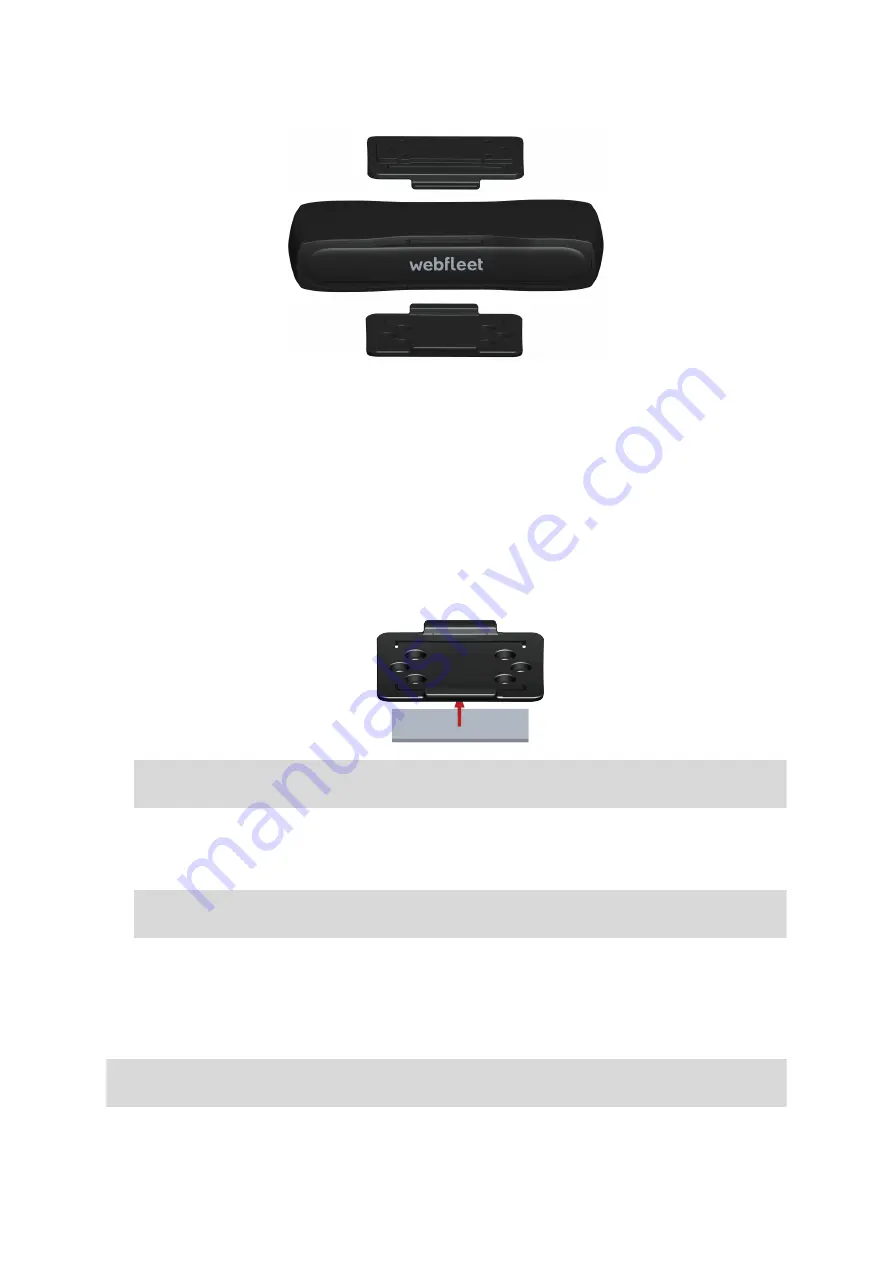
You can attach the holder to the top or to the bottom side of the LINK 710.

Attaching the holder using the adhesive strip

You can use the adhesive strip to fix the LINK 710 to your vehicle. 

Follow the safety

instructions in this document

.

1. Choose a flat surface for accurate positioning of the unit.

Remember, when the LINK 710 is in the holder, it must not be obstructed by metal
objects.

2. Clean the surface with the supplied cleaning tissue, so that the surface is oil free,

dry and clean.

3. Remove the protective film from one side of the strip.
4. Stick the strip to the bottom side of the holder as shown below.

Important

: Use the strip only in combination with the holder. Do NOT place the

strip on the serial number sticker of the device.

5. Remove the protective film from the other side of the strip.
6. Place the holder with the adhesive strip on the prepared surface. Press it gently

for a few seconds until it sticks.

Note

: The full strength of the strip will be reached after approximately 72 hours

depending on the temperature.

7. Insert the LINK 710 into the holder. Press gently until it clicks into place.

Attaching the holder using self-tapping screws

You can use two self-tapping screws to fix the holder to your vehicle.

Please refer to the list of what's in the box, to check that the self-tapping screws
(3.5 x 16 mm, 1/7 x 5/8 inches) are included in your product package.

1. Choose a flat surface for the LINK 710.

16

Содержание LINK 710

Страница 1: ...LINK 710 Installation Guide...

Страница 2: ...nection overview 1 wire 10 Connecting to the CAN bus 11 Connecting to power 12 Choosing the correct position 13 Mounting the LINK 710 15 Attaching the holder using the adhesive strip 16 Attaching the...

Страница 3: ...te SAR compliance 32 Button battery warning 32 Environmental and Battery information 32 Operating temperature 33 WEEE e waste disposal 33 How Webfleet Solutions uses your information 33 Exposure limit...

Страница 4: ...y way LINK 710 is a GPS receiver and mobile network module in one unit always providing the vehicle s current position When used with a compatible Driver Terminal you can easily handle orders as well...

Страница 5: ...0 1 Yellow LED connection status indicator 2 Green LED system status indicator 3 Reset button 4 Service Update Mini USB cable connector 5 1 Wire Interface 6 I O cable connector 7 Power CAN connector 8...

Страница 6: ...he Activation Code A device with internet connection and software to scan and read QR codes The QR code of the LINK 710 which is printed on a sticker on the bottom of the device The login credentials...

Страница 7: ...e caused through improper installation The installation and initial operation of the unit must be performed by authorised personnel only for example a qualified radio dealer or an automotive electroni...

Страница 8: ...ge to the device Short circuits inside the unit can be caused by contact with water or other liquids The unit may be damaged by contact with water Use and store the unit in an area protected from wate...

Страница 9: ...overview Power CAN cable Make sure this wire is fused with max 10A Twisted pair Loose ends of CAN L CAN H wires must be protected against short circuits Separate by using a heat shrink tube Only one o...

Страница 10: ...Connection overview 12 PIN IO cable Twisted pair Loose ends of CAN L CAN H wires must be protected against short circuits Separate by using a heat shrink tube Connection overview 1 wire 10...

Страница 11: ...turer manual for working on the electric BUS system of the vehicle Do not cut the vehicle s wire harness but use a special wire stripper If you have to remove the insulation of wires that are close to...

Страница 12: ...you have inserted the plug into the LINK 710 first you must connect the GND wire before you connect the PWR wire and the IGN wire as described below 1 Connect the GND wire brown to ground clamp 31 2...

Страница 13: ...1 Top side of the device must not be obstructed by metal items 2 Keep minimum distance of 5 cm 2 inches to metal items The device must be positioned with the top side pointing to the sky The device mu...

Страница 14: ...onents in the car like built in alarms gateway control units navigation units or to toll collect devices where it could cause or receive interferences Before installing the device please consider the...

Страница 15: ...s so that optimal mobile network transmission and GPS reception is ensured The unit must be placed on an oil free dry and clean surface when using the adhesive strips Extreme temperature changes diffe...

Страница 16: ...Important Use the strip only in combination with the holder Do NOT place the strip on the serial number sticker of the device 5 Remove the protective film from the other side of the strip 6 Place the...

Страница 17: ...external GPS antenna from Webfleet Solutions is not part of the standard LINK 710 product package Important Only use the GPS antenna from Webfleet Solutions otherwise GPS performance may be poor or n...

Страница 18: ...ber cap from the GPS antenna connector 2 Insert the plug of the GPS antenna into the GPS antenna connector on the LINK 710 3 Prepare a smooth clean oil free and dry surface on the windscreen 4 Attach...

Страница 19: ...If the device is already activated the green LED should be on all the time If the LED does not perform as described monitor the LEDs for diagnostics Mobile network reception test For this test you may...

Страница 20: ...s credentials for the online installation tool please contact Webfleet Solutions or your fleet manager Make sure you have the following The Contract Confirmation letter including the Activation Code A...

Страница 21: ...tion available or application failed Contact the Webfleet Solutions support team at www webfleet com support Rapidly flashing YELLOW LED is OFF Reset to factory settings ON and short OFF every 3sec Ig...

Страница 22: ...blem In case of SIM modem issues please contact the Webfleet Solutions customer support at www webfleet com support ON and short OFF every 3sec Connecting If for longer than ten minutes please contact...

Страница 23: ...nds The LINK 710 restarts within approximately five seconds after releasing the button If restarting the device does not succeed remove the Power CAN cable from the LINK 710 Then plug it into the Powe...

Страница 24: ...ax 30 V Current power consumption average values At 14 V typically 0 05 A 0 7 W At 28 V typically 0 03 A 0 84 W Standby typically 0 0015 A 0 042 W During data transmission 14 V 0 15 A 2 1 W 28 V 0 1 A...

Страница 25: ...A 4 pin MicroFit connector with Dallas 1 wire interface and LED current source approx 17mA for an indicator light is available The 1 Wire master is using a 3 3V supply Ignition input To be connected...

Страница 26: ...High speed CAN CAN2H CAN2L High speed CAN CAN2HLS CAN2LLS Low speed CAN CAN3H CAN3L High speed CAN Only one of the CAN2 ports can be used USB A Mini USB connector for service functionality for example...

Страница 27: ...l inputs of the LINK 710 operate according to the principle of a voltage detector Voltages below 2 Volts are definitively interpreted as being low and voltages higher than 3 Volts are definitively int...

Страница 28: ...vehicle voltage 9 30V can offer defined levels When using inductive loads a free wheeling diode must be used in parallel with the load Wiring the digital output The digital output OUT of the LINK 710...

Страница 29: ...light or a switch with an integrated indicator light Connect a normally open momentary push button switch and indicator light to the IN OUT When you press the push button for a short time the logbook...

Страница 30: ...siness trip Using the input IN for idle time reporting Your LINK 710 can report idle times to WEBFLEET when the engine is running for longer than five minutes and the vehicle is not moving This requir...

Страница 31: ...se of mobile phones or other electronic devices for example the requirement to use hands free options for making calls when driving Always obey applicable laws and road signs especially those relating...

Страница 32: ...by the Council of the European Union The SAR limit recommended by The Council of the European Union is 2 0W kg averaged over 10 grams of tissue for the body 4 0 W kg averaged over 10 grams of tissue...

Страница 33: ...attery leaks and you come into contact with the leaked fluids rinse thoroughly with water and seek medical attention immediately Battery waste disposal THE BATTERY CONTAINED IN THE PRODUCT MUST BE REC...

Страница 34: ...icle Exposure limits This device complies with radiation exposure limits set forth for an uncontrolled environment In order to avoid the possibility of exceeding the radio frequency exposure limits hu...

Страница 35: ...K 710 you need a valid and active WEBFLEET Telematics Service Platform subscription Accessories supplied with this device Power cable Holder Fixings Basic installation guide Accessories not supplied w...

Страница 36: ...here provided that the new terms are clearly indicated on the first page of each file where they apply IN NO EVENT SHALL THE AUTHORS OR DISTRIBUTORS BE LIABLE TO ANY PARTY FOR DIRECT INDIRECT SPECIAL...

Страница 37: ...of a Defect you must contact Webfleet Solutions during the Warranty Period via www webfleet com to explain the Defect and to obtain an RMA number Return Materials Authorization if necessary You must r...

Страница 38: ...d to damages for the inability to use the equipment or access data loss of data loss of business loss of profits business interruption or the like arising out of the use of or inability to use the Har...

Отзывы: