


18
INSTRUCTION MANUAL
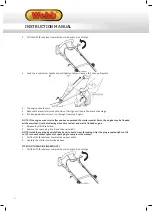
SIDE DISCHARGE CHUTE
NOTE : When using the side discharge function. Remove the grass collector and plug the mulch plug into
the rear of the machine.
1.
Unlock the side discharge cover and lift. Hook in the side discharge chute.
2.
Allow the side discharge cover to secure onto the side discharge chute into position.
3.
Remove the grass collector. Place the grass collector in a safe place.
4.
Insert the mulch plug into the rear of the machine.
5.
Start the machine and mow. Grass will be discharged from the side discharge chute back to the floor.
NOTE: If any grass residue is caught in the side discharge chute, clean it using a brush. Do not remove
grass debris in the mower deck or on the blade by hand or with your feet. Instead use suitable tools such
as a brush or broom.
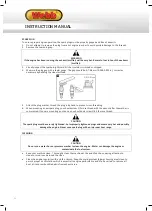
MULCH PLUG
NOTE: Mulching stops collection of grass into the rear collector.
1.
Lift the rear cover and remove the grass collector.
2.
Insert the mulch plug into the rear of the machine
3.
Allow the rear collector to sit on the rear of the deck.
1.
Start the machine and mow. The grass will be discharged back to the floor, under the deck in finely cut
particals providing nutriants to the ground.
MOWING INSTRUCTIONS
1.
Walk, never run with the mower, be very careful when mowing uneven or rough ground.
2.
Be careful when changing the direction of the mower on a slope. Mow across the face of slopes, never
down or up.
3.
Do not mow excessively steep slopes.
4.
Best results will be achieved if the grass is dry. Wet grass will clog the blade & grass collection system.
5.
Grass grows at different rates at different times of the year. Never use the lowest cutting height for the
first cut of the season or in drought conditions.
6.
Do not remove grass debris in the mower deck or on the blade by hand or with your feet. Instead use
suitable tools such as a brush or broom.
7.
Check that all nuts, bolts and screws are well tightened.
8.
Before mowing, place the grass collector in its position.
9.
Before mowing make sure that the blade and the blade fixing screw are securely fastened. When blade
cutting edges require re-sharpening, this must be done evenly on both sides, so as to prevent any
imbalance. If you are unsure how to sharpen the blade, please visit your local Approved Service Dealer.
If the blade is damaged, it must be replaced.
10.
When mowing, always wear a long trousers and strong footwear.
11.
Do not run the engine in an enclosed and/or poorly ventilated area, where gas of the engine contains
carbon monoxide, which are dangerous for your health.
12.
Work only when there is enough light.
13.
Turn off the engine if you must leave the lawnmower unattended.
14.
Never lift the rear of the mower while starting the engine and never place your hands and feet
underneath the deck or into the rear discharge chute while the engine is running.
15.
Never change in any way the rated speed of the engine.
16.
On self-propelled mowers, disconnect the self-propelled system before starting the engine.
17.
Never lift or carry the mower while the engine is running.
18.
Stop the engine and remove the spark plug cover in these cases:
-
Before any operation under the deck or the rear discharge chute.
-
Before any maintenance, repairing or checking operations.
-
Before carrying, lifting or removing the mower.
-
If you leave the mower unattended or changing the cutting height.
-
To remove and emptying the grass catcher.
-
After hitting a foreign object, stop the engine and check thoroughly the mower in order to see if it
SELF-PROPELLED
To self-propel your lawnmower,
1.
Start the engine as stated above.
2.
Push the drive lever up to the main handle. The lawnmower will start to move with the engine running
and blade rotating. It is easier to manually push the machine a couple of steps and then engage the self-
propelled motion to ensure the grass is not damaged and the machine does not take off, away from the
user suddenly.
3.
To stop the lawnmower moving, just simply release the drive lever in good time.
4.
The self-propel speed has been set at the factory and cannot be adjusted.
MOWING WITH COLLECTOR
WARNING
Always observe the strictest safety procedures when using the lawnmower. Carefully read the safety
instructions of this manual before using the lawnmower.
Never open the rear flap when the grass bag has been detached (to be emptied) and the engine is still
running. The rotating blade can cause serious injuries!
1.
Select your required height of cut setting.
2.
Start the engine and allow it to run and warm up. See Starting the Engine section of the manual.
3.
Keep a firm grip on the upper handle with OPC/Brake lever always engaged when attempting to cut.
4.
Pull the Drive lever up to the handle when you wish to self-propel.
EMPTYING THE GRASS BAG
As soon as grass clippings start to trail the lawnmower, it is time to empty the grass bag.
NOTE: Before taking off the grass collector, switch off the engine and wait until the blade has come to a
stop.
1.
To take off the grass collector, use one hand to lift up the rear cover and the other to grab onto the grass
collector carry handle. The rear cover automatically falls down after removing the grass collector and
closes off the rear chute opening.
2.
Empty the grass debris from the grass collector and refit.
NOTE: If any grass residue is caught in the discharge chute, clean it using a brush. Do not remove grass
debris in the mower deck or on the blade by hand or with your feet. Instead use suitable tools such as a
brush or broom. To ensure that the cut grass can be collected into the grass collector, the discharge
opening and inside the mower deck must be cleared of any blockage.
Содержание WER410HP
Страница 26: ...26 INSTRUCTION MANUAL PARTS DIAGRAM DVO140 PARTS LIS...
Страница 28: ...28 INSTRUCTION MANUAL PARTS DIAGRAM WER460SP 1938220001 PARTS L PARTS LIS...
Страница 31: ...Notes...
Страница 32: ...Notes...
Страница 33: ...Notes...
Страница 40: ...Webb Lawnmowers Murdock Road Dorcan Swindon Wiltshire SN3 5HY...