background image

nuovo l'interruttore per spegnere "OFF". 

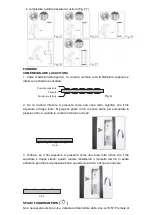
CUCITURA ALL’INDIETRO [

La cucitura all’indietro viene spesso usata per rinforzare l’inizio e la fine della cucitura 

(cucitura posteriore) 

1. Questa cucitura è adatta per il fissaggio della cucitura per evitare punti sciolti.

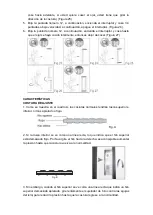
2. Prima di tutto, arrestare la macchina, quindi premere il pulsante come mostrato

nell’immagine,  ora la macchina può cucire all’indietro.  Per cucire normalmente in

avanti, rilasciare il tasto.

FUNZIONE 

ZIGZAG 

1. Impostare la manopola di selezione sul disegno a zig-zag (punti 4 e 10)

2. Ruotare il volantino per sollevare l'ago alla posizione più alta. Impostare la

manopola di selezione su punti a zig-zag o linee rette.

Attenzione: quando si desidera cambiare punti, ripetere il terzo passo prima. 

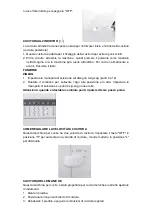
COME REGOLARE LA VELOCITÀ DI CUCITURA 

Questa macchina per cucire ha due velocità di cucitura. Impostare il tasto "OFF"  in 

posizione "H" per aumentare la velocità di cucitura, mentre metterlo in posizione "L" 

per diminuirla. 

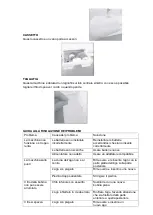
CUCITURA DELLE MANICHE 

Questa macchina per cucire è stata progettata per cucire maniche e/o strette aperture 

in indumenti. 

1. Alzare il piedino.

2. Posizionare il capo sul braccio di cucitura.

3. Abbassare il piedino e seguire le istruzioni di cucitura regolari.

Содержание SW45

Страница 1: ...Instructions manual Manuel d utilisation Bedienungsanleitung Handboek Manual de Utilización Manuale d uso SW45 Sewing machine Machine à coudre Nähmaschine Naaimachine Máquina de coser Macchina da cucire ...

Страница 2: ......

Страница 3: ... Any such person using this machine must be supervised by an experienced adult who us responsible for their safety during use 5 Use this appliance only same as described in this manual 6 Do not insert think into the machine s gap when running 7 Keep fingers away from all locomotors parts special around the needle 8 Do not use the machine in rough environment 9 Do not use beet needles 10 Stop worki...

Страница 4: ...not be carried out by children unless they are at least 8 years of age and are supervised by an adult 18 Keep the appliance and its power cord out of reach of children under 8 years of age 19 When using electrical equipment safety precautions must always be taken to prevent the risk of fire electric shock and or injury in the event of misuse 20 Make sure that the voltage rating on the typeplate co...

Страница 5: ...NAME OF PARTS ...

Страница 6: ...HINE TO THE MAINS POWER SUPPLY 1 Connect plug A to the machine and plug B into the main socket 2 Connect the foot control C to the machine 3 The speed of the machine can be regulated by applying pressure to the foot controller Caution Always switch OFF and unplug the machine when not in use Output DC 6V 7 2W ACCESSORIES ...

Страница 7: ...hole in the chrome lever and pull straight down towards the needle 5 Feed the thread through the hole in the needle holder 6 Feed the thread through the eye of the needle Caution When threading the sewing machine make sure that the power off speed switch is in the OFF position and follow the steps1 6 below Turn hand wheel counter clockwise until the needle is in the highest position REPLACING THE ...

Страница 8: ...bin otherwise the magnetized bobbin case will not be activated and there will not be any tension on your bobbin thread WINDING THE BOBBIN 1 Put a spool of thread on spool pin Fig 7 2 Guide the thread through the upper of the thread clamper Fig 8 3 Put the Push the bobbin into the bobbin winder spindle and make sure it aligns with the groove of the bobbin winder spindle Fig 9 4 Turn the winding spi...

Страница 9: ...e needle SEWINGSEWING 1 Turn the hand wheel on the side of the sewing machine anticlockwise to raise the needle to its highest position Fig 17 2 Lift the presser foot and place the fabric you wish to sew under the presser foot Fig 18 3 Lower the presser foot Fig 19 4 Press the ON OFF button on the ON position and begin sewing Do not pull the fabric Gently guide the fabric to keep the seam straight...

Страница 10: ...n the presser foot on the cloth where you need to sew buttonhole then choose the 12th stitch 2 Turn on the switch and sew 3 4 stitch in low speed then turn off switch Fig 23 3 Choose the 11th stitch turn on switch and sew on the cloth in suitable length then turn off switch Note that try to keep sewed stitch in straight line Fig 24 4 Raise the presser foot turn the cloth head back because cloth is...

Страница 11: ...top thread is too loose Please turn in thread damp clock wise to increase pressure until the stitching returns to normal Fig B 3 However when the top thread looks like a straight line indicating an over tight top thread slowly turn the thread clamp anti clock wise to reduce pressure until the stitching back to normal Fig C WORKING LAMP IF additional light is needed press the light switch to turn t...

Страница 12: ...l to zigzag pattern 4th 10th 2 Turn the hand wheel to raise the needle to the highest Position Set pattern selection dial to zigzag or straight lines Caution when you want to change stitches please repeat the third step first SETTING THE SEWING SPEED This sewing machine has two sewing speeds Push the OFF button in the H position the switch is right and will increase the sewing speed while in the L...

Страница 13: ...incorrectly Reinstall the batteries making sure they are the correct way around Batteries are low Use new batteries Adaptor power inadequate Use compatible adaptor Skipping stitches Needle eye not in the middle Remove and re insert the needle with the flat side of the needle to the back Needle bent Remove and re insert a new needle Presser foot too loose Tighten the presser foot Bobbin thread cann...

Страница 14: ...n hand wheel to lower the needle into fabric and then start sewing The instructions state the substance of the following P Switch off or unplug the appliance when leaving it unattended P Unplug the appliance before carrying out maintenance or replacing lamps P ENVIRONMENT CAUTION Do not dispose of this product as it has with other household products There is a separation of this waste product into...

Страница 15: ... si elles ont eu des instructions concernant l utilisation de l appareil par une personne responsable de leur sécurité Les enfants doivent être surveillés pour s assurer qu ils ne jouent pas avec l appareil 5 N utiliser cette machine que dans le but pour lequel elle a été conçue et tel que spécifié dans ce manuel N utiliser que les accessoires spécifiés dans ce manuel et recommandés par le fabrica...

Страница 16: ... auprès d un Service après vente afin d éviter tout danger 16 Cet appareil peut être utilisé par des enfants âgés d au moins 8 ans à condition qu ils bénéficient d une surveillance ou qu ils aient reçu des instructions quant à l utilisation de l appareil en toute sécurité et qu ils comprennent bien les dangers encourus 17 Le nettoyage et l entretien par l utilisateur ne doivent pas être effectués ...

Страница 17: ... le cas adressez vous au revendeur et ne branchez pas l appareil 21 Ne jamais laisser l appareil sans surveillance lorsqu il est en fonctionnement 22 Veuillez conserver ce document à disposition et le remettre au futur propriétaire en cas de cession de votre appareil 23 L appareil ne doit pas être utilisé s il a chuté s il y a des signes visibles de dommages ...

Страница 18: ... le côté A à la machine et le côté B à la prise 2 Connecter la pédale C à la machine 3 La vitesse de couture peut être réglée avec la pédale Attention Toujours débrancher la machine lorsque vous ne l utilisez pas Output DC 6V 7 2W Vue arrière Support de bobine Volant Support de canette Lampe Pied Pressoir Filtre Tiroir Pédale ...

Страница 19: ...scendez le fil vers l aiguille 5 Enfilez le fil dans le support de l aiguille 6 Enfilez enfin le fil dans le chas de l aiguille Attention Enfilez la machine en position OFF et suivez bien les étapes 1 à 6 dans l ordre Une fois la machine enfilée remontez l aiguille en tournant le volant à droite de la machine REMPLACER LA CANETTE 1 Enlevez le couvercle et sortez la canette vide Img 1 2 Placez la c...

Страница 20: ...in que son support aimanté puisse tendre le fil correctement REMPLISSAGE DE LA CANETTE 1 Placez une bobine de fil dur le débobineur Img 7 2 Passez le fil par le guide fil comme indiqué sur l image Img 8 3 Placez la canette sur le débobineur prévu à cet effet Img 9 4 Enroulez le fil dans la canette Img 10 5 Poussez la canette vers la droite comme sur l image Img 11 6 Placez le bouton sur L pour com...

Страница 21: ...guille que lorsque la machine est débranchée COUDRE 1 Remontez l aiguille à l aide du volant Img 17 2 Relevez le pied presseur pour mettre votre tissu en place Img 18 3 Abaissez le pied presseur Img 19 4 Placez le bouton ON OFF sur ON et commencez à coudre Ne tirez pas le tissu contentez vous de le guider pour contrôler la couture Img 20 5 Une fois terminé placez le bouton ON OFF sur OFF Img 20 6 ...

Страница 22: ...ntré sur l image BOUTONNIÈRES 1 Placez le tissue sous le pied presseur et choisissez le point numéro 12 2 Faites 3 ou 4 points au ralenti puis arrêtez Img 23 3 Choisissez le point numéro 11 et continuez à coudre à la longueur souhaitée et arrêtez Img 24 4 Soulevez le pied presseur et retournez le tissu Img 25 5 Placez la sélection de point sur le 12 faites 3 ou 4 points au ralenti puis arrêtez Img...

Страница 23: ...u vous devez tourner la bobine dans le sens des aiguilles d une montre jusqu à ce que le point soit normal Fig B 3 Si le point du dessous est plat le fil inférieur est trop tendu vous devez tourner la bobine dans le sens contraire des aiguilles d une montre jusqu à ce que le point soit normal Fig C LAMPE DE TRAVAIL Si vous avez besoin d éclairage supplémentaire placez le bouton de la lampe sur ON ...

Страница 24: ...ui vous convient 4th 10th 2 Relevez l aiguille et placez le tissu avant de commencer à coudre Attention Avant de changer de point arrêtez de coudre sélectionner le point puis recommencez à coudre SELECTION DE LA VITESSE DE COUTURE La machine a deux vitesse de couture Placez le bouton ON OFF sur H pour la vitesse rapide et sur L pour la vitesse lente COUDRE DES MANCHES Cette machine peut coudre des...

Страница 25: ...ouvelles piles Adaptateur inadapté Utilisez un adaptateur adapté Manque des points L aiguille n est pas bien centrée Replacez l aiguille Aiguille tordue Remplacez l aiguille Pied presseur trop relâché Resserrez le pied presseur La bobine de fil de tourne pas Il n y a plus de fil dans la canette Remplacez la canette Machine mal enfilée Renfilez la machine Le fil se coupe Aiguille tordue Remplacez l...

Страница 26: ... d effectuer de maintenance ou changer la lampe P ENVIRONNEMENT ATTENTION Vous ne devez pas vous débarrasser de cet appareil avec vos déchets ménagers Un système de collecte sélective pour ce type de produit est mis en place par les communes vous devez vous renseigner auprès de votre mairie afin d en connaître les emplacements En effet les produits électriques et électroniques peuvent contenir des...

Страница 27: ...e personen gebruik van deze machine moet worden begeleid door een ervaren volwassene die ons verantwoordelijk voor hun veiligheid tijdens het gebruik 5 Gebruik dit apparaat alleen hetzelfde als beschreven in deze handleiding 6 Steek dat in gat van de machine tijdens het hardlopen 7 Houd uw vingers uit de buurt van alle motorische onderdelen speciaal rond de naald 8 Gebruik de machine niet in ruwe ...

Страница 28: ...j de mogelijke gevaren kennen 17 Reiniging en onderhoud mogen niet worden uitgevoerd door kinderen tenzij ze 8 jaar of ouder zijn en onder toezicht van een volwassene staan 18 Houd het apparaat en het snoer buiten bereik van kinderen onder de 8 jaar der Reichweite von Kindern unter 8 Jahren auf 19 Bij het gebruik van elektrische apparatuur moeten altijd veiligheidsmaatregelen worden genomen om het...

Страница 29: ...waar dit document bij de hand en geef het aan de toekomstige eigenaar in geval van overdracht van uw apparaat 23 Het apparaat mag niet worden gebruikt als het is gevallen er zijn duidelijke tekenen van schade zichtbaar ...

Страница 30: ... BEVESTIGEN 1 Stop stekker A in de machine en stop stekker B in het stopcontact 2 Verbind voet pedaal C aan de machine 3 De snelheid van de machine kan geregeld worden door druk uit te oefenen op het drukvoet Waarschuwing Chakel de naaimachine altijd uit indien deze niet in gebruik is Vermogen DC 6V 7 2W ACCESSORIES ...

Страница 31: ...de naaldhouder 6 Leid de draad door het oog van de naald Waarschuwing Bij het inrijgen van de naaimachine die nu ervoor te zorgen dat de power off speed switch is in de stand uit en volg de onderstaande steps1 6 Draai het handwiel tegen de klok in totdat de naald in de hoogste stand DE SPOEL VERVANGEN 1 Verwijder het spoelhuisdeksel en neem de lege spoel figuur 1 2 Plaats de spoel in het spoelhuis...

Страница 32: ...g op uw onderdraad staan DE SPOEL OMWIKKELEN 1 Zet een klos garen op de garenpen Fig 7 2 Leid de draad door de bovenkant van de draad klem Fig 8 3 Doe de Duw de spoel in de spoelas en zorg ervoor dat het uitgelijnd met de groef van de spoelas Fig 9 4 Draai de wikkeldoorn klok mee te maken kronkelende de klok mee weg Fig 10 5 Druk de spoel naar rechts Fig 11 6 Open de snelheid schakelaar om te begi...

Страница 33: ...el op de zijkant van de naaimachine tegen de klok in om de naald omhoog tot de hoogste stand Fig 17 2 Til de naaivoet en plaats de stof die u wilt naaien onder de persvoet fig 18 3 Zet de persvoethendel fig 19 4 Druk op de aan uit knop op de ON positie en begin te naaien Laat de stof niet trekken Zachtjes begeleiden van de stof om de naad recht te houden Fig 20 5 Na het afronden van naaien drukt u...

Страница 34: ...ies dan de 12e steek 2 Zet de schakelaar en naai 3 4 steken op lage snelheid dan schakelt u de schakelaar fig 23 3 Kies de 11e steek zet schakelaar en naai op het doek in de geschikte lengte vervolgens uit schakelaar Merk op dat proberen te genaaid steek in een rechte lijn te houden afb 24 4 Zet de persvoet omhoog draai de doek hoofd terug omdat doek naar voren wordt genaaid als je wilt knoopsgat ...

Страница 35: ...endraad te los Schakel in thread vochtige klok mee om de druk te verhogen totdat de stiksels weer normaal Fig B 3 Echter wanneer de bovendraad ziet eruit als een rechte lijn aangeeft een over strakke top draad langzaam draaien de draad klem tegen de klok om de druk totdat de stiksels te verminderen terug naar normaal Fig C WERKLAMP Als er extra licht nodig is drukt u op de lichtschakelaar om het l...

Страница 36: ...knop kan de machine terug te krijgen om vooruit te naaien FUNCTIES ZIGZAG 1 Zet de steekkeuzeknop op patroon 4 10e zigzag 2 Draai het handwiel om de naald in de hoogste stand te brengen Stel steekkeuzeknop te zigzaggen of rechte lijnen Waarschuwing bij het vervangen van de steken herhaal de derde stap DE NAAISNELHEID INSTELLEN Deze naaimachine heeft twee naai snelheden Druk op de OFF knop in de H ...

Страница 37: ...ging draad afgesneden van de draad GIDS VOOR PROBLEEMOPLOSSING Probleem Mogelijke Oorzaak Oplossing Geen stroom of de machine is niet krachtig Accu is verkeerd geinstalleerd Herinstalleer de batterijen door ze juist te plaatsen Accu is bijna leeg Gebruik nieuwe batterijen Stroomvoorziening is niet voldoende Gebruik een geschikte adapter Stiksels worden overgeslagen Naald oog niet in het midden Ver...

Страница 38: ...eer Naald niet in stof gezet alvoens het naaien Verwijderen en plaats een nieuwe naald draad weer draai het handwiel om de naald in de stof te verlagen en begin met naaien De instructies geven aan de inhoud van het volgende P Schakel Uit of haal de stekker bij het verlaten van deze achterlaat P Haal Het apparaat voor het uitvoeren van onderhoud of het vervangen van lampen P MILIEU ATTENTIE Dit app...

Страница 39: ...oder mangelnder Erfahrung oder Wissen bestimmt Jede solche Person muss von einem erfahrenen Erwachsenen überwacht werden die für ihre Sicherheit während des Gebrauchs verantwortlich sind 5 Verwenden Sie dieses Gerät nur so wie in diesem Handbuch beschrieben wird 6 Stecken Sie nichts in den Spalt der Maschine während sie läuft 7 Halten Sie die Finger fern von allen Bewegungssystemteilen besonders v...

Страница 40: ...efahren zu vermeiden 16 Dieses Gerät darf von Kindern ab 8 Jahren benutzt werden sofern diese beaufsichtigt werden oder eine Einweisung in den sicheren Gebrauch des Geräts erhalten haben und die damit verbundenen Gefahren verstehen 17 Kinder dürfen das Gerät nur reinigen oder pflegen wenn sie mindestens 8 Jahre alt sind und von einem Erwachsenen beaufsichtigt werden 18 Bewahren Sie das Gerät und d...

Страница 41: ...e sich an den Händler und schließen Sie das Gerät nicht an 21 Lassen Sie das Gerät während des Betriebs niemals unbeaufsichtigt 22 Bitte halten Sie dieses Dokument bereit und geben Sie es im Falle einer Übertragung Ihres Gerätes an den zukünftigen Besitzer weiter 23 Das Gerät darf nicht benutzt werden wenn es fallen gelassen wurde wenn auffällige Zeichen von Beschädigungen sichtbar sind ...

Страница 42: ...ose 2 Verbinden Sie das Fußpedal C mit der Maschine 3 Die Geschwindigkeit der Maschine kann durch Aufbringen von Druck auf das Fußpedal geregelt werden Vorsicht Schalten Sie das Gerät immer aus und ziehen Sie das Gerät bei Nichtgebrauch aus der Steckdose Ausgang DC 6V 7 2W Rückansicht Spulenwickelspindel Exzenterrad Fadenklemme Licht Nähfuß Nähfuß Heber Schublade Fußpedal Aufnahme AC DC Aufnahme ...

Страница 43: ...urch das Loch in dem Chrom Hebel und ziehen Sie ihn gerade nach unten in Richtung der Nadel 5 Führen Sie den Faden durch das Loch in dem Nadelhalter 6 Führen Sie den Faden durch das Nadelöhr Achtung Beim Einfädeln in die Nähmaschine stellen Sie sicher dass der Power off Drehzahlschalter in der Position OFF steht und folgen Sie den Schritten 1 6 unten Drehen Sie das Handrad gegen den Uhrzeigersinn ...

Страница 44: ...nst wird die magnetisierte Spulenkapsel nicht aktiviert und es wird keine Spannung auf Ihrem Unterfaden sein AUFWICKELN DER SPULE 1 Setzen Sie eine Garnrolle auf den Garnrollenstift Abb 7 2 Führen Sie den Faden durch die obere der Fadenklemme Abb 8 3 Setzen Sie die Spule in die Spulerspindel und stellen Sie sicher dass sie mit dem Schlitz der Spulerspindel ausgerichtet ist Abb 9 4 Drehen Sie den W...

Страница 45: ...rennen Sie den AC DC Adapter bevor Sie die Nadel ersetzen NÄHENSEWING 1 Drehen Sie das Handrad auf die Seite der Nähmaschine gegen den Uhrzeigersinn um die Nadel in die höchste Position zu bringen Abb 17 2 Heben Sie den Nähfuß an und legen Sie den Stoff den Sie nähen möchten unter den Nähfuß Abb 18 3 Senken Sie den Nähfuß Abb 19 4 Drücken Sie die ON OFF Taste auf die Position ON und beginnen Sie z...

Страница 46: ...MANUELLES KNOPFLOCH 1 Legen Sie Stoff unter den Nähfuß und drücken Sie den Nähfuß auf den Stoff wo Sie das Knopfloch nähen müssen dann wählen Sie den 12 Stich 2 Drücken Sie den Schalter an und nähen Sie 3 4 Stiche in niedriger Geschwindigkeit schalten Sie dann Schalter ab Abb 23 3 Wählen Sie die 11 Stich stellen Sie den Schalter an und nähen den Stoff in geeigneter Länge dann stellen Sie den Schal...

Страница 47: ...r zu straff noch zu locker Top thread Cloth Bottom thread Fig A 2 Wenn das untere Gewinde aussieht wie eine gerade Linie ist das obere Gewinde zu locker Bitte drehen Sie einen feuchten Faden im Uhrzeigersinn um den Druck bis die Nähte wieder normal sind zu erhöhen Fig B 3 Wenn der Oberfaden allerdings aussieht wie eine grade Linie führt das zu einem überdichten Oberfaden drehen Sie die Fadenklemme...

Страница 48: ...s Nähen umkehren Durch loslassen der Rückwärtstaste kann die Maschine wieder vorwärts nähen EIGENSCHAFTEN ZICKZACK 1 Stellen Sie Muster Einstellrad auf Muster 4 10 2 Drehen Sie das Handrad um die Nadel in die höchste Position zu bringen Stellen Sie das Muster Einstellrad auf Zickzack oder gerade Linien Achtung wenn Sie den Stich ändern möchten wiederholen Sie bitte den dritten Schritt zuerst EINST...

Страница 49: ...rnehmen 2 Positionieren Sie das Kleidungsstück über den Näharm 3 Senken Sie den Nähfuß und folgen Sie den regulären Nähanleitungen SCHUBLADE Diese Schublade ist ein Zubehörstaufach FADENABSCHNEIDER Es gibt einen Fadenschneider auf der zentralen linken Seite der Maschine Er kann den Faden nach dem Nähen oder Spulen abschneiden ...

Страница 50: ...iner neue Nadel Nadelschaft sitzt nicht richtig Entfernen und wieder einlegen einer neue Nadel Fadenspannungswählscheibe Gewinde führen oder Fadenziehleiste zu eng Lösen Sie die Fadenspannung zwischen Nummer 3 5 Stiche zu locker oder uneben Faden durch die obere Spule blockiert Ziehen Sie den Garnrollenstift und lassen Sie die Spule oder Gewinde flüssig laufen Oberfaden zu fest oder Unterfaden zu ...

Страница 51: ...ektrische und elektronische Produkte gefährliche Stoffe die schädliche Auswirkungen auf die Umwelt oder die menschliche Gesundheit haben und sollte recycelt werden Das Symbol hier darauf hinweisen dass elektrische oder elektronische Geräte sollten sorgfältig ausgewählt werden ist ein fahrbarer Abfallbehälter mit einem Kreuz markiert Adeva SAS H Koenig Europe 8 rue Marc Seguin 77290 Mitry Mory Fran...

Страница 52: ...falta de experiencia o conocimiento acerca del uso de este aparato Cualquier persona que utilice esta máquina debe ser supervisada por un adulto con experiencia que se haga responsable de su seguridad durante el uso 5 Utilice este aparato sólo para lo que se describe en este manual 6 No introduzca nada en la ranura de la máquina cuando esta se está usando 7 Mantenga los dedos alejados de todas las...

Страница 53: ...cio post venta para evitar cualquier peligro 16 Este aparato puede ser utilizado por niños de al menos 8 años de edad siempre que cuenten con supervisión y hayan recibido instrucciones sobre el uso seguro del electrodoméstico y sean plenamente conscientes de los peligros que implica 17 La limpieza y mantenimiento de la máquina no debe ser efectuada por niños a menos que tengan como mínimo 8 años d...

Страница 54: ...red de su instalación Si no es así póngase en contacto con el distribuidor y no conecte la unidad 21 Por favor tenga este documento a mano y entréguelo al futuro propietario en caso de transferencia de su dispositivo 22 El dispositivo no debe utilizarse si se ha caído si hay signos evidentes de daño ...

Страница 55: ...ACIÓN DE ENERGÍA ELÉCTRICA 1 Conecte el enchufe A a la máquina y enchufe B en la toma principal 2 Conecte el pedal de control C a la máquina 3 La velocidad de la máquina se puede regular mediante la aplicación de presión al pedal Precaución Siempre apague y desenchufe la máquina cuando no esté en uso Salida DC 6V 7 2W ACCESSORIES ...

Страница 56: ...ilo a través del agujero en la palanca de cromo y tire hacia abajo hacia la aguja 5 Pase el hilo a través del agujero en el soporte de la aguja 6 Pase el hilo por el ojo de la aguja Precaución Al enhebrar la máquina de coser asegurarse de que el interruptor de apagado velocidad está en la posición OFF y a continuación siga los pasos 1 6 Gire la rueda hacia la izquierda hasta que la aguja esté en l...

Страница 57: ...e utilizar siempre una bobina de metal de lo contrario la caja de la bobina magnetizada no se activará y no habrá ninguna tensión en el hilo de la bobina ENROLLAR LA BOBINA 1 Coloque un carrete de hilo en el portacarrete Fig 7 2 Guíe el hilo a través de la parte superior de la abrazadera de rosca Figura 8 3 Ponga el Empuje la bobina en el eje de la bobinadora y asegúrese de que se alinee con la ra...

Страница 58: ...a cambiar la aguja COSER 1 Gire la rueda en el lado de la máquina de coser en sentido antihorario para subir la aguja a su posición más alta Figura 17 2 Levante el pedal y coloque la tela que desea coser debajo del pedal figura 18 3 Baje el pedal figura 19 4 Pulse el botón ON OFF en la posición ON y comience a coser No tire de la tela Guíe suavemente la tela para mantener la costura recta Figura 2...

Страница 59: ...s patrones de costura para elegir el patrón de costura que desee MANUAL DEL OJAL 1 Ponga tela debajo del prensatelas y presione el prensatelas en la tela donde usted necesita para coser ojales a continuación elija la 12ª puntada 2 Encienda el interruptor y coser 3 4 puntada a baja velocidad a continuación apague el interruptor figura 23 3 Elija la puntada número 11 gire el interruptor y coser en e...

Страница 60: ...RÍSTICAS COSTURA DE AJUSTE 1 Como se muestra en el cuadro A las costuras normales tendrán rosca superior e inferior ni más apretado o flojo Fig A 2 Si la rosca inferior se ve como una línea recta lo que indica que el hilo superior está demasiado flojo Por favor gire el hilo hacia la derecha es aconsejable aumentar la presión hasta que la costura vuelva a la normalidad Fig B 3 Sin embargo cuando el...

Страница 61: ...mo se muestra en la imagen la máquina empezará a coser hacia atrás Suelte el botón de marcha atrás la máquina empezará a coser hacia delante CARACTERÍSTICAS ZIGZAG 1 Ajuste el dial de selección de patrón de zigzag 4to 10mo 2 Gire la rueda de mano para levantar la aguja a la posición más alta Seleccione el patrón de puntadas en zigzag o líneas rectas Precaución cuando se quiere cambiar el tipo de p...

Страница 62: ... almacenamiento de accesorios CORTADOR DE HILOS Cuenta con un cortador de hilo en el lado central izquierdo de la máquina se puede cortar el hilo después de coser SOLUCIÓN DE PROBLEMAS Problema Causa del problema Solución No hay fuente de energía o la máquina funciona muy lentamente Las baterías están má instaladas Vuelva a instalar las baterías asegurandose de que están bien puestas Las baterías ...

Страница 63: ...a y asegúrela bien Se jala la tela muy fuertemente cuando se cose Saque y vuelva a insertar una aguja nueva y cosa nuevamente La aguja no se ha bajado hasta la tela cuando se empezó a coser Saque y vuelva a insertar una aguja nueva cosa nuevamente gire la rueda de ajuste para bajar la aguja hasta la tela y luego empiece a coser Las instrucciones indican la sustancia de lo siguiente P Apague o desc...

Страница 64: ...a esperienza o conoscenza dell apparecchio salvo che non siano controllati o abbiano ricevuto sotto la supervisione di una persona responsabile della loro sicurezza precedenti istruzioni all utilizzo dell apparecchio 5 Si prega di utilizzare questa macchina osservando esclusivamente le istruzioni riportate in questo manuale 6 Durante l esecuzione non inserire oggetti nelle insenature della macchin...

Страница 65: ...recchio può essere utilizzato da bambini a partire da 8 anni purché sorvegliati e istruiti all uso sicuro dell apparecchio e pienamente a conoscenza dei pericoli che comporta 17 La pulizia e la manutenzione non devono essere eseguite da bambini a meno che abbiano più di 8 anni e siano sorvegliati da un adulto 18 Conservare l apparecchio e il cavo di alimentazione fuori dalla portata di bambini di ...

Страница 66: ...l funzionamento 22 Si prega di tenere questo documento a portata di mano e di consegnarlo al futuro proprietario in caso di trasferimento del dispositivo 23 Il dispositivo non deve essere utilizzato se è stato lasciato cadere sono visibili evidenti segni di danneggiamento ...

Страница 67: ...e B alla presa elettrica 2 Collegare il pedale C alla macchina 3 La velocità della macchina può essere regolata applicando pressione sulla pedaliera Attenzione Spegnere sempre e scollegare la macchina quando non è in uso Uscita CC 6V 7 2WACCESSORIES Bobina di avvolgimento Rotella di supporto Morsetto filo Presa pedale Presa alimentatore Cassetto Luce Piedino Filtro del piedino ...

Страница 68: ...ire il filo attraverso il foro nel supporto dell ago 6 Inserire il filo attraverso la cruna dell ago Attenzione Quando si infila il filo nella macchina per cucire fare in modo che l interruttore off velocità è in posizione OFF e seguire i passi 1 6 sotto Girare il volantino in senso antiorario fino a quando l ago è nella posizione più alta COME SOSTITUIRE LA BOBINA 1 Rimuovere il coperchio traspar...

Страница 69: ...della bobina AVVOLGIMENTO DELLA BOBINA 1 Mettere un rocchetto di filo sull apposito supporto Fig 7 2 Far passare il filo attraverso la parte superiore del fermaglio Fig 8 3 Mettere la bobina nel mandrino e assicurarsi che si allinei con la scanalatura del mandrino di avvolgimento Fig 9 4 Ruotare il mandrino di avvolgimento in senso orario per far arrotolare il filo in senso orario Fig 10 5 Premere...

Страница 70: ...a da cucire in senso antiorario per sollevare l ago nella posizione più alta Fig 17 2 Sollevare il piedino e posizionare il tessuto da cucire sotto il piedino Fig 18 3 Abbassare il piedino Fig 19 4 Premere il tasto ON OFF sulla posizione ON e iniziare a cucire Non tirare il tessuto Guidare delicatamente il tessuto per mantenere dritta la cucitura Fig 20 5 Dopo aver terminato la cucitura premere il...

Страница 71: ... un asola quindi scegliere il punto 12 2 Accendere l interruttore e cucire 3 4 punti a bassa velocità quindi spegnere l interruttore Fig 23 3 Scegliere il punto 11 accendere l interruttore e cucire sul panno di lunghezza idonea quindi spegnere l interruttore Cercare di mantenere il punto in linea retta Fig 24 4 Sollevare il piedino e girare il tessuto sul lato posteriore in quanto la stoffa è cuci...

Страница 72: ...oppo lento Si prega di girare in filo in senso orario per aumentare la pressione fino a quando le cuciture ritornano normali Fig B 3 Tuttavia se il filo superiore si presenta come una linea retta indica che il filo superiore è troppo stretto quindi ruotare lentamente il morsetto del filo in senso antiorario per ridurre la pressione fino a quando la cucitura è di nuovo normale Fig C SPIA DI FUNZION...

Страница 73: ...gno a zig zag punti 4 e 10 2 Ruotare il volantino per sollevare l ago alla posizione più alta Impostare la manopola di selezione su punti a zig zag o linee rette Attenzione quando si desidera cambiare punti ripetere il terzo passo prima COME REGOLARE LA VELOCITÀ DI CUCITURA Questa macchina per cucire ha due velocità di cucitura Impostare il tasto OFF in posizione H per aumentare la velocità di cuc...

Страница 74: ... sono scariche Usare batterie nuove Alimentatore non adatto Usare un adattatore compatibile La macchina salta punti La cruna dell ago non è al centro Rimuovere e reinserire l ago con la parte piatta dell ago sulla parte posteriore L ago si è piegato Rimuoverlo e inserirne uno nuovo Piedino troppo allentato Stringere il piedino Il filo della bobina non può essere arrotolato Il filo inferiore si è e...

Страница 75: ... volantino per abbassare l ago nel tessuto e quindi iniziare a cucire Le istruzioni indicano la sostanza di quanto segue P Spegnere o staccare la spina quando si lascia incustodita la macchina P Scollegare l apparecchio prima di eseguire la manutenzione o la sostituzione delle lampade P AMBIANTE ATTENZIONE Non gettare quest apparecchio tra i rifiuti domestici Per questo tipo di prodotti è fornito ...

Отзывы: