background image

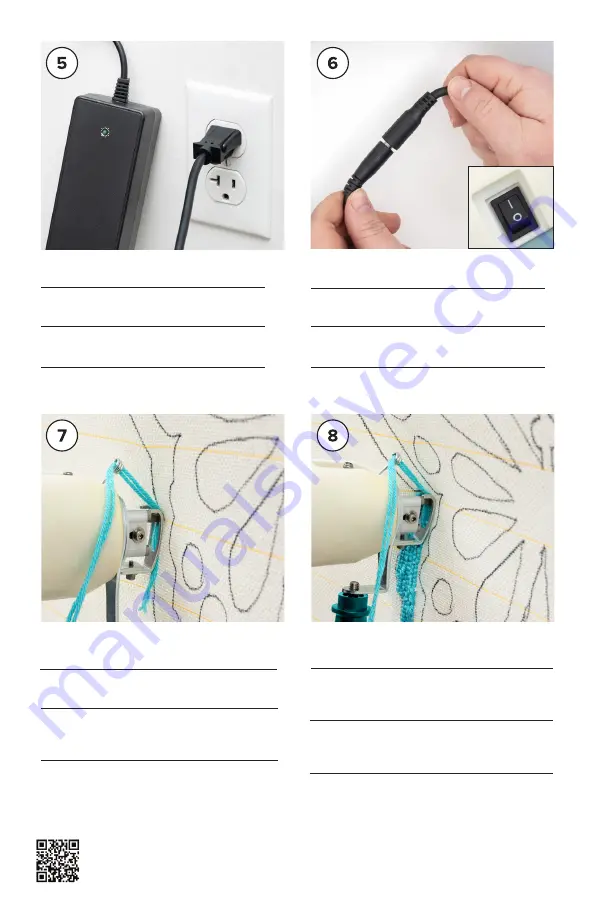
5

Plug the power cord into an outlet. Power 

indicator lights up when on. 
Branchez le cordon d’alimentation dans une 

prise de courant. Le témoin d’alimentation 

s’allume lorsqu’il est activé.  
Enchufa el cable de alimentación en un toma-

corrientes. El indicador de energía se ilumina 

cuando está encendido. 
Stecken Sie das Netzkabel in eine Steckdose. 

Die Betriebsanzeige leuchtet, wenn das Gerät 

eingeschaltet ist. 

Connect the power output to the Tufting Tool 

plug. Turn on the power switch.
Connectez la sortie d’alimentation à la fiche 

de l’outil à tufter. Allumez le commutateur 

d’alimentation.
Conecta la salida de alimentación al enchufe 

de la herramienta de tufting. Enciende el 

interruptor de energía. 
Schließen Sie den Stromausgang an den 

Stecker des Tufting-Werkzeugs an. Schalten 

Sie den Netzschalter ein. 

To start tufting, insert the front end of the needle 

through tightly framed Tufting Cloth (Frame and 

Cloth sold separately). 
Pour commencer le tuftage, insérez l’extrémité 

avant de l’aiguille dans la toile à tufter bien 

encadrée (cadre et toile vendus séparément). 
Para comenzar a crear tufting, inserta el 

extremo frontal de la aguja a través de la tela 

para tufting bien enmarcada (la estructura y la 

tela se venden por separado).
Um mit dem Tuften zu beginnen, führen Sie 

das vordere Ende der Nadel durch das fest 

eingerahmte Tufting-Tuch (Rahmen und Tuch 

sind separat erhältlich). 

Start at the bottom of your tufting project. Hold 

down the start switch, apply pressure, and move 

the tool up the Tufting Cloth. 
Commencez par le bas de votre projet de 

tuftage. Maintenez le bouton marche, appli-

quez une pression et déplacez l’outil vers le 

haut de la toile à tufter.  
Comienza en la parte inferior de su proyecto de 

tufting. Mantén presionado el interruptor de en-

cendido, aplica presión y mueve la herramienta 

hacia arriba en la tela de tufting. 
Beginnen Sie am unteren Rand Ihres Tuft-

ing-Projekts. Halten Sie den Startschalter 

gedrückt, üben Sie Druck aus und bewegen 

Sie das Werkzeug über das Tufting-Tuch.  

It’s highly recommended to read the entire instructions and watch videos tutorials. 

/ Il est fortement recommandé de lire toutes les instructions et de regarder les tu-

toriels vidéo. / Es muy recomendable leer las instrucciones completas y ver videos 

instructivos. / Es wird dringend empfohlen, die gesamte Anleitung zu lesen und die 

Lernvideos anzusehen.

Содержание EASY TURF TD-01

Страница 1: ...EL D UTILISATION DE L OUTIL TUFTER MANUAL DE USO PARA LA HERRAMIENTA DE TUFTING TUFTING WERKZEUG BENUTZERHANDBUCH Household Use Only Utilisation R sidentielle Uniquement Dise ado nicamente Para Uso Ho...

Страница 2: ...aci n del producto Produktinformationen 3 Operating instructions Mode d emploi Instrucciones de funcionamiento Bedienunghinweise 4 English Anglais Ingl s Englisch 6 French Fran ais Franc s Franz sisch...

Страница 3: ...Engranaje de rueda Radgetriebe Alignment Alignement Alineaci n Ausrichtung Rotatable handle Poign e rotative Mango giratorio Rotierbarer Griff Linear bearing Roulement lin aire Cojinete lineal Linear...

Страница 4: ...guja a trav s del ori ficio de la aguja y luego a trav s de la bobina F hren Sie den Nadeleinf dler durch das Nadelloch und dann durch die Spule Pull the threader and yarn back through the needle hole...

Страница 5: ...ar a crear tufting inserta el extremo frontal de la aguja a trav s de la tela para tufting bien enmarcada la estructura y la tela se venden por separado Um mit dem Tuften zu beginnen f hren Sie das vo...

Страница 6: ...ug not the cord CAUTION 1 Never operate the appliance with any air openings blocked Keep ventilation openings of the Tufting Tool free from the accumulation of lint dust and loose yarn 2 Keep fingers...

Страница 7: ...help SAFETY 1 Always turn off and unplug the Tufting Tool while threading the yarn 2 Never touch the moving parts on the Tufting Tool while it s running 3 Always put your hair up and away from Tuftin...

Страница 8: ...ing Tool upward The Tufting Tool only moves in one direction To make diagonal or curved lines use both handles to guide the gun in the appropriate direction 4 Significant and consistent pressure must...

Страница 9: ...sent manuel Utiliser seulement accessoires recommand s par le fabricant comme il est expliqu dans le pr sent manuel 3 Ne jamais utiliser cet appareil s il le cordon ou la fiche lectrique est endommag...

Страница 10: ...le contre les interf rences nuisibles dans une installation r sidentielle Cet quipement g n re utilise et peut mettre de l nergie radiofr quence et s il n est pas install et util is conform ment aux i...

Страница 11: ...ous que le fil a un chemin libre vers l outil tufter o il ne risque pas de s emm ler ou d tre pi tin pendant que vous travaillez Assurez vous de faire passer le fil dans la bobine de l outil tufter po...

Страница 12: ...imension votre projet ENTRETIEN DE VOTRE PROJET DE TUFTAGE Passez l aspirateur sur les tapis deux fois par semaine pour les garder propres Ne pas faire trem per dans l eau ni nettoyer sec Effectuez un...

Страница 13: ...imentaci n que se proporciona con l Solo debe ser alimentado con la tensi n ultra baja de seguridad correspondiente a las marcas en el aparato Cuando se usa la herramienta de tufting existe un riesgo...

Страница 14: ...ienta de tufting usa aire comprimido o retira la cubierta de la herramienta y usa un cepillo peque o Para quitar la cubierta de la herramienta de tufting quita los 5 tornillos de la cubierta y sep ral...

Страница 15: ...o en el lugar equivocado de tu dise o Usa unas tijeras para recortar las hebras de lana largas o sueltas APLICA ADHESIVO PARA TUFTING Aplica el adhesivo para tufting Easy Tuft se vende por separado en...

Страница 16: ...en Sie das Ger t nicht wo Aerosolprodukte Sprays verwendet werden oder wo Sauerstoff verabreicht wird 8 Um das Ger t vom Stromnetz zu trennen schalten Sie alle Bedienelemente aus Position O und ziehen...

Страница 17: ...mehrere der folgenden Ma nahmen zu beheben Empfangsantenne neu ausrichten oder Standort ndern Abstand zwischen Ausr stung und Receiver vergr ern Ausr stung an eine Steckdose anschlie en deren Stromkre...

Страница 18: ...eg des Garns zum Tufting Werkzeug nicht blockiert ist so dass es sich nicht verheddern kann und Sie nicht darauf treten w hrend Sie arbeiten Achten Sie darauf das Garn durch die Spule des Tufting Werk...

Страница 19: ...ten hat schneiden Sie Reliefs entlang des Randes damit er sich in sich selbst falten kann Falten Sie den bersch ssigen Tufting Stoff auf die R ckseite des Tufting Projekts und kleben Sie ihn mit einer...

Страница 20: ...For questions contact us at Pour toute question contactez nous au Si tienes preguntas comun cate al Bei Fragen kontaktieren Sie uns unter 801 226 0747 info americancrafts com...

Отзывы: