background image

42

Symptom

Possible causes

How to solve

other abnormalities)

Rotary valve rod on main valve is stuck.

Repair

Rotary motor is damaged

Repair or change

The rotation support is damaged.

Change

Indifferent left and right

rotation speed (no other

abnormalities)

The right and left rotation of multiway valve

is of different overloaded pressure

Adjust

Rotation valve rod of multiway valve is

slightly stuck.

Delayed or powered

rotation (no other

abnormalities)

Serious external leak of hydraulic oil pipe

Change pipe fitting and sealing

components

Low overloaded pressure for rotation of

multiway valve

Adjust

Serious internal leak of rotary motor

Repair or change

The high and low pressure chambers of

multiway valve are connected, sand hole on

valve body due to casting, which causes one-

way action or linked actions

Change

The rotation mechanism

moves even it is operated Main valve rod spring breaks

Change

The excavator makes

abnormal noise and

shakes during operation.

Low oil level of hydraulic oil tank

Add oil

The oil contains too much moisture and air

Change

Safety valve of multiway valve makes noise

Adjust

Damaged coupling

Change

Vibration caused by loose pipe clamp

Adjust

Blocked filter

Change

Air exists in oil suction hose

Release the air

Uneven engine rpm

Adjust

The bearing of working

lubricated or scraped

device is not

Apply lubrication oil or change the

shaft or sleeve

Powerless oil cylinder or

oil leak

Damaged sealing components

Change the sealing components

A groove is found on the piston rod due to

abrasion or detachment of chromium coating

of piston rod, which causes oil leak.

Coat, paint, repair or change

The air in the cylinder causes shaking noise

during operation

Release the air

Содержание CTX8010

Страница 1: ...1 CTX8010 MINI EXCAVATOR OPERATION PARTS MANUAL ...

Страница 2: ...vice Technologies of CTX8010 Excavator Section I Basic construction knowledge Section II Preparation for work Section III Operational essentials Section IV Operational precautions Chapter VI Maintenance of CTX8010 Excavator Section I Daily inspection Section II Periods of overhaul medium and minor repair Chapter VII Troubleshooting of CTX8010 Excavator Section I General Section II Troubleshooting ...

Страница 3: ...ping ditching and fertilization in garden vegetable greenhouse agricultural transformation indoor demolition small earthwork civil engineering road recovery basement and indoor construction concrete breaking burying of cable laying of water supply line garden cultivation desilting and others The excavator are equipped with Changchai diesel engines domestic main pumps and rotary motors traveling mo...

Страница 4: ...4 Quick hitch Narrow bucket Log grab Mechanical thumb Auger Ripper Rake ...

Страница 5: ...5 Section II Main performance parameters ...

Страница 6: ...tion length 2796 48 J Overall height 1155 Work range Unit mm A Max digging radius on ground 3017 16 B Max digging depth 1745 55 C Max digging height 2842 D Max unloading height 1919 82 E Max vertical digging depth 1371 51 F Min swing radius 1292 67 G Max lifting height of dozer blade 347 H Max digging depth of dozer blade 255 Performance parameters Weight of complete machine kg 1000 Standard bucke...

Страница 7: ...sm control mechanism drive system traveling mechanism and auxiliary equipment as shown in fig 1 1 Mounted on the rotary table are the regular full swing type hydraulic excavators main components of drive system swing mechanism and auxiliary devices which are referred to as upper rotary Therefore a CTX8010 Excavator is divided into work equipment upper rotary and traveling mechanism ...

Страница 8: ...eling motor hydraulic energy changed to mechanical energy sprocket rubber crawler starting oftraveling 2 Expandable track route diesel engine coupler hydraulic pump mechanical energy changed to hydraulic energy distributor valve electromagnetic valve central swing joint telescopic oil cylinder hydraulic energy changed mechanical energy Chassis expands outwards 3 Swing power route diesel engine cou...

Страница 9: ...ulic pump mechanical energy changed to hydraulic energy distributor valve arm cylinder hydraulic energy changed to mechanical energy arm movement 7 Bucket power route diesel engine coupler hydraulic pump mechanical energy changed to hydraulic energy distributor valve bucket cylinder hydraulic energy changed to mechanical energy bucket movement ...

Страница 10: ...tor When two hydraulic motors run in the same direction this machine goes straightly forward when one motor is supplied with oil and the other is braked excavator steers around the braked track when two motors runs reversely excavator rotates in situ Each part of traveling mechanism is mounted on integral traveling frame The pressure oil from hydraulic pump goes through the multi way directional v...

Страница 11: ...are resistant to wear and easy to replace 3 The load is easy to get off shortening the unloading time and increasing the effective capacity of bucket 5 2 2 Structure Bucket shape and size for backhoe are highly related to work objects In order to meet various excavation one excavator could be equipped with multiple types of buckets with backhoe most popular Bucket teeth could be mounted with rubbe...

Страница 12: ... of CTX8010 Excavator I Rotary motor Rate of flux LPM Rotate speed RPM Pressure Bar Torque Nm continu ous Discontin uity continu ous Discontin uity continu ous Discontin uity continu ous Discontin uity 53 57 266 281 124 138 328 358 ...

Страница 13: ...12 Main pump ...

Страница 14: ...ive Main Item No 5 Part No Length Geroler Item No 6 Part No Width Screw Cap Item No 6 Part No Length Screw Cap Item No 6 Part No Length Part No mm inch Part No mm inch Part No mm inch Part No mm inch 310 19 0 21373 003 118 1 4 65 8507 003 34 6 1 36 14409 003 138 4 5 45 14409 007 172 4 6 79 ...

Страница 15: ...14 Section IV Schematics of main valve ...

Страница 16: ...15 Section V Electrical system diagram ...

Страница 17: ...esigned according to 160 180 cm for males and 150 170 cm for females 2 Startup and stop should be steady with its speed and strength in control At the same time the combine actions should be also in control 3 Easy handy and visual operations In general the operational force on handle does not exceed 40 60 N and handle travel does not exceed 17cm 4 Control mechanism should minimize the deformation ...

Страница 18: ...m and bucket instead of any slewing or traveling Each complete action of excavator should be carried out for a few times completing the preheating and ready to work Section III Operational essentials 1 Excavator s Control Console Arm Control Lever Travel control lever The water temperature Auxiliary Control pedal Accelerator lever The Light Controller Lever for blade The Battery Voltage Staring Sw...

Страница 19: ...axis forward move the right handle d Right turn with right track as axis forward move the left handle 3 Excavation 1 1 The excavator slewing and the work equipment are respectively controlled with two handles with positions shown below ...

Страница 20: ... forward the swing arm will turn right 2 Press and hold the swing arm button place your foot on the assist pedal and step back the swing arm will turn to the left 2 3 Expandable track 1 Press and hold the expandable track button place your foot on the assist pedal and step forward the chassis expands outwards ...

Страница 21: ...r have the max excavating force It is suitable for relatively hard soil so as to decrease the excavating resistance 2 To excavate any soft soil bucket should be angled with the soil to be 60 increasing the workefficiency 1 2 Lower excavation Keep the angle between bucket base and the bevel at 30 and retract the arm to start work 1 3 Upper excavation Keep the bucket blade vertical to the ground and...

Страница 22: ...ds 10 For long distance traveling please rest for 5min every running for 20min so as not to damage the traveling motor 11 Never try to cross over a slope of more than 15 degree so as to avoid the machine fromoverturning 12 Avoid any accidents occurring during machine reversing or slewing 13 In work do not completely dig the soil out of bottom of machine 14 Avoid any collapse never run on high dam ...

Страница 23: ...n hydraulic oil tank 1 Check the fuel level in tank 1 Check if the fuel pipe is leaked or cracked Check if the fuel pipe is cracked or bent Check the work equipment pivots Check if the hydraulic hose and the pipeline leak Check if the bucket teeth is worn or loosened 4 Check the seatbelt 1 Check the bolts and nuts for tightening torque Check the bolts and nuts for tightening torque Aperi odicall N...

Страница 24: ...the fuel pipe is cracked or bent 7 Change the Diesel filter 8 Check the fuel hose for leakage crack 9 Check the fuel hose for crack leakage 10 Change the bucket 11 Connection of bucket 12 Remove the traveling handle 13 Replace the seatbelt 14 Check the defection of track 15 Maintenance of tensioner Note Maintenance interval under normal conditions Maintenance interval of engine oil Change interval...

Страница 25: ...vots of bucket and connecting rod 10 Others 6 2 Lubrication of slewing bearing 2 3 Lubrication of external meshing gear of slewing bearing 1 Note it is recommended to use the lithium grease Maintenance interval under normal conditions 1 Maintenance and lubrication of work equipment pivots Pivot between bucket and connecting rod Pivot at base of boom Pivot at base of boom cylinder ...

Страница 26: ...et onto ground 3 Idle engine at low speed for 5min 4 Turn the ignition switch to OFF and then take off thekey 5 With the upper structure standing still add the grease into the two greasenipples 6 Start up engine to lift the bucket free from the ground and then swing the upper structure by 45 degree 1 8 cycle 7 Lower the bucket onto ground 3 External meshing gear 45 of slewing bearing every 500h ...

Страница 27: ...t onto ground 3 Idle engine at low speed for 5min 4 Turn the ignition switch to OFF and then take off thekey 5 The grease has to be stored on the top of external meshing gear of slewing bearing free of any pollution Add approximate 0 5kg of grease if needed Any polluted grease should be replaced with new one ...

Страница 28: ...ty Interval h 10 50 100 250 500 1000 2000 Engine oil 1 Engine oil filter 1 According to the temperature range during the interval select the viscosity of oil listed in the table below Recommended engine oil brand 15W 40 engine oil ...

Страница 29: ...r to take the filter elementout 11 Reinstall the new filter and tighten the screws fixing the new element with ascrewdriver 12 Remove the oil filter cap to add the recommended oil into engine After 15 min check if the oil level is between the circle markers 13 Put the oil filler cap back on 14 Shut down engine Unplug the ignition key 15 Check if the drain plug is leaking 16 Check the oil level on ...

Страница 30: ...r nuts do not have your body facing them as the hydraulic parts even if they cools down still have pressure d Never try to check the traveling or slewing motor circuits on slope as they may have pressure due to their dead weight 4 While connecting the hydraulic hoses and pipeline keep the seal surface free of any dirt and damage Keep the above mentioned in mind a Clean the hose the pipeline and in...

Страница 31: ...er the bucket onto the ground 5 Idle engine at low speed for 5min 6 Shut down engine Unplug the ignition key 8 Check if the oil level in hydraulic oil tank between the markers on dipstick and add it if needed Caution Hydraulic oil tank has pressure and therefore slowly open its cap to release pressure before adding of oil 9 Open the hydraulic oil tank to add oil and then check the oil level again ...

Страница 32: ...pickup filter and the levers Caution the hydraulic oil tank has pressure Slowly open the hydraulic oil cap to release the pressure before taking off the cap 13 Clean the filter and inside of hydraulic tank 14 Use oil pickup pump to suck the oil residue out of bottom of hydraulic oiltank 15 Put on the filter and the levers to make sure the filter is correctly fixed onto theoutlet 16 Clean and re in...

Страница 33: ...31 22 Lower the bucket onto the ground 23 Turn off the engine Unplug the ignitionkey ...

Страница 34: ...ay lead to gangrene Caution leaked hydraulic oil and lubricant may lead to fire or personal casualty 1 Park machine on the flat ground Lower the bucket onto the ground Shift the pilot switch to Lock Turn off the engine Unplug the ignition key 2 Check if there is lost part loosened pipe clamps twisted hose pipeline or hose rubbing with each other In case of any abnormal please replace or tighten it...

Страница 35: ... 3 Replace it Replace it Tighten or replace the hose or O ring Every 250h Hose surface Hose end Hose surface Hose surface Hose Hose Hose end and joint body Crack 4 Crack 5 Reinforcing material protruded 6 Local part protruded 7 Bend 8 Bend 9 Deformation or corrosion 10 Replace it Replace it Replace it Replace it Replace it Change it proper bending radius Replace it ...

Страница 36: ... scale Add the fuel ifneeded Important keep any dirt dust water or other foreign material from getting into fuel system 7 While filling of fuel tank make sure the fuel is not sprayed on machine and addedproperly 8 Put the cap back on fuel filler to avoid any lost or damage Inspection of Diesel filter every 200h Diesel filter is used to separate the water or sediment from fuel Ensure the quality of...

Страница 37: ...k the battery electrolyte level and the terminals Caution gas inside of battery may explode it Therefore keep any spark and flame away from battery Use a flashlight to check the electrolyte level In addition the sulphuric acid in battery electrolyte is as toxic as to burn your skin or your cloth holes or to blind your eyes Therefore take the following methods to avoid any rick ...

Страница 38: ... 1 Rinse the skin 2 Use the soda or the lime to neutralize the acid 3 Rinse eyes for 10 l5 min and then go todoctor Caution a Always firstly disconnect the battery clips away from the ground and then lastly connectit b Always keep the terminals at top to battery and the breather clean to avoid the battery from discharging Check if the battery terminal is loosened or rusted Coat the terminals with ...

Страница 39: ...ew one to machine If needed replace the bucket and connect the new one to machine Adjust the connecting rod of bucket 1 If needed Take down the traveling lever 2 If needed Check and replace the fuse 1 Every 3 years Check the track defection 2 Maintenance of tensioner 2 Check the fuel injection timing If needed Measure the compression pressure of engine Check the starter and the A C generator Check...

Страница 40: ...move after the removal of pin 2 Slide the O ring out as shown in the figure 3 Remove the bucket pins A and B to separate the bucket and the arm Clean the pin and its pin hole and then properly grease them 4 Adjust the arm and the new bucket correctly and make sure the bucket does not roll away 5 Install the bucket pins A andB 6 Put the locker and ring onto pins A andB 7 Adjust the connection clear...

Страница 41: ...ue M16 bolts fixing the traveling motor 252 39 2 M16 bolts fixing the sprocket 252 39 2 M20 bolts fixing the slewing bearing 570 60 M20 bolts fixing the swing mechanism 570 60 Important 1 Before installed the bolts and nuts should be cleaned 2 Grease the bolts and the nuts such as the white zinc b able to be dissolved to lubricant so as to stabilize their abrasion coefficient 3 The counterweight b...

Страница 42: ...heavy duty bucket Freezing cold Fuel use the high fuel suitable for low temperature Lubricant hydraulic oil and engine oil with dry quality and low viscosity Battery keep the battery fully charged and maintain it at shorter interval The electrolyte may be frozen if it is not fully charged Track keep the track clean Park the machine on solid ground to avoid the track frozen Falling stone Roof at dr...

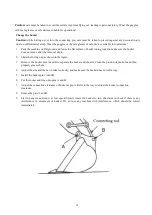
Страница 43: ...et tooth pin Unmatched bucket tooth pin and Change the bucket tooth pin seat 1 Loose crawler 1 Tighten the crawler 2 The guide wheel shall move slowly in front on rugged road The crawler has tangled up 2 The driving wheel moves fast in front on rugged road Section III Troubleshooting of hydraulic system Symptom Possible causes How to solve The whole excavator does not move Low oil level of hydraul...

Страница 44: ... of hydraulic components The blocked engine filter causes serious decrease of loaded rpm and even flames out Change the element The blocked hydraulic filter accelerates abrasion of pump motor and valve and leads to internal leak Clean and change the element according to the maintenance schedule Serious between main valve rod and valve hole causes serious internal leak Repair the valve rod The righ...

Страница 45: ...ltiway valve or sandstone inside it Change Low overloaded pressure Adjust Serious internal leak of oil cylinder Change the oil seal The main valve is disabled due to internal leak Repair or change Boom bucket rod and bucket moves even it is not operated Multiway valve core is stuck or serious internal leak Grind or change Multiway valve rod spring breaks Change Leak of working cylinder or the work...

Страница 46: ...to casting which causes one way action or linked actions Change The rotation mechanism moves even it is operated Main valve rod spring breaks Change The excavator makes abnormal noise and shakes during operation Low oil level of hydraulic oil tank Add oil The oil contains too much moisture and air Change Safety valve of multiway valve makes noise Adjust Damaged coupling Change Vibration caused by ...

Страница 47: ...lue of fault diagnosis 1 Low battery Battery voltage Color of charge state densimeter Above 12V Green if it is white change the battery 2 Fuse F1 and F11 fail In case the fuse is burnt the GND fail may happen If he monitoring indicator on the monitor panel is not illuminated inspect the circuit between battery and specified fuse 3 Engine ignition switch fault Turn the start switch of engine to OFF...

Страница 48: ...engine to OFF as preparation and keep it at OFF during diagnosis Resistance Below 1 9 Poor GND of wire harness contact with earth circuit Turn the start switch of engine to OFF as preparation and keep it at OFF during diagnosis Resistance Above 1M 10 Short circuit of wire harness contact with 24V circuit Turn the start switch of engine to OFF as preparation and keep it at OFF during diagnosis Volt...

Страница 49: ...epair ignition switch and inspect and repair the starter 6 Long period operation of battery may increase the internal resistance therefore it is necessary to repair the battery and correctly charge the battery and change with new battery pack if necessary the battery shall be fully charged to ensure successful start up ofengine 2 Check if it is low fuel level that makes hard to start the diesel en...

Страница 50: ...e fault How to solve 1 Inspect and change the fuel filter 2 Inspect and change the air filter element 3 Inspect and adjust the fuel pump 4 Inspect the fuel tube and oil channel to ensure unblocked oil supply 5 Inspect the starter and start control device for reliable operation 6 Start the engine in correct ways 7 Add fuel of correct grade and discharge the water in fuel in the low part of fuel tan...

Страница 51: ...ry terminal and connector 3 Repair the battery earth wire 4 Inspect the start circuit and ensure the terminal of starter shall be live 5 Inspect starter electromagnetic relay to eliminate fault of electromagnetic relay it shall obvious to hear the sound making by the relay when it sucks and separates 6 Inspect and repair the starter 7 Start again to engage the starter driving gear and engine flywh...

Страница 52: ...48 ...
Отзывы: