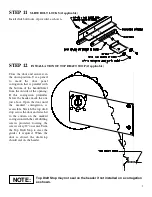
Wayne-Dalton DS-75 Скачать руководство пользователя страница 9


STEP 11  

SLIDE BOLT LOCKS (if applicable)


Install slide bolt locks, if provided, as shown. 


STEP 12   

INSTALLATION OF TOP DRAFT STOP (if applicable) 


Close  the  door  and  secure it in 

the down position. Use a pencil 

to  mark  the  door  panel 

corrugation that is parallel with 

the  bottom  of  the  header/lintel 

from the outside of the opening. 

If  this  corrugation  protrudes 

below the header, mark the one 

just above. Open the door until 

the  marked  corrugation  is 

accessible. Stretch the top draft 

stop across the door and attach it 

to  the  curtain  on  the  marked 

corrugation with the self-drilling 

screws  provided,  locating  the 

screws every 12" on center. Trim 

the Top Draft Stop to clear the 

guides  if  required.  When  the 

door  is  closed,  the  draft-stop 

should seal on the header. 


Top Draft Stop may not seal on the header if not installed on a corrugation 

as shown.


NOTE: 

Содержание DS-75

Страница 1: ...this door Pay close attention to all warnings and important safety notices This manual MUST be attached to the wall in close proximity of the door DS 75 DS 100 MINI ROLL UP DOORS INSTALLATION INSTRUC...

Страница 2: ...lted connections to make sure they are secure 8 To prevent injuries never place hands or fingers between the curtain and the guides while the door is being operated 9 This manual is not intended to pr...

Страница 3: ...angles mount and the fasteners required The dimensions for the opening width opening height headroom and side room MATERIAL Inspect your door for possible damage or shortage of parts Report any short...

Страница 4: ...view all instructions thoroughly before starting installation STEP 2 CHECK THE DOOR OPENING Verify the opening measurements with the door packing slip Consult the factory if the actual opening width v...

Страница 5: ...and clamp in place Install bolts in the top and bottom holes in the wall angle Verify that both wall angles are level and double check the angle to angle measurement at the top middle and bottom to e...

Страница 6: ...r shimming if necessary and install the appropriate wall mounting fasteners through the two holes in the bracket flange Tighten the flange nuts on each bracket If mounted on steel jambs install wall m...

Страница 7: ...ply two complete turns of pre tension to the spring by rotating the curtain roll in the direction shown Depending on door size it may be necessary to pry the bottom bar past the guide flare The amount...

Страница 8: ...om bar Tie a rope around the curtain roll and slowly rotate the curtain roll in the opposite direction as tension was applied until spring is neutral Change the location of the spring attachment bolt...

Страница 9: ...ning If this corrugation protrudes below the header mark the one just above Open the door until the marked corrugation is accessible Stretch the top draft stop across the door and attach it to the cur...

Страница 10: ...bottom bar stops STEP 4 Test door operation to determine if spring balance requires adjustment Adjust tension as needed per the following instructions Spring tension can cause death or injury Repairs...

Страница 11: ...with the next tooth Operate the door to determine if the spring tension decrease was sufficient Repeat spring tension decrease procedure as needed to properly balance the door STEP 5 Once spring tensi...

Страница 12: ...PURPOSE ARE MADE BY MANUFACTURER IN CONNECTION WITH MANUFACTURE OR SALE OF ITS PRODUCTS Claims for defects in material and workmanship covered by this warranty shall be made in writing to the dealer...

Отзывы: