background image


CAUTION 


CAUTION


WARNING


IMPORTANT! 

HINT: 

NOTE: 

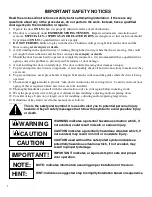
IMPORTANT SAFETY NOTICES 


Read the enclosed instructions carefully before attempting installation. If there are any 

questions about any of the procedures, do not perform the work. Instead, have a qualified 

door agency do the installation or repairs. 

1.


Operate the door 

ONLY

 when it is properly adjusted and free of all obstructions. 

2.


The door is constantly under 

EXTREME SPRING TENSION.

  Repairs, adjustments, installation and 

removal, 

ESPECIALLY 

of

 SPRINGS AND RELATED PARTS,

 are dangerous so that such work should 

be performed 

ONLY

 by qualified door service people. 

3.


DO NOT PERMIT 

children to play with the door. Children could get caught between the door and the 

floor causing 

severe injury or death

4.


Avoid standing in the open doorway or walking through the doorway while the door is moving. One could 

get caught between the door and the floor causing 

severe injury or death

5.


Should the door become hard to operate or completely inoperative, it is recommended that a qualified door 

agency correct the problem to prevent possible injuries or door damage. 

6.


Avoid installing the door on windy days.  The door could fall causing door damage or injury. 

7.


To prevent injuries due to loose components, at least monthly check all bolted connections to make sure they 

are secure. 

8.


To prevent injuries, never place hands or fingers between the curtain and the guides while the door is being 

operated. 

9.


This manual is 

not

 intended to provide "take-down" instructions for existing doors.  Consult your local door 

agency if this is required, before new doors are to be installed. 

10.


Thoroughly familiarize yourself with the construction codes in your region before initiating work. 

11.


Wear the proper protective safety gear at all times when installing, adjusting and/or repairing doors. 

12.


Consider using a 2-person (or larger) crew for installing, adjusting and/or repairing larger doors. 

13.


Definitions of key words used in this manual are as follows: 


This is the safety alert symbol. It is used to alert you to potential personal injury 

hazards. Obey all safety messages that follow this symbol to avoid possible injury 

or death. 


WARNING indicates a potential hazardous situation which, if 

not avoided, could result in death or serious injury. 


CAUTION indicates a potentially hazardous situation which, if 

not avoided, may result in minor or moderate injury. 


CAUTION used without the safety alert symbol indicates a 

potentially hazardous situation which, if not avoided, may 

result in property damage. 


IMPORTANT! indicates a required step for safe and proper 

door operation. 


NOTE: indicates information assuring proper installation of the door. 


HINT: indicates a suggested step to simplify installation based on experience. 

Содержание DS-75

Страница 1: ...this door Pay close attention to all warnings and important safety notices This manual MUST be attached to the wall in close proximity of the door DS 75 DS 100 MINI ROLL UP DOORS INSTALLATION INSTRUC...

Страница 2: ...lted connections to make sure they are secure 8 To prevent injuries never place hands or fingers between the curtain and the guides while the door is being operated 9 This manual is not intended to pr...

Страница 3: ...angles mount and the fasteners required The dimensions for the opening width opening height headroom and side room MATERIAL Inspect your door for possible damage or shortage of parts Report any short...

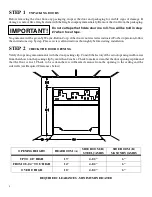
Страница 4: ...view all instructions thoroughly before starting installation STEP 2 CHECK THE DOOR OPENING Verify the opening measurements with the door packing slip Consult the factory if the actual opening width v...

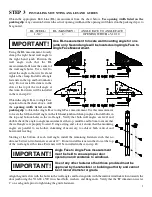
Страница 5: ...and clamp in place Install bolts in the top and bottom holes in the wall angle Verify that both wall angles are level and double check the angle to angle measurement at the top middle and bottom to e...

Страница 6: ...r shimming if necessary and install the appropriate wall mounting fasteners through the two holes in the bracket flange Tighten the flange nuts on each bracket If mounted on steel jambs install wall m...

Страница 7: ...ply two complete turns of pre tension to the spring by rotating the curtain roll in the direction shown Depending on door size it may be necessary to pry the bottom bar past the guide flare The amount...

Страница 8: ...om bar Tie a rope around the curtain roll and slowly rotate the curtain roll in the opposite direction as tension was applied until spring is neutral Change the location of the spring attachment bolt...

Страница 9: ...ning If this corrugation protrudes below the header mark the one just above Open the door until the marked corrugation is accessible Stretch the top draft stop across the door and attach it to the cur...

Страница 10: ...bottom bar stops STEP 4 Test door operation to determine if spring balance requires adjustment Adjust tension as needed per the following instructions Spring tension can cause death or injury Repairs...

Страница 11: ...with the next tooth Operate the door to determine if the spring tension decrease was sufficient Repeat spring tension decrease procedure as needed to properly balance the door STEP 5 Once spring tensi...

Страница 12: ...PURPOSE ARE MADE BY MANUFACTURER IN CONNECTION WITH MANUFACTURE OR SALE OF ITS PRODUCTS Claims for defects in material and workmanship covered by this warranty shall be made in writing to the dealer...

Отзывы: