7
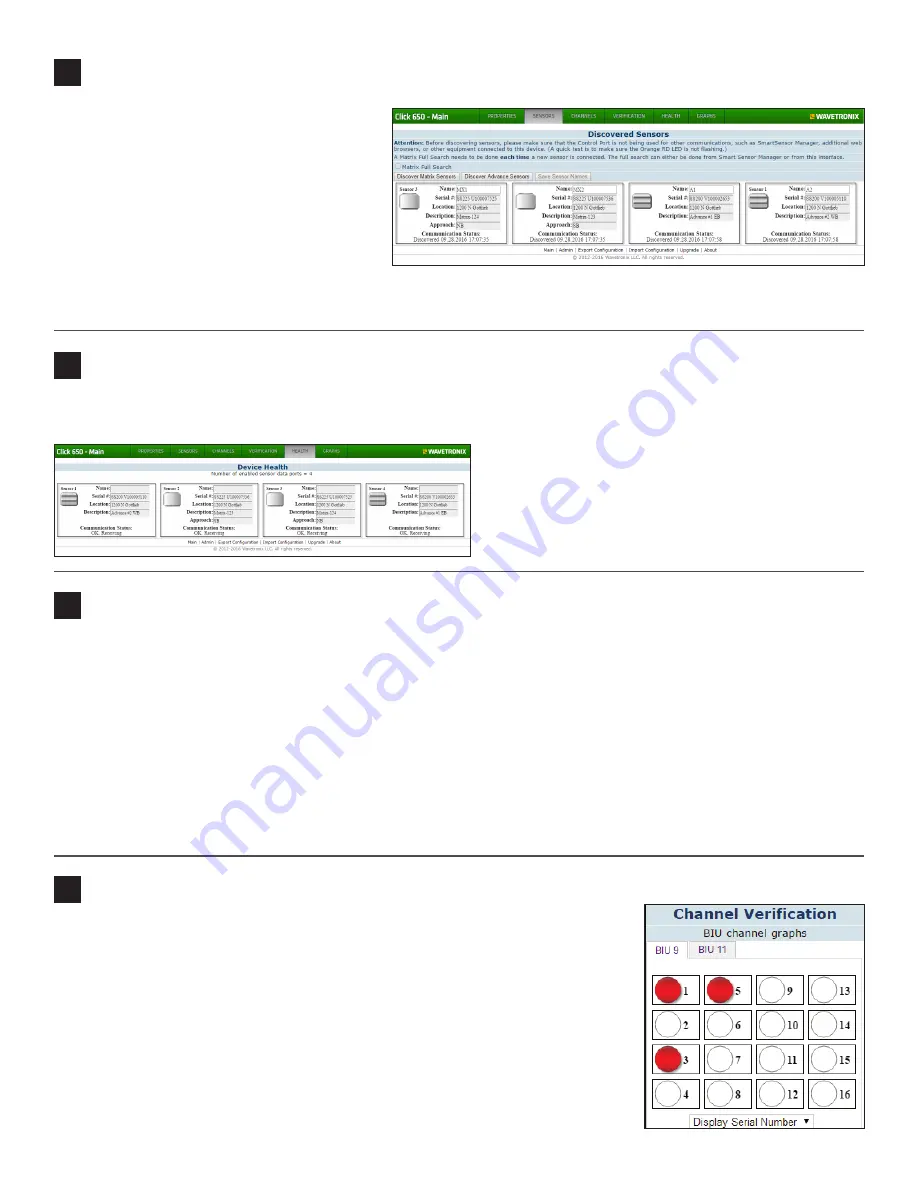
Discover sensors
8
Check sensor health (optional)
As mentioned earlier in this guide, it’s best to
have the sensors entirely configured via SSM
before you begin this process.
1
Click on the
Sensors
tab.
2
If you have Advance sensors connected to
the Click 650.656, click
Discover Advance
Sensors
and wait until the sensors appear.
3
If you have Matrix sensors, click the
Matrix
Full Search
checkbox, then
Discover Matrix
Sensors
. This may take a while to complete.
4
If desired, use the
Name
field to give each sensor an identifying moniker, then click
Save Sensor Names
.
If, at any point, you want to check the communication status of the sensors, you can click the
Health
tab to open the screen
seen here. Each sensor will be listed along with its communication status.
If the Click 650/656 is receiving a sensor’s pushed channel
data, the Communication status will show “OK, Commu-
nicating” or a similar message. If a sensor isn’t communi-
cating with the Click 650/656, this screen will display how
long it has been since detection data was received from
the sensor.
9
Map channels
Under the
Channels
tab, map the incoming sensor channels from the attached sensors to outgoing detector channels.
Choose the appropriate BIU tab at the top of the screen. Then, for each outgoing detector channel (left column) that you want
to map, do the following:
1
If desired, change the phase number and description (phase assignments are necessary to generate graphs, discussed
below).
2
In the fifth column, choose the sensor with the channel you want to map (use the dropdown above to change how the
sensors are identified. Then use the dropdown in the 6th column to choose the sensor channel to map to the detector
channel.
3
You can map multiple sensor channels to a single detector channel: click the + button on the far right and repeat step 2
with the new row. Use the
Logic:
field to define how to AND/OR the channels together. Repeat as needed.
10
Verify channels
To verify that the channels are configured and working correctly, go to the
Verification
tab and click on the desired BIU tab. A grid with all channels will appear; use the follow-
ing key to determine that the channels are doing what you intended:
˽
White circle –
Channel not mapped.
˽
Gray circle –
Channel mapped but currently inactive.
˽
Red circle –
Channel mapped and currently active.
Note.
Click on a channel to
show that channel’s details
below the verification box.


