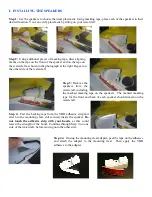
Step 5:
Carefully align the speaker with the previously made
placement marks on the adhesive tape without pressing the adhesive
to the body of the watercraft. Once properly aligned, gently press the
exposed adhesive strip to the body of the watercraft.
Step 6:
Lift out on the plunger pins on each side of the speaker and
lift the speaker off the mounting cleat, leaving only the mounting cleat
attached to the watercraft.
II. INSTALLING THE VOLUME CONTROL SWITCH
Before beginning the installation:
•
Review the following instructions and photographs.
•
Choose a location to mount the volume control switch that is comfortable and convenient to operate while riding the watercraft.
The most popular locations to mount the volume control switch can be seen below.
•
Clean and dry the area of the watercraft where the volume control switch will be mounted.
•
Once the adhesive strip on the back of the volume control switch has been applied to the watercraft, it cannot be moved. Be
certain of the location before the volume control switch is pressed into place, as the adhesive strip adheres instantly.
Refer to your watercraft instruction manual to learn how to remove the covering surrounding your
handlebars in order to properly route the wires.
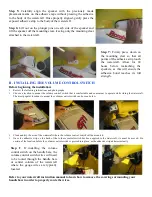
Step 7:
Firmly press down on
the mounting cleat so that all
points of the adhesive strip touch
the watercraft. Allow for 24
hours before reattaching the
speakers, as this will ensure the
adhesive bond reaches its full
strength.
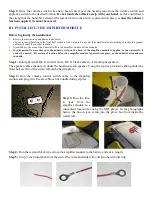
Step 1
: If installing the volume
control switch on the handle bars, the
volume control switch wires will need
to be routed through the handle bars
or central column of the watercraft
where the gauge wires are typically
located.


